
1. Introduction
The GUPUP 50 FT Bluetooth LED Strip Lights provide versatile and customizable lighting for indoor spaces. This manual provides detailed instructions for setup, operation, and maintenance to ensure optimal performance and user satisfaction. The LED strip lights offer millions of colors, various scene modes, music synchronization, and convenient control via a smartphone application or the included 24-key IR remote control.
2. What's in the Box
Before beginning installation, please verify that all components are present:
- 50 FT LED Strip Lights (one roll)
- 24-key IR Remote Control
- Power Adapter
- Control Box with Splitter Cables
- User Manual

3. Setup & Installation
Follow these steps to properly install your GUPUP LED Strip Lights:
- Prepare the Surface: Ensure the installation surface (e.g., wooden or lacquer wall, ceiling, furniture) is clean, dry, and smooth. Dust or uneven surfaces can affect adhesive performance.
- Connect Components:
- Connect the power adapter to the control box.
- Connect the LED strip(s) to the splitter cables on the control box. Ensure the arrows on the connectors align for proper electrical contact. Push firmly until a click is heard.
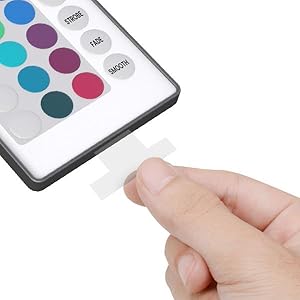
- Remove the plastic tab from the remote control's battery compartment to activate it.
- Test the Lights: Before fully adhering the strip, plug the power adapter into an electrical outlet and use the remote or app to test the lights. Verify all colors and functions work correctly.
- Adhere the LED Strip: Peel off the protective backing from the 3M adhesive tape on the back of the LED strip. Carefully press the strip onto the desired surface, applying firm pressure along its entire length to ensure strong adhesion.
- Secure Connections: Ensure all connections are secure and cables are neatly arranged to prevent accidental disconnections or damage.

Installation Video
Video 3.1: This video demonstrates the installation process and remote control functionality of the GUPUP LED Strip Lights. It shows how to connect the components and operate the lights using the remote.
4. Operating Instructions
The GUPUP LED Strip Lights can be controlled using either the smartphone application or the included IR remote control.
4.1. Smartphone App Control
Download the dedicated app (e.g., 'Apollo Lighting' as suggested in some visuals) from your device's app store. Once installed, connect to the LED lights via Bluetooth. The app offers comprehensive control:
- Color Selection: Choose from 16 million colors.
- Brightness Adjustment: Adjust light brightness from 1% to 100%.
- Dynamic Modes: Select from various modes such as Flashing, Quick, Jump, Fade, and 64 multi-scene modes.
- Music Sync: Utilize the built-in sensitive microphone to synchronize light changes with music or voice rhythms.
- Timer Function: Set schedules for the lights to automatically turn on or off.
- Memory Function: The lights automatically recall the last mode settings when powered on again.


4.2. IR Remote Control
The 24-key IR remote control provides quick access to essential functions:
- ON/OFF: Power the lights on or off.
- Color Buttons: Directly select static colors (Red, Green, Blue, White, Orange, Yellow, Cyan, Purple, etc.).
- Brightness Control: Adjust the intensity of the lights.
- Mode Buttons: Cycle through various dynamic modes (e.g., Jump, Fade).
- Music Mode Buttons: Activate music synchronization modes.

Ambiance Video
Video 4.1: This video showcases various lighting effects and ambiance created by the GUPUP LED Strip Lights in different room settings.
5. Maintenance
To ensure the longevity and optimal performance of your LED strip lights, follow these maintenance guidelines:
- Cleaning: Gently wipe the LED strips with a dry, soft cloth to remove dust. Avoid using liquid cleaners directly on the strips or connectors.
- Adhesive Care: The 3M adhesive is designed for strong adhesion. If repositioning is necessary, do so carefully to avoid damaging the strip or the surface. Ensure surfaces are clean before initial application to maximize adhesion.
- Connection Integrity: Periodically check all connections (power adapter, control box, LED strips) to ensure they are secure and free from damage. Loose connections can lead to flickering or inconsistent lighting.
- Storage: If storing the LED strips, ensure they are rolled neatly and protected from dust and moisture.
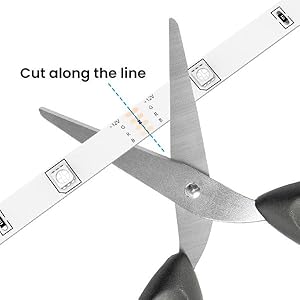
- Cutting the Strip: The LED strip can be cut to desired lengths at designated cutting marks, usually indicated by a scissor icon or copper pads. Ensure the power is disconnected before cutting.
6. Troubleshooting
If you encounter issues with your GUPUP LED Strip Lights, refer to the following common troubleshooting steps:
- Lights Not Turning On:
- Check if the power adapter is securely plugged into both the wall outlet and the control box.
- Ensure all connections between the LED strip(s) and the control box are firm and correctly aligned (arrow to arrow).
- Verify the remote control has a working battery and the plastic tab has been removed.
- Incorrect Colors or Partial Lighting:
- This often indicates a loose or improper connection between the LED strip and the control box. Disconnect and reconnect, ensuring pins are fully inserted and aligned.
- If only a segment of the strip is affected, check the connection point immediately preceding the issue.
- Remote Control Not Responding:
- Ensure there are no obstructions between the remote and the IR receiver on the control box.
- Replace the remote control battery if necessary.
- Confirm the plastic tab has been removed from the battery compartment.
- App Connection Issues:
- Ensure Bluetooth is enabled on your smartphone.
- Restart the app and try reconnecting.
- If issues persist, try restarting your phone and the LED lights (by unplugging and replugging the power adapter).
7. Specifications
| Feature | Specification |
|---|---|
| Model Number | WFDS017 |
| Length | 50 Feet |
| Color | Multicolor (RGB) |
| Indoor/Outdoor Usage | Indoor |
| Light Source Type | LED |
| Power Source | Corded Electric |
| Voltage | 12 Volts |
| Wattage | 60 Watts |
| Control Method | App Control, Remote Control |
| Special Features | Color Changing, Music Sync, Timer Function, Memory Function |
| Item Weight | 5.6 ounces |
8. Warranty & Support
Specific warranty details for the GUPUP 50 FT Bluetooth LED Strip Lights are not provided in this manual. For warranty information, technical support, or any product-related inquiries, please contact the manufacturer or seller directly through their official support channels. Keep your purchase receipt as proof of purchase.