
Young YY-101018E0072
Young K-1029A Universal A/C Remote Control User Manual
Model: YY-101018E0072
1. Product Introduction
The Young K-1029A is a universal A/C remote control designed to operate a wide range of domestic and international air conditioners. This remote eliminates the need for complex point-to-point settings, offering digital automatic search functions for easy setup. It features low power consumption, extensive functionality, and a strong, long-distance emission capability.
Its ergonomic design ensures a comfortable grip, and the large LCD display provides clear visibility for all operations. Key features include a clock function, power on/off timing, and a night lighting function.
Key Features:
- Universal compatibility with thousands of popular air conditioner models (8000 in 1). Note: Not compatible with window or portable air conditioners.
- Large LCD screen for clear display and easy operation.
- Manual and automatic code searching for adaptable air conditioner types.
- No programming or pairing needed for initial use with compatible units.
- Includes clock and timing settings.
- Requires 2 x AAA batteries (not included).
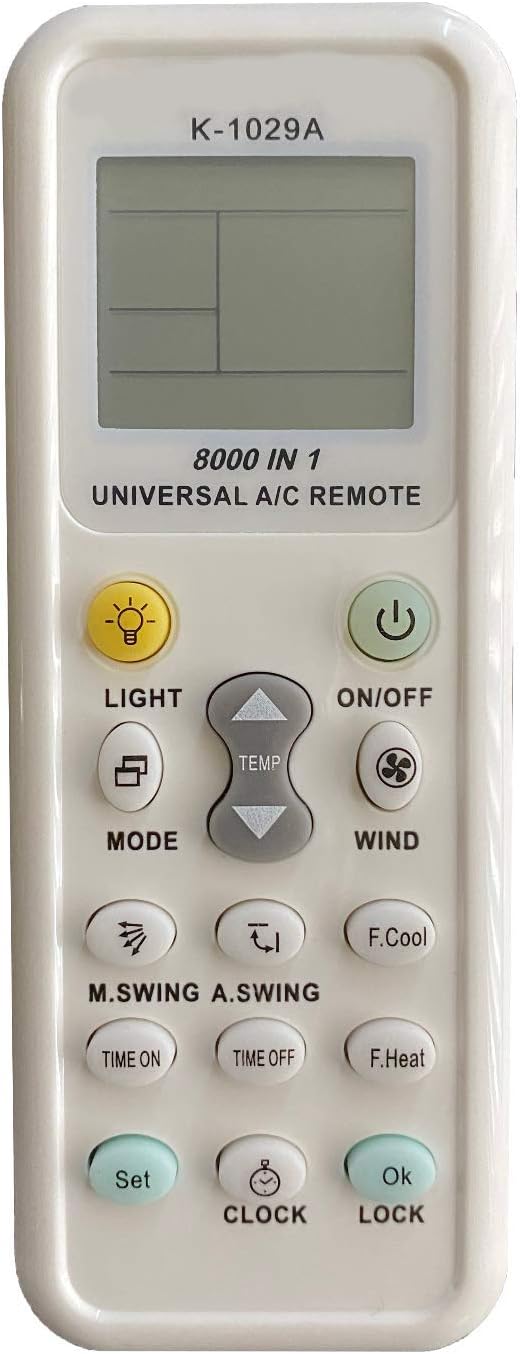
Front view of the K-1029A remote control, highlighting its LCD display and button layout.
2. Setup
2.1 Battery Installation
- Remove the battery cover located on the back of the remote control.
- Insert two AAA (No.7) batteries, ensuring correct polarity (+/-).
- Replace the battery cover. A clock display should appear in the lower left corner of the LCD screen, indicating successful battery installation.

Back of the remote control with the battery compartment open.
2.2 Remote Control Settings (Code Search Methods)
If the remote control does not operate your air conditioner immediately, use one of the following methods to find the correct code:
Method A: Brand Point-to-Point Fast Search
- Manually turn on your air conditioner.
- Refer to the 'Key corresponding brand table' in the physical manual to find the code for your air conditioner brand.
- Press and hold the 'Code' key on the remote control corresponding to your brand until the air conditioner makes a sound (indicating it has received the signal).
- Release the button. Test the remote control's functions. If it works, the setup is complete.
Method B: Manual Input Code Method
- Hold down the 'Set' button for approximately three seconds until the code number on the LCD screen begins to flicker. Release the button.
- Press the 'Temperature' ^ or v buttons to search for the correct code. Each press will cycle through codes. When your air conditioner responds (e.g., makes a sound or turns on/off), press the 'OK' button to confirm the code.
- Test the remote control's functions (e.g., turn on/off, change temperature). If it works effectively, the setting is complete. If not, repeat steps 1-2.
Method C: Digital Automatic Search
- Ensure your air conditioner is powered on. Point the remote control towards the air conditioner's receiving window.
- Hold down the 'Set' button for approximately three seconds until the code number on the LCD screen begins to flicker rapidly. Release the button. The remote will automatically start searching for codes.
- Observe your air conditioner. When it responds (e.g., turns on/off, makes a sound), immediately press the 'OK' button to confirm the code.
- Test the remote control's functions. If it works, the setting is complete. If not, press 'Set' again to continue the automatic search.

Page 1 of the original instruction manual, showing setup details.
3. Operating Instructions
3.1 Panel Description and Button Functions
The remote control features a clear LCD display and various buttons for controlling your air conditioner:
- LCD Display: Shows current temperature, operation mode, signal emission, air volume, wind direction, clock, and mode code.
- ON/OFF Button: Powers the air conditioner on or off.
- LIGHT Button: Activates the backlight for the LCD display.
- MODE Button: Cycles through operation modes (e.g., Cool, Heat, Fan, Dry, Auto).
- TEMP ^ / v Buttons: Adjusts the temperature up or down.
- WIND Button: Adjusts fan speed.
- M.SWING / A.SWING Buttons: Controls horizontal and vertical swing of the air conditioner's louvers.
- TIME ON / TIME OFF Buttons: Sets the timer for automatic power on/off.
- F.Cool Button (Fast Cool): Automatically sets to cooling mode, 21°C, strong wind, and automatic wind direction.
- F.Heat Button (Fast Heat): Automatically sets to heating mode, 27°C, strong wind, and automatic wind direction.
- CLOCK Button: Used for setting the current time.
- SET Button: Used for entering code search mode.
- OK Button: Confirms selections.
- LOCK Button: Activates/deactivates child lock.
3.2 Setting the Clock
- Press and hold the 'CLOCK' button for approximately 3 seconds until the clock numbers on the LCD display begin to flicker.
- Use the 'Temperature' ^ or v buttons to adjust the time.
- Press the 'CLOCK' button again to exit the setting function, or press 'OK' to confirm the time.
3.3 Timer Function (Time ON/OFF)
This function allows you to set a specific time for the air conditioner to automatically turn on or off.
- Press and hold either the 'TIME ON' or 'TIME OFF' button for approximately 3 seconds. The time display will begin to flicker.
- Use the 'Temperature' ^ or v buttons to adjust the desired ON or OFF time.
- Press the 'TIME ON' or 'TIME OFF' button again to confirm the setting.
- Note: The timing function may be available even when the air conditioner is in power-off mode for some models.
3.4 Child Lock Function
To prevent unintended operation by children or accidental presses:
- Press and hold the 'LOCK' button for approximately 3 seconds. A child lock icon will appear on the LCD display, indicating the remote is locked.
- To unlock, press and hold the 'LOCK' button again for approximately 3 seconds. The child lock icon will disappear.

Page 2 of the original instruction manual, showing advanced functions and brand compatibility list.
4. Maintenance
4.1 General Care
- Keep the remote control dry. Avoid exposing it to water or high humidity, which can damage internal circuits.
- Do not drop, knock, or shake the remote control. Rough handling can break internal circuit boards.
- Keep the remote control away from direct sunlight and heat sources. High temperatures can shorten the life of electronic devices, damage batteries, and warp plastic parts.
- Clean the remote control with a soft, dry cloth. Do not use harsh chemicals, cleaning solvents, or strong detergents.
4.2 Battery Replacement
Replace batteries when the remote control's range decreases or the display becomes dim. Always replace both batteries at the same time with new AAA batteries. Do not mix old and new batteries or different types of batteries.
5. Troubleshooting
If your universal A/C remote control is not functioning as expected, please refer to the following common issues and solutions:
| Problem | Possible Cause | Solution |
|---|---|---|
| Remote does not control A/C. | Incorrect code set; Batteries are dead or inserted incorrectly; Remote is not compatible with your specific A/C model (e.g., window/portable unit). | Re-attempt code search using Manual Input or Automatic Search methods (Section 2.2). Ensure batteries are fresh and correctly inserted. Verify your A/C is not a window or portable unit. |
| LCD display is dim or blank. | Low or dead batteries. | Replace both AAA batteries with new ones. |
| Remote works intermittently. | Weak batteries; Obstruction between remote and A/C; Remote sensor on A/C is dirty. | Replace batteries. Ensure a clear line of sight to the A/C. Clean the A/C's remote sensor. |
| Cannot set time or timer. | Incorrect button sequence; Child lock is active. | Follow the instructions in Section 3.2 and 3.3 carefully. Deactivate child lock (Section 3.4) if it is enabled. |
6. Specifications
- Model: K-1029A (YY-101018E0072)
- Dimensions: 3.15 x 1.18 x 0.79 inches
- Item Weight: 2.39 ounces
- Power Supply: 2 x AAA 1.5V Batteries (Not Included)
- Compatible Devices: Air Conditioner (Universal, 8000 in 1)
- Connectivity Technology: Infrared
- Special Feature: Universal compatibility, Large LCD display, Clock and timing functions, Night lighting.
- Manufacturer: Young Electronics
- Country of Origin: China
7. Warranty and Support
This product is manufactured by Young Electronics. For any issues or support inquiries not covered in this manual, please contact the retailer or manufacturer directly. Keep your purchase receipt for warranty claims, if applicable.
Please note that specific warranty terms may vary by region and retailer. Refer to your point of purchase for detailed warranty information.
Related documentsYY-101018E0072


Ask a question about this manual
Ask about setup, troubleshooting, compatibility, parts, safety, or missing instructions. Manuals+ will review the question and use this page’s manual context to help answer it.