1. Product Overview
The Blackview Tab 8 is a 10.1-inch Android tablet designed for versatile use, from entertainment to productivity. It features a vibrant FHD+ IPS display, an Octa-Core processor, 4GB of RAM, and 64GB of internal storage, expandable via a microSD card. Equipped with dual cameras (13MP rear, 5MP front), GPS, FM radio, and 5G Wi-Fi connectivity, it offers a comprehensive mobile experience.

Figure 1: Blackview Tab 8 Tablet highlighting key features like the 10.1-inch FHD+ IPS display and 6580mAh battery.
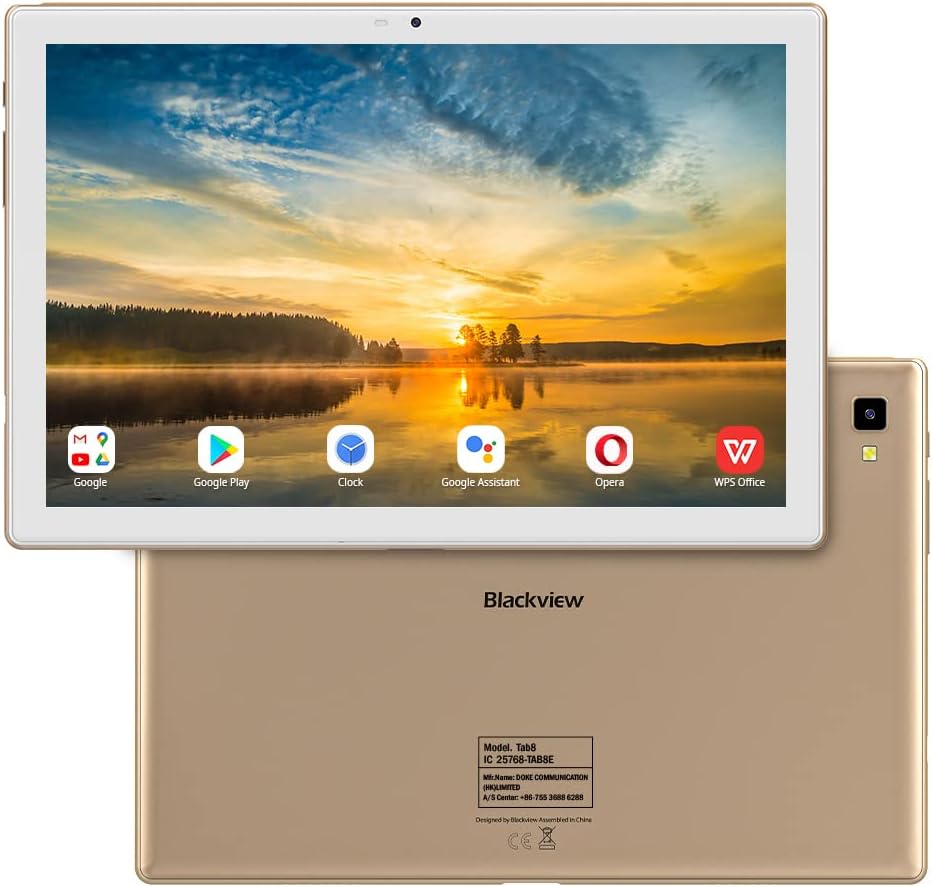
Figure 2: Front and rear views of the Blackview Tab 8 Tablet, showcasing its design and camera placement.
2. Initial Setup
2.1 Unboxing and Components
Upon opening the package, ensure all components are present. The Blackview Tab 8 typically includes the tablet, a leather case, a charger, a USB cable, and a user manual. The tablet comes with a protective film on the screen.
Video 1: An unboxing video demonstrating the contents of the Blackview Tab 8 package, including the tablet and its accessories.
2.2 Powering On and Initial Configuration
- Press and hold the power button located on the side of the tablet until the Blackview logo appears.
- Follow the on-screen prompts to select your language, connect to a Wi-Fi network, and set up your Google account.
- If prompted, configure security settings such as a PIN, pattern, or password. The tablet also supports Face Unlock for convenient access.
2.3 Charging the Tablet
Before first use, it is recommended to fully charge the tablet. Connect the provided USB cable to the tablet's charging port and the other end to the power adapter. Plug the adapter into a wall outlet. The charging indicator will appear on the screen.
2.4 Inserting SIM and MicroSD Cards
The Blackview Tab 8 supports dual SIM cards for cellular connectivity (Dual 4G VoLTEV) and a microSD card for expandable storage up to 128GB. Locate the SIM/microSD card tray on the side of the tablet. Use the provided SIM ejector tool to open the tray. Carefully place the SIM card(s) and/or microSD card into their respective slots, ensuring correct orientation, then reinsert the tray.
3. Operating Your Tablet
3.1 Basic Navigation and Gestures
- Tap: Select an item or activate a button.
- Swipe: Scroll through screens, lists, or content.
- Pinch-to-zoom: Enlarge or reduce the view of images and web pages.
- Long press: Access contextual menus or move icons.
3.2 Connecting to Networks
To connect to Wi-Fi, go to Settings > Network & internet > Wi-Fi. Select your desired network and enter the password if required. For cellular data, ensure a SIM card is inserted and mobile data is enabled in Settings > Network & internet > Mobile network.
3.3 Using the Cameras
The tablet features a 13MP rear camera and a 5MP front camera. Open the Camera app to capture photos and videos. Tap the screen to focus, and press the shutter button to take a picture. Switch between front and rear cameras using the camera toggle icon.

Figure 3: Capturing moments with the 13MP rear camera of the Blackview Tab 8.
3.4 Multitasking and Productivity
The Blackview Tab 8 supports split-screen multitasking, allowing you to run two applications side-by-side. To activate, open an app, then swipe up from the bottom of the screen and hold to access recent apps. Drag one app to the top or bottom of the screen, then select another app for the remaining space.
Video 2: Demonstrating features of the Blackview Tab 8, including split-screen multitasking and external keyboard support.
The tablet can also be paired with an external keyboard (sold separately) for enhanced typing and productivity, transforming it into a portable workstation.

Figure 4: The Blackview Tab 8 supports diverse activities, from work to entertainment.
3.5 Face Unlock
For quick and secure access, the Blackview Tab 8 features Face Unlock. To set it up, navigate to Settings > Security > Face Unlock and follow the on-screen instructions to register your face. Once configured, simply look at the front camera to unlock your device.
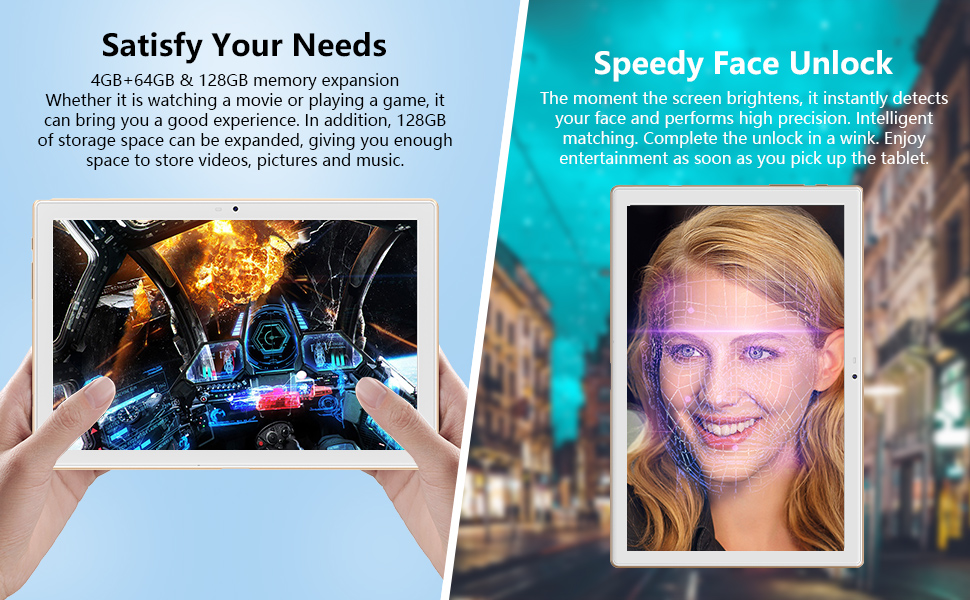
Figure 5: The Blackview Tab 8 offers speedy face unlock and ample storage for games and media.
4. Maintenance
4.1 Battery Care
- Avoid exposing the tablet to extreme temperatures.
- Use only the original charger or a certified compatible charger.
- For optimal battery longevity, avoid frequently draining the battery completely or keeping it at 100% charge for extended periods.
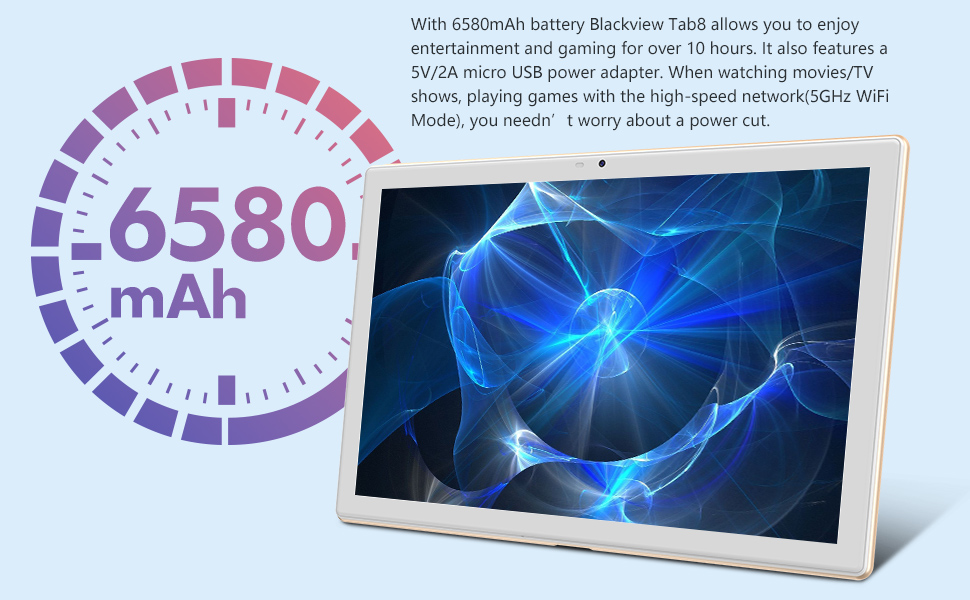
Figure 6: The Blackview Tab 8 is equipped with a 6580mAh battery for extended use.
4.2 Cleaning the Tablet
Use a soft, lint-free cloth to clean the screen and body of the tablet. For stubborn smudges, slightly dampen the cloth with water or a screen cleaner designed for electronics. Avoid using harsh chemicals or abrasive materials.
4.3 Software Updates
Regularly check for system updates to ensure your tablet has the latest features and security patches. Go to Settings > System > System update to check for and install available updates. The tablet runs on Android 10, which offers extensive compatibility and system stability.

Figure 7: The Blackview Tab 8 operates on Android 10, ensuring broad application compatibility.
4.4 Storage Management
The tablet comes with 64GB of internal storage. To manage storage, go to Settings > Storage. You can free up space by uninstalling unused apps, deleting old files, or moving media to a microSD card (up to 128GB supported).

Figure 8: The Blackview Tab 8 features 4GB RAM and 64GB ROM, with support for up to 128GB expandable storage.
5. Troubleshooting
5.1 Common Issues and Solutions
- Tablet not turning on: Ensure the battery is charged. Connect the charger and wait a few minutes before attempting to power on again.
- Screen unresponsive: Try restarting the tablet by holding the power button for about 10-15 seconds until it powers off and then on again.
- Wi-Fi connection issues: Check if Wi-Fi is enabled in settings. Restart your router and the tablet. Forget the network and reconnect.
- Apps crashing or freezing: Clear the app's cache (Settings > Apps & notifications > [App Name] > Storage & cache > Clear cache). If the issue persists, try reinstalling the app.
5.2 Factory Reset
If you encounter persistent software issues, a factory reset may resolve them. Warning: A factory reset will erase all data on your tablet. Back up important data before proceeding. To perform a factory reset, go to Settings > System > Reset options > Erase all data (factory reset) and follow the instructions.
6. Specifications
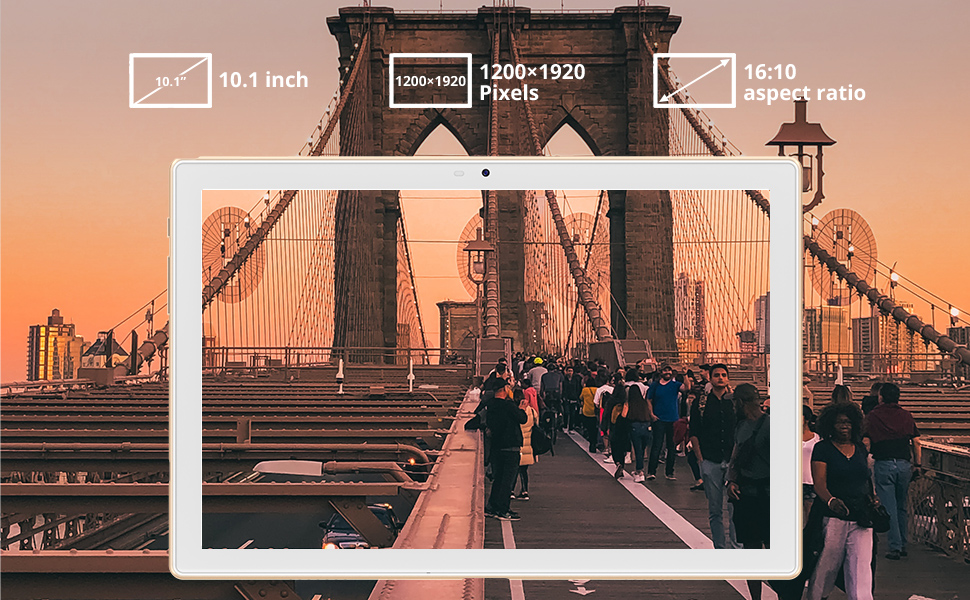
Figure 9: The Blackview Tab 8 features a 10.1-inch FHD+ display with a 1200x1920 resolution.
| Feature | Specification |
|---|---|
| Model | Blackview Tab 8 |
| Display Size | 10.1 Inches |
| Display Resolution | 1920x1200 IPS FHD |
| Processor | Octa Core |
| RAM | 4 GB |
| Internal Storage | 64 GB |
| Expandable Storage | Up to 128 GB (MicroSD) |
| Operating System | Android 10 |
| Rear Camera | 13 MP |
| Front Camera | 5 MP |
| Battery Capacity | 6580 mAh |
| Average Battery Life | 8 Hours |
| Connectivity | 5G Wi-Fi, Dual 4G VoLTEV, Bluetooth, GPS, FM |
| Dimensions (LxWxH) | 9.57 x 6.38 x 0.35 inches |
| Weight | 1.32 pounds |
7. Warranty and Support
For warranty information and technical support, please refer to the warranty card included in your product packaging or visit the official Blackview website. Keep your proof of purchase for warranty claims. If you experience any issues not covered in this manual, please contact Blackview customer service for assistance.


