
MINIX NEO P1
MINIX 66W Turbo 3-Port GaN Wall Charger (NEO P1)
Instruction Manual
1. Introduction
Thank you for choosing the MINIX 66W Turbo 3-Port GaN Wall Charger (NEO P1). This compact and powerful charger is designed to provide ultra-fast charging for a wide range of devices, from laptops to smartphones, utilizing advanced Gallium Nitride (GaN) technology. Its versatile design includes multiple ports and international plug adapters, making it an ideal companion for both daily use and travel.
2. Safety Information
- Do not expose the charger to liquids, moisture, or extreme temperatures.
- Avoid dropping or subjecting the charger to strong impacts.
- Do not attempt to disassemble, repair, or modify the charger.
- Ensure the charger is used within its specified input voltage range (100-240V AC).
- Keep out of reach of children.
- Disconnect the charger from the power outlet when not in use.
- If the charger shows any signs of damage or malfunction, discontinue use immediately.
3. Package Contents
- MINIX NEO P1 66W Turbo 3-Port GaN Wall Charger Body
- UK Pin Adapter
- EU Pin Adapter
- Storage Bag
4. Product Overview
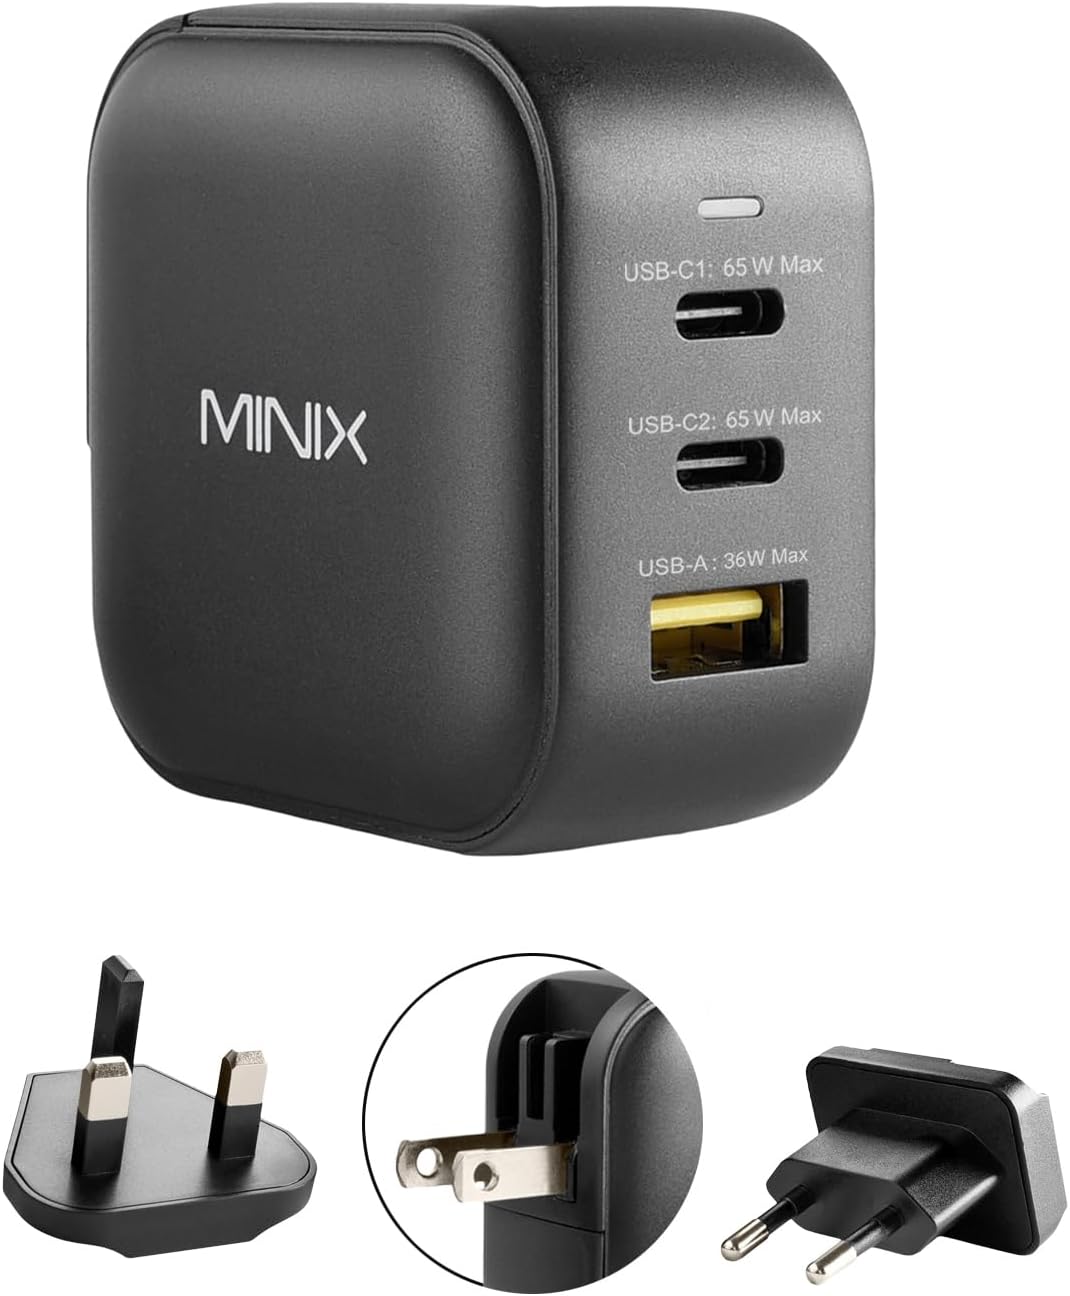
Figure 1: Front view of the MINIX NEO P1 charger showing 2 USB-C ports (65W Max each) and 1 USB-A port (36W Max).
The MINIX NEO P1 features a compact design with a foldable US plug. It includes two USB-C Power Delivery (PD) ports and one USB-A Quick Charge (QC) 3.0 port. A small LED indicator is present on the top surface to show power status. The charger comes with interchangeable UK and EU pin adapters for international compatibility.

Figure 2: Detailed view of the MINIX NEO P1 charger highlighting its dimensions (53mm x 53mm x 30.7mm) and port specifications: 2 x USB-C Ports (65W PD3.0, 5~15V/3A, 20V/3.25A) and 1 x USB-A Port (36W QC3.0, 5V/3A, 9V/2A, 12V/1.5A, 20V/1.8A).
5. Setup
5.1 Attaching International Plug Adapters
The MINIX NEO P1 comes with a built-in foldable US plug. For use in other regions, attach the appropriate international adapter:
- Fold the built-in US plug flat into the charger body.
- Align the desired UK or EU pin adapter with the slots on the charger body.
- Slide the adapter firmly into place until it clicks securely.

Figure 3: Demonstrates how to attach the EU plug adapter to the charger body.

Figure 4: Visual representation of the US, UK, and EU plug types compatible with the charger.
5.2 Connecting to a Power Outlet
Once the correct plug adapter is attached, insert the charger firmly into a compatible wall outlet. The LED indicator on the charger will light up, confirming it is receiving power.
6. Operating Instructions
6.1 Charging Your Devices
Connect your devices to the available USB-C or USB-A ports using appropriate charging cables. The MINIX NEO P1 features Dynamic Smart Detection, which automatically adjusts the power output of each port based on the connected devices to ensure efficient and safe charging.

Figure 5: The MINIX NEO P1 charger actively charging a laptop, tablet, and smartphone, demonstrating its multi-device capability.
6.2 Power Distribution
The total power output of the charger is 66W. The power is dynamically distributed among the ports as follows:

Figure 6: Power distribution diagram for the MINIX NEO P1. When using one port, USB-C ports can deliver up to 65W, and USB-A up to 36W. When using two ports, power is split (e.g., 45W/20W for USB-C, or 45W/18W for USB-C and USB-A). When using all three ports, power is distributed as 45W/15W/5W.
6.3 Official Product Video
Video 1: An overview of the MINIX 66W Turbo 3-Port GaN Wall Charger, showcasing its features and compact design.
7. Specifications
| Feature | Detail |
|---|---|
| Product Dimensions | 2.09 x 2.09 x 1.21 inches |
| Item Weight | 7 ounces |
| Model Number | NEO P1 |
| Total USB Ports | 3 (2 x USB Type C, 1 x USB Type A) |
| Wattage | 65 watts (Max) |
| Input Voltage | 100-240V AC, 50~60Hz, 1.8A |
| Special Features | Fast Charging, Lightweight Design, Short Circuit Protection, Travel-friendly (foldable plugs, UK/EU pin converters) |
| Protection | Over-current, Over-voltage, Over-temperature, Short-circuit Protection |
| Compatible Devices | MacBook Air 13'' (2018) / MacBook 12'' / MacBook Pro 13'' / MacBook Pro 15'', Microsoft Surface Pro 7 / Surface Laptop 3 / Surface Go, iPad Pro 12.9'' / iPad Pro 10.5'' / iPad Pro 11'' / iPad Air 10.5'' / iPad mini / AirPods Pro, iPhone 16/15/14/13/12/11 Pro Max/10/ 8 Plus / 8 / 7 / 6, Samsung Galaxy S23/ S21/S20 Ultra / S20+ / S20 / S10+ / S10 / S10e / S9+ / S9 / S9 Plus / S8 / S8 Plus / Note 10 / 9 / 8 / 7, Google Pixel 4 / 4 XL / 3a / 3a XL / 3 / 3 XL / 2 / 2 XL / Pixel C |
8. Maintenance
- Clean the charger with a dry, soft cloth. Do not use liquid cleaners.
- Store the charger in a cool, dry place when not in use.
- Regularly inspect the charger and cables for any signs of wear or damage.
9. Troubleshooting
9.1 Device Not Charging
- Ensure the charger is properly plugged into a live power outlet and the LED indicator is on.
- Verify that the charging cable is securely connected to both the charger and your device.
- Try using a different charging cable or port to rule out a faulty cable or port.
- Check if your device is compatible with the charger's power output.
9.2 Slow Charging
- Ensure you are using a high-quality charging cable that supports fast charging.
- Refer to the Power Distribution table (Section 6.2) to understand how power is shared when multiple devices are connected. Disconnecting other devices may increase charging speed for a single device.
- Verify that your device supports the fast charging protocols (PD, QC 3.0) offered by the charger.
10. Warranty and Support
MINIX products are backed by a manufacturer's warranty. For detailed warranty information, product support, or technical assistance, please visit the official MINIX website or contact their customer service. Keep your purchase receipt for warranty claims.
Official MINIX Store: Visit the MINIX Store on Amazon
Related documentsNEO P1


Ask a question about this manual
Ask about setup, troubleshooting, compatibility, parts, safety, or missing instructions. Manuals+ will review the question and use this page’s manual context to help answer it.