1. Introduction
Thank you for purchasing the Kemai MD-1702BT Portable Multi-Band Radio. This device offers versatile audio entertainment with FM, AM, and Shortwave (SW) radio reception, along with modern connectivity options including Bluetooth, USB, and SD card playback. This manual provides essential information for safe operation, setup, and maintenance of your radio.
2. Safety Information
- Read all instructions before using the device.
- Do not expose the radio to rain, moisture, or extreme temperatures.
- Avoid placing the unit near heat sources or in direct sunlight.
- Use only the specified power adapter or batteries.
- Do not attempt to disassemble or modify the unit. Refer all servicing to qualified personnel.
- Keep out of reach of children.
3. Product Overview
3.1 Front Panel Controls

Image 1: Angled front view of the Kemai MD-1702BT radio, providing a clearer look at the control layout. It shows the volume and tuning knobs, along with buttons for mode selection and playback control (play/pause, skip).
- Volume Knob: Adjusts the audio output level.
- Tuning Knob: Selects radio frequencies.
- Mode Button: Switches between FM, AM, SW, Bluetooth, USB, and SD card modes.
- Playback Controls: Play/Pause, Previous Track, Next Track (for USB/SD/Bluetooth modes).
- Frequency Display: Shows the current radio frequency or track information.
3.2 Side and Top Panel Features
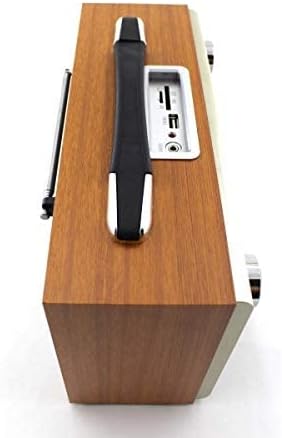
Image 2: The top view of the Kemai MD-1702BT radio, featuring a sturdy carrying handle for portability. The USB port, SD card slot, and AUX input are also visible on the top panel.
- USB Port: For connecting USB flash drives to play audio files.
- SD Card Slot: For inserting SD memory cards to play audio files.
- AUX Input: 3.5mm jack for connecting external audio devices.
- Carrying Handle: For easy portability.
3.3 Rear Panel Connections

Image 3: This image illustrates the rear panel of the Kemai MD-1702BT radio. It clearly shows the battery compartment for D-cell batteries, the AC power input socket, and the telescopic antenna for improved radio reception.
- Battery Compartment: Holds D-cell batteries for portable power.
- AC Power Input: For connecting the AC power cord.
- Telescopic Antenna: Extends for improved radio signal reception.
4. Setup
4.1 Powering the Device
The Kemai MD-1702BT radio can be powered by either AC power or batteries.
- AC Power: Connect the provided AC power cord to the AC power input socket on the rear of the radio and then plug it into a standard wall outlet.
- Battery Power: Open the battery compartment on the rear of the radio. Insert the required number of D-cell batteries (not included), ensuring correct polarity (+/-). Close the compartment securely.
4.2 Antenna Adjustment
For optimal radio reception, extend the telescopic antenna fully. Adjust its angle and direction to achieve the clearest signal.
5. Operating Instructions
5.1 Radio Operation (FM/AM/SW)
- Turn on the radio using the power switch (often integrated with the volume knob).
- Press the Mode button repeatedly to select the desired radio band (FM, AM, or SW).
- Extend and adjust the telescopic antenna for best reception.
- Rotate the Tuning Knob to scan for radio stations. The frequency will be displayed on the screen.
- Adjust the Volume Knob to your preferred listening level.
5.2 Bluetooth Operation
- Turn on the radio.
- Press the Mode button until "Bluetooth" or "BT" appears on the display, indicating Bluetooth pairing mode.
- Enable Bluetooth on your mobile device (smartphone, tablet, etc.) and search for available devices.
- Select "MD-1702BT" from the list of devices to pair.
- Once paired, you can play audio from your device through the radio. Use the radio's playback controls or your device's controls to manage music.
5.3 USB/SD Card Playback
- Turn on the radio.
- Insert a USB flash drive into the USB Port or an SD card into the SD Card Slot.
- The radio should automatically switch to USB or SD card mode and begin playing audio files. If not, press the Mode button to select the correct source.
- Use the playback controls (Play/Pause, Previous Track, Next Track) to navigate your audio files.
5.4 AUX Input
- Turn on the radio.
- Connect an external audio device (e.g., MP3 player, phone) to the AUX Input jack using a 3.5mm audio cable (not included).
- Press the Mode button to select AUX input.
- Control playback from your external audio device. The radio's volume knob will control the output volume.
6. Maintenance
- Cleaning: Wipe the radio with a soft, dry cloth. Do not use abrasive cleaners or solvents.
- Battery Care: If the radio will not be used for an extended period, remove the batteries to prevent leakage.
- Storage: Store the radio in a cool, dry place away from direct sunlight and extreme temperatures.
7. Troubleshooting
| Problem | Possible Cause | Solution |
|---|---|---|
| No power | AC cord not connected; Batteries depleted or incorrectly inserted. | Check AC connection; Replace batteries or ensure correct polarity. |
| Poor radio reception | Antenna not extended or poorly positioned; Weak signal. | Extend and adjust the telescopic antenna; Try moving the radio to a different location. |
| Bluetooth not pairing | Radio not in Bluetooth mode; Device too far; Bluetooth off on external device. | Ensure radio is in Bluetooth mode; Move devices closer; Enable Bluetooth on your device. |
| USB/SD card not playing | Incorrect file format; Card/drive not inserted correctly; Radio not in correct mode. | Ensure audio files are compatible (e.g., MP3); Reinsert card/drive; Select USB/SD mode. |
8. Specifications

Image 4: This image provides the physical dimensions of the Kemai MD-1702BT radio, indicating a length of 27.5 cm, a height of 17 cm (including handle), and a depth of 10.5 cm.
| Feature | Detail |
|---|---|
| Brand | Kemai |
| Model Number | MD-1702BT |
| Connectivity Technology | Wireless (Bluetooth) |
| Tuner Technology | FM, AM, Shortwave (SW) |
| Power Source | Battery Powered (D-cell), AC Power |
| Hardware Interface | USB |
| Special Feature | Portable |
| Item Weight | 1.1 pounds (approximately 0.5 kg) |
| Dimensions (Approx.) | 27.5 cm (Length) x 17 cm (Height) x 10.5 cm (Depth) |
9. Warranty and Support
For warranty information and customer support, please refer to the documentation provided at the time of purchase or contact your retailer. Keep your proof of purchase for any warranty claims.


