
Walfront SVP-916
Walfront SVP-916 Adjustable Over and Under Voltage Protector (80A) User Manual
Model: SVP-916 | Brand: Walfront
1. Safety Information
Please read this manual carefully before installation and operation. Failure to follow these instructions may result in electric shock, fire, or damage to the device or connected equipment.
- Installation and maintenance should only be performed by qualified personnel.
- Ensure the power supply is disconnected before any wiring or maintenance.
- Verify that the voltage and current ratings of the protector match your application requirements.
- Do not operate the device in wet or damp conditions.
- Do not attempt to repair or modify the device. Contact support if issues arise.
2. Product Overview
The Walfront SVP-916 is an adjustable over and under voltage protector designed to safeguard electrical equipment from voltage fluctuations. It features real-time voltage and current display, adjustable protection parameters, and automatic recovery functions.
Key Features:
- Overvoltage Protection
- Undervoltage Protection
- Real-time Voltage Display (Voltage Measurement)
- Adjustable Overvoltage Value and Recovery Value
- Adjustable Undervoltage Value and Recovery Value
- Adjustable Overvoltage and Undervoltage Action Times
- Adjustable Fault Recovery Delay Time
- Adjustable Power-on Delay Time
- Reset Mode Selection
- Fault Query Function
- Factory Reset Function

3. Installation
The SVP-916 is designed for DIN rail mounting. Ensure proper electrical connections are made according to the wiring diagram.
3.1 Mounting
Mount the device securely onto a standard 35mm DIN rail in an appropriate electrical enclosure. Ensure adequate ventilation and clearance around the device.
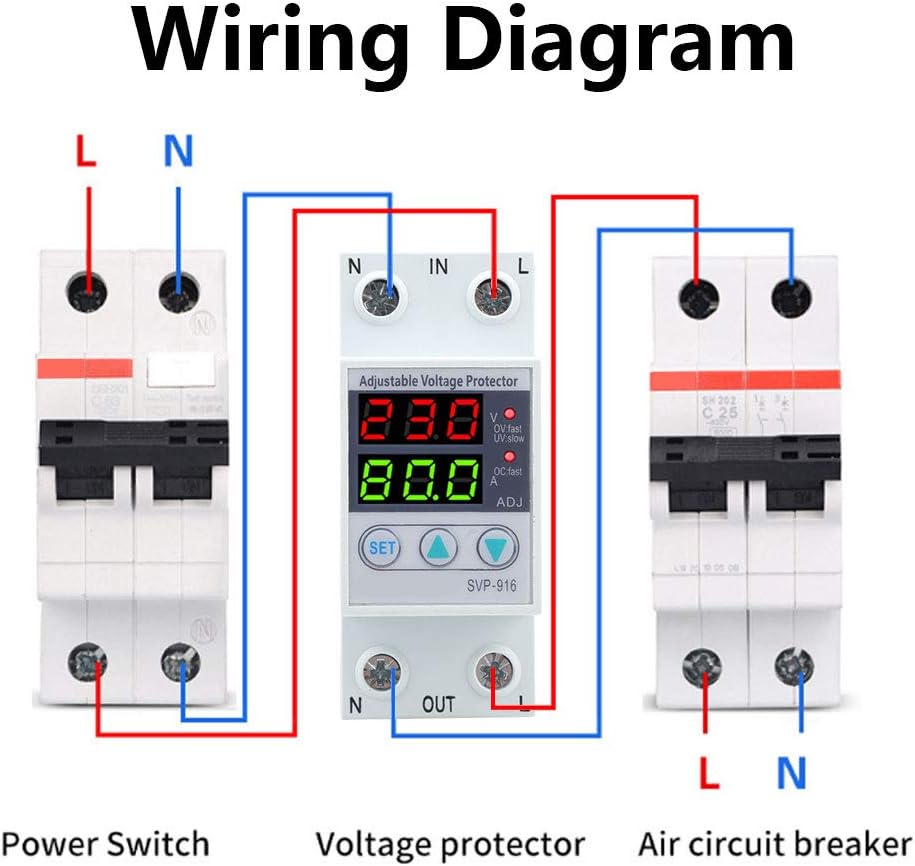
3.2 Wiring Diagram
Connect the input (IN) and output (OUT) terminals as shown in the diagram below. Ensure correct polarity (Line 'L' and Neutral 'N') and secure all connections.
3.3 Dimensions
Refer to the diagram below for the physical dimensions of the SVP-916 to ensure proper fit and clearance in your installation.

4. Operating Instructions
4.1 Display and Indicators
The device features a dual digital display and indicator LEDs:
- Top Display: Shows real-time voltage (V).
- Bottom Display: Shows real-time current (A).
- OV:fast LED: Indicates overvoltage condition.
- UV:slow LED: Indicates undervoltage condition.
- OC:fast LED: Indicates overcurrent condition (if applicable to the specific model, though primary function is voltage protection).
- ADJ: Indicates adjustment mode.
4.2 Button Functions
- SET Button: Enters parameter setting mode and cycles through parameters.
- Up (▲) Button: Increases the value of the selected parameter.
- Down (▼) Button: Decreases the value of the selected parameter.
4.3 Parameter Adjustment
To adjust protection parameters:
- Press and hold the SET button for approximately 3 seconds to enter parameter setting mode. The ADJ indicator will illuminate.
- Press the SET button repeatedly to cycle through the adjustable parameters. Each parameter will be displayed on the screen.
- Use the Up (▲) and Down (▼) buttons to adjust the value of the currently displayed parameter.
- After setting all desired parameters, wait for approximately 5-10 seconds without pressing any buttons. The device will automatically exit setting mode and save the changes.
Adjustable Parameters:
- Overvoltage Value Range: 130V-150V-OFF (Default: 140V)
- Overvoltage Recovery Value: Adjustable
- Overvoltage Action Time: Adjustable
- Undervoltage Value Range: OFF-80V-100V (Default: 90V)
- Undervoltage Recovery Value: Adjustable
- Undervoltage Action Time: Adjustable
- Fault Recovery Delay Time: 2-512 seconds (Default: 60s)
- Power-on Delay Time: 2-255 seconds (Default: 2s)
Note: The specific voltage ranges for over/undervoltage protection are configured for 100-130VAC systems. Always refer to the values displayed on your device and ensure they are appropriate for your electrical system.
5. Maintenance
The Walfront SVP-916 is designed for minimal maintenance. Regular inspection can help ensure its continued reliable operation.
- Cleaning: Periodically clean the exterior of the device with a soft, dry cloth. Do not use abrasive cleaners or solvents.
- Inspection: Annually inspect wiring connections to ensure they are tight and free from corrosion. Check for any signs of physical damage to the device.
- Environment: Ensure the operating environment remains within specified temperature and humidity ranges.
6. Troubleshooting
This section provides guidance for common issues. For problems not listed here, contact customer support.
6.1 Fault Query
The device includes a fault query function to review past protection events. Consult the full product documentation or contact support for specific instructions on accessing fault logs.
6.2 Common Issues
- Device Not Powering On:
- Check input power supply.
- Verify wiring connections are secure and correct.
- Ensure the power-on delay time has elapsed.
- Constant Tripping (Overvoltage/Undervoltage):
- Check the actual line voltage with a multimeter to confirm stability.
- Review and adjust the overvoltage/undervoltage protection thresholds to suit your system's normal operating range.
- Adjust the action time and recovery delay settings if brief fluctuations are causing nuisance trips.
- Settings Not Retained After Power Cycle:
- Ensure settings are properly saved by allowing the device to exit adjustment mode automatically after making changes.
- If the issue persists, perform a factory reset and reconfigure.
6.3 Factory Reset
To restore the device to its factory default settings, consult the specific instructions provided with your device or contact Walfront customer support. This action will erase all custom settings.
7. Specifications
| Parameter | Value |
|---|---|
| Model | SVP-916 |
| Rated Voltage | 100-130VAC 50/60Hz |
| Rated Current (Adjustable) | 1-80A (for 80A model) |
| Overvoltage Value Range | 130V-150V-OFF (Default: 140V) |
| Undervoltage Value Range | OFF-80V-100V (Default: 90V) |
| Recovery Delay Time | 2-512s (Default: 60s) |
| Boot Delay Time | 2-255s (Default: 2s) |
| Mechanical & Electrical Performance | ≥4000 times |
| Disconnect Capacity (Overvoltage) | (Values provided in source data, e.g., 221~300V, appear to be for 220V systems. Please refer to device markings for 100-130VAC specific values.) |
| Disconnect Capacity (Undervoltage) | (Values provided in source data, e.g., 219~150V, appear to be for 220V systems. Please refer to device markings for 100-130VAC specific values.) |
| Material | Plastic |
| Mounting Type | DIN Rail (Note: Some documentation may list 'Tabletop', but the device is designed for DIN rail mounting.) |
| Item Weight | 6.5 ounces |
Note: Some specification values, particularly for disconnect capacity, appear to be listed for a 220V system in the provided data. For the 100-130VAC model, the actual disconnect capacity values will correspond to the lower voltage range. Always refer to the specific markings on your device and the most current product documentation for precise specifications.
8. Warranty and Support
For warranty information, technical support, or service inquiries, please contact Walfront customer service through their official channels or the retailer from whom the product was purchased.
Keep your purchase receipt as proof of purchase for warranty claims.
Ask a question about this manual
Ask about setup, troubleshooting, compatibility, parts, safety, or missing instructions. Manuals+ will review the question and use this page’s manual context to help answer it.