
1. Introduction
Thank you for purchasing the IINE Cute Switch Wireless Gamepad. This controller is designed to provide a comfortable and immersive gaming experience on your Nintendo Switch console. Featuring a charming cartoon kitten design, it includes advanced functions such as turbo, dual vibration, and 6-axis gyroscope for precise control. Please read this manual carefully before use to ensure proper operation and maintenance.
2. Safety Information
- Keep the controller away from water, moisture, and extreme temperatures.
- Do not attempt to disassemble or modify the controller. This will void the warranty and may cause damage.
- Use only the provided charging cable or a certified equivalent.
- Avoid dropping or subjecting the controller to strong impacts.
- Store the controller in a clean, dry place when not in use.
3. Package Contents
- IINE Cute Switch Wireless Gamepad
- USB-C Charging Cable
- User Manual (this document)
4. Product Overview
Familiarize yourself with the layout and functions of your IINE Cute Switch Wireless Gamepad.

Figure 4.1: IINE Cute Switch Wireless Gamepad - Front View
Button Layout:
- Left Analog Stick: For movement and camera control.
- D-Pad: Directional input.
- Right Analog Stick: For camera control and aiming.
- A/B/X/Y Buttons: Standard action buttons.
- L/R Buttons: Shoulder buttons.
- ZL/ZR Buttons: Trigger buttons.
- HOME Button: Returns to the Nintendo Switch HOME Menu.
- Screenshot Button: Captures screenshots.
- +/- Buttons: Plus and Minus buttons.
- SYNC Button: Used for pairing the controller.
- Turbo Button: Activates/deactivates turbo function.
- 3.5mm Headset Port: For audio output when wired.
5. Setup
5.1 Charging the Controller
Before first use, fully charge the controller. Connect the provided USB-C charging cable to the controller's charging port and the other end to a USB power source (e.g., Nintendo Switch dock, USB wall adapter). The built-in 300mAh battery provides approximately 10 hours of playtime and takes about 2 hours to fully recharge. The controller can be used while charging.

Figure 5.1: Battery Capacity and Playtime
5.2 Connecting to Nintendo Switch (Wireless)
- From the Nintendo Switch HOME Menu, select Controllers, then Change Grip/Order.
- On the IINE controller, press and hold the SYNC button (located near the charging port) for 3 seconds until the indicator lights start flashing.
- The controller will pair with the Switch within 3 seconds. Once connected, the player indicator lights on the controller will illuminate steadily.

Figure 5.2: Wireless Connection to Switch
5.3 Connecting to Nintendo Switch (Wired)
To use the controller in wired mode, connect it directly to the Nintendo Switch dock using the USB-C charging cable. Ensure your Switch system settings allow for Pro Controller Wired Communication.
5.4 Wake Up Function
To wake up your Nintendo Switch console from sleep mode using the controller, simply press the HOME button and the Y button simultaneously for 2-3 seconds. The console will power on and the controller will attempt to reconnect.

Figure 5.3: Wake Up Function
6. Operating Instructions
6.1 Basic Gameplay
Once connected, the IINE controller functions like a standard Nintendo Switch Pro Controller. Use the analog sticks for movement and camera control, the D-pad for directional input, and the A/B/X/Y buttons for in-game actions.
6.2 Turbo Function
The turbo function allows a button to be pressed repeatedly as long as it is held down, or to auto-fire without holding. To set up turbo:
- Press and hold the Turbo button, then press the desired action button (A/B/X/Y/L/R/ZL/ZR) to enable turbo for that button.
- Repeat the process to change the turbo mode (manual fire, auto-fire, clear auto-fire).
- To clear turbo for a specific button, press and hold the Turbo button, then press the button again.
- To clear all turbo settings, press and hold the Turbo button for 5 seconds.
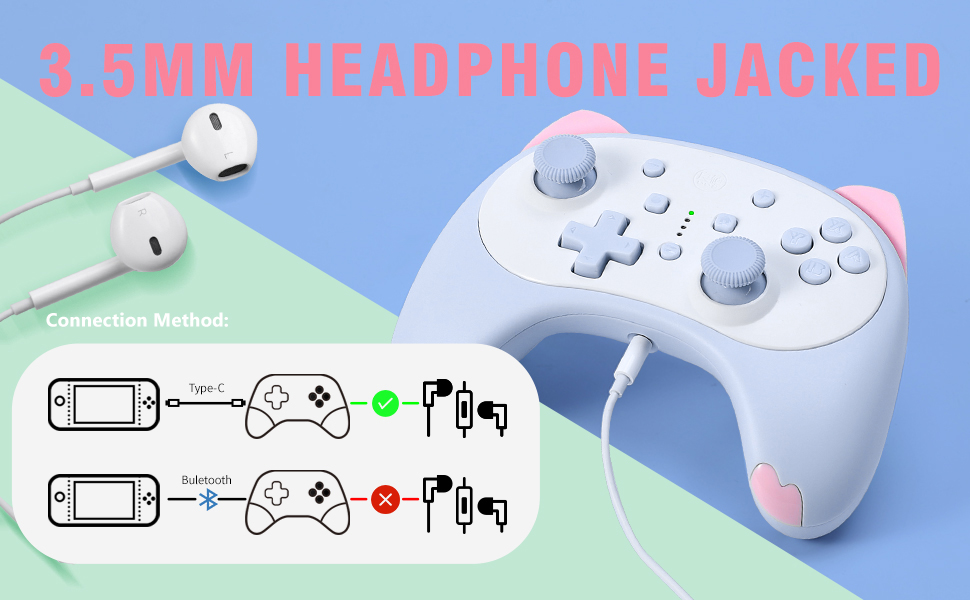
Figure 6.1: Turbo/Auto-Fire Function
6.3 Double Vibration Function
The controller features dual motors for realistic vibration feedback. The vibration intensity can be adjusted to four levels:
- Increase Vibration: Press and hold the Turbo button, then press the Up button on the D-pad for 5 seconds.
- Reduce Vibration: Press and hold the Turbo button, then press the Down button on the D-pad for 5 seconds.

Figure 6.2: Double Vibration Adjustment
6.4 6-Axis Gyroscope
The built-in 6-axis gyroscope provides precise motion control, enhancing accuracy and allowing for more detailed device motion recognition in compatible games.

Figure 6.3: 6-Axis Gyro Sensor
6.5 3.5mm Headset Port
The controller includes a 3.5mm audio port, allowing you to connect a headset for in-game audio and voice chat. Note: The headset port is only functional when the controller is connected to the Switch dock via a Type-C cable (wired mode).

Figure 6.4: 3.5mm Headset Port Usage
7. Maintenance
- Cleaning: Use a soft, dry cloth to clean the controller. Do not use abrasive cleaners or solvents.
- Storage: Store the controller in a cool, dry place away from direct sunlight and extreme temperatures.
- Battery Care: To prolong battery life, avoid fully discharging the battery frequently. If storing for a long period, charge the controller to about 50% every few months.
8. Troubleshooting
- Controller not connecting: Ensure the controller is charged. Go to the Switch's 'Change Grip/Order' screen and press the SYNC button on the controller. If issues persist, try restarting both the Switch and the controller.
- Vibration not working: Check if vibration is enabled in the Nintendo Switch system settings. Adjust the vibration intensity as described in Section 6.3.
- Input lag/disconnection: Ensure there are no strong electromagnetic interferences nearby. Try moving closer to the Switch console.
- Headset port not working: Confirm the controller is connected to the Switch dock via a USB-C cable. The headset port does not function in wireless mode.
- Controller unresponsive: Try resetting the controller by inserting a thin object (like a paperclip) into the small reset hole (if present, typically on the back or bottom) for a few seconds. Then attempt to reconnect.
9. Specifications
| Brand | IINE |
| Model | Cute Switch Wireless Gamepad |
| Connectivity | Bluetooth |
| Compatible Platforms | Nintendo Switch, PC |
| Controller Type | Gamepad |
| Color | Blue (Kitten Design) |
| Item Weight | 5.2 ounces |
| Product Dimensions | 5 x 3.74 x 2.05 inches |
| Power Source | Battery Powered |
| Battery Type | 1 Lithium Polymer battery (included) |
| Battery Capacity | 300mAh |
| Playtime | Up to 10 hours |
| Recharge Time | Approx. 2 hours |
| Special Features | Turbo Function, Dual Vibration, 6-Axis Gyroscope, 3.5mm Headset Port, Wake Up Function |
10. Warranty and Support
This product comes with a standard manufacturer's warranty. For detailed warranty information, please refer to the packaging or contact the retailer where you purchased the product. For technical support, troubleshooting assistance, or any inquiries regarding your IINE Cute Switch Wireless Gamepad, please contact IINE customer service through their official website or the contact information provided with your purchase.
For more information, visit the official IINE Store: IINE Store on Amazon