
1. Introduction
The Air Vent Gable Ventilator 53315 is designed to improve attic ventilation by exhausting hot, humid air from the attic space. This helps to reduce heat buildup, which can lower cooling costs and extend the life of your roof. This manual provides essential information for the safe installation, operation, and maintenance of your ventilator.
2. Safety Information
General Safety Warnings
- Disconnect Power: Always disconnect power at the circuit breaker or fuse box before installing, servicing, or cleaning the ventilator. Failure to do so can result in electric shock or serious injury.
- Qualified Electrician: All electrical wiring must be performed by a qualified electrician in accordance with all local and national electrical codes.
- Moving Parts: Keep hands, hair, and loose clothing away from moving parts to prevent injury.
- Proper Grounding: Ensure the ventilator is properly grounded to prevent electrical hazards.
- Secure Mounting: Mount the ventilator securely to prevent it from falling or vibrating excessively during operation.
- Read Instructions: Read and understand all instructions before beginning installation or operation.
3. Package Contents
Verify that all components are present before beginning installation:
- Air Vent Gable Ventilator 53315 unit
- Adjustable Thermostat (pre-wired)
- Mounting hardware (screws)
- Instruction Manual (this document)
4. Setup and Installation
Installation Location
The Air Vent Gable Ventilator 53315 is designed for installation in the gable end of an attic. Ensure the chosen location allows for proper airflow and is structurally sound to support the unit.
Mounting Instructions
- Prepare Opening: If installing in an existing gable vent, ensure the opening is clear and appropriately sized for the ventilator. If creating a new opening, cut a circular opening in the gable end that matches the fan's diameter.
- Position Ventilator: Carefully position the ventilator unit within the opening. The mounting flanges on the fan housing should rest against the interior framing or sheathing of the gable.
- Secure Unit: Using the provided mounting screws, securely fasten the ventilator to the framing or sheathing through the pre-drilled holes in the mounting flanges. Ensure the unit is level and stable.
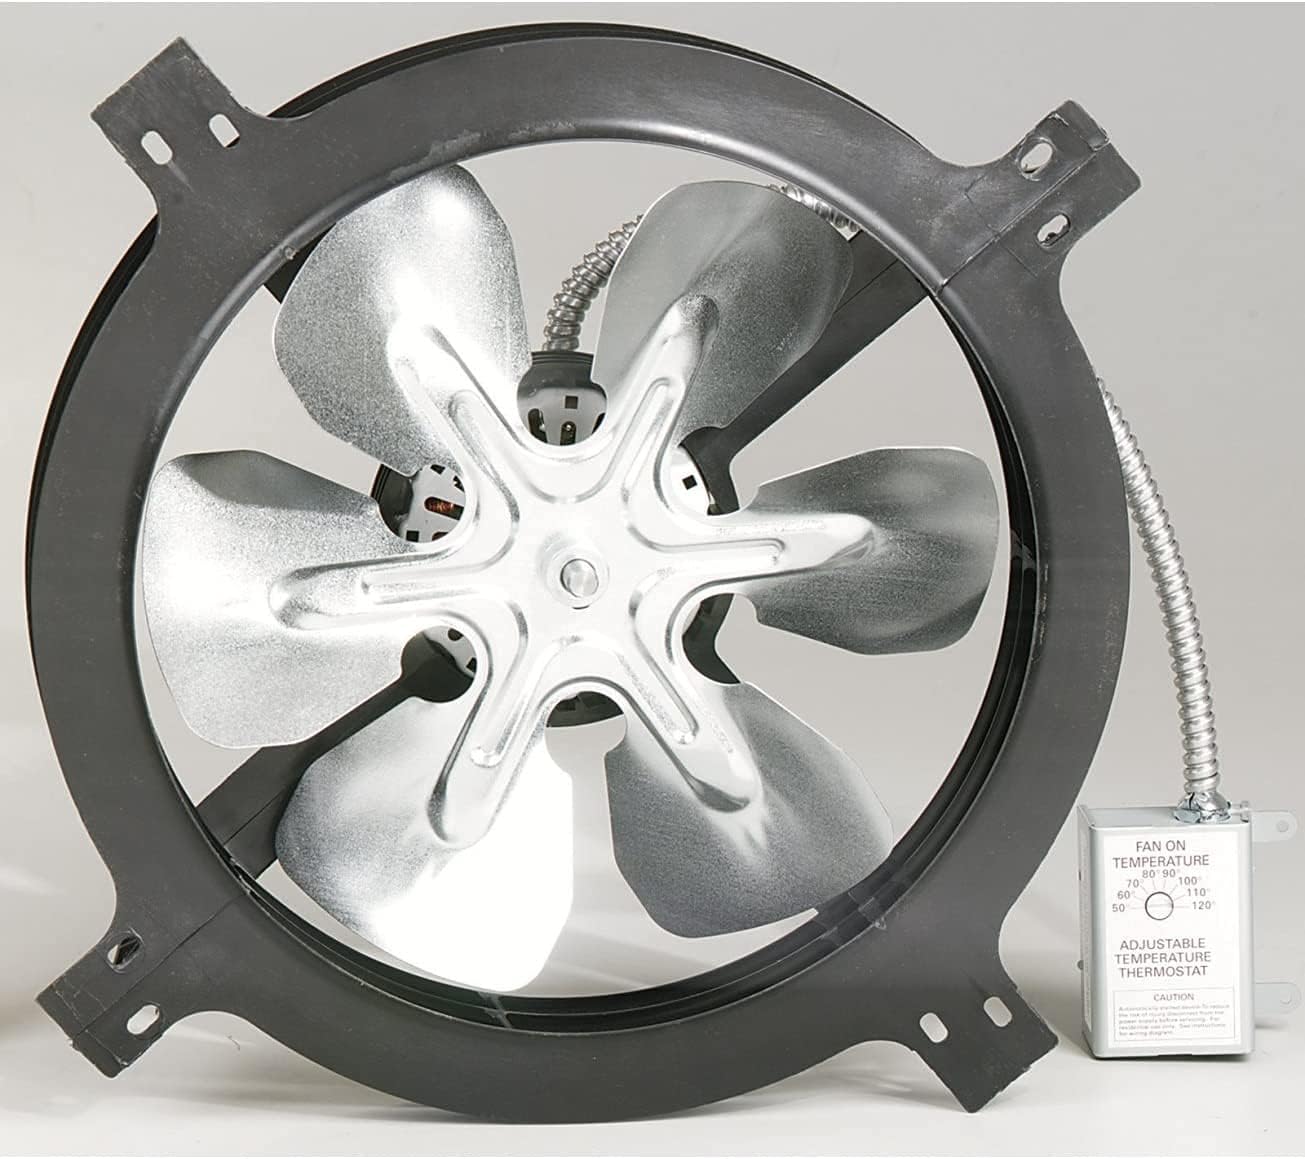
Figure 1: Air Vent Gable Ventilator 53315. This image displays the Air Vent Gable Ventilator 53315. It features a circular fan housing with six metallic blades. A flexible metallic conduit extends from the fan housing to a small rectangular control box. This control box, labeled 'ADJUSTABLE TEMPERATURE THERMOSTAT', has a dial for setting the 'FAN ON TEMPERATURE' with markings from 50° to 120° Fahrenheit.
Electrical Wiring
- Power Disconnection: Ensure power to the circuit is OFF at the main service panel before proceeding.
- Connect Wiring: Connect the ventilator's electrical wires to a dedicated 120V AC power supply circuit. Follow all local and national electrical codes. The ventilator is pre-wired with an adjustable thermostat.
- Grounding: Properly ground the ventilator according to electrical codes.
- Secure Connections: Ensure all electrical connections are tight and secure within an appropriate junction box.
- Restore Power: Once all wiring is complete and inspected, restore power to the circuit.
5. Operating Instructions
The Air Vent Gable Ventilator 53315 operates automatically based on the temperature setting of its integrated thermostat.
Adjusting the Thermostat
- Locate the adjustable thermostat control box, typically attached to the fan unit via a flexible conduit (refer to Figure 1).
- The thermostat dial allows you to set the desired 'FAN ON TEMPERATURE'. The fan will activate when the attic temperature reaches this set point.
- Rotate the dial to select the desired temperature. Common settings range from 90°F to 110°F for optimal attic cooling. Setting a lower temperature will cause the fan to run more frequently.
- The fan will continue to run until the attic temperature drops below the set point, at which time it will automatically shut off.
6. Maintenance
Regular maintenance ensures optimal performance and longevity of your ventilator.
- Annual Inspection: Annually, or more frequently in dusty environments, inspect the fan blades and motor for dust, debris, or obstructions.
- Cleaning: With power disconnected, carefully clean the fan blades and motor housing using a soft cloth. Do not use harsh chemicals or immerse electrical components in water.
- Check Wiring: Periodically check electrical connections for tightness and signs of wear.
- Clear Vents: Ensure that all attic intake and exhaust vents are clear of obstructions (e.g., insulation, bird nests) to allow for proper airflow.
7. Troubleshooting
If your ventilator is not operating as expected, refer to the following common issues and solutions:
| Problem | Possible Cause | Solution |
|---|---|---|
| Fan does not turn on. | No power to the unit. Thermostat set too high. Motor malfunction. | Check circuit breaker/fuse. Lower thermostat setting. Contact a qualified technician. |
| Fan runs continuously. | Thermostat set too low. Attic temperature consistently high. Thermostat malfunction. | Raise thermostat setting. Ensure adequate intake ventilation. Contact a qualified technician. |
| Excessive noise or vibration. | Loose mounting. Debris in fan blades. Motor bearing wear. | Tighten mounting screws. Disconnect power and clear debris. Contact a qualified technician. |
If troubleshooting steps do not resolve the issue, contact customer support or a qualified service professional.
8. Specifications
| Feature | Specification |
|---|---|
| Brand | Air Vent |
| Model Name | 53315 |
| Electric Fan Design | Exhaust Fan |
| Power Source | Corded Electric |
| Wattage | 75 watts |
| Item Weight | 8.7 Pounds |
| Indoor/Outdoor Usage | Outdoor |
| Installation Type | Gable or Attic Mount |
| Product Dimensions | 7.4 x 18.4 x 18.4 inches |
| Control Method | Adjustable Thermostat |
9. Warranty Information
Air Vent products are manufactured to high-quality standards. This product is covered by a manufacturer's warranty against defects in materials and workmanship. For specific warranty terms, conditions, and duration, please refer to the warranty card included with your purchase or visit the official Air Vent website. Keep your proof of purchase for warranty claims.
10. Customer Support
For technical assistance, replacement parts, or further inquiries regarding your Air Vent Gable Ventilator 53315, please contact Air Vent customer support. Contact information can typically be found on the product packaging or the official Air Vent website.


