
Introduction
This instruction manual provides detailed information on the setup, operation, and maintenance of your Digital Nc Mini TTL Speedlite Automatic Flash, model VK630CNMULT. Please read this manual thoroughly before using the product to ensure proper function and to maximize its performance and lifespan.
Product Features
- Compatibility: Compatible with Canon Hot Shoe cameras, including Canon Powershot SX50 HS, SX60 HS, G1 X Mark II, G1 X Mark III, G3 X, G5 X, and all Canon EOS & EOS Rebel cameras.
- Multiple Flash Modes: Supports Manual, TTL (Through-The-Lens), Slave (S1, S2), and Stroboscopic modes.
- Sync Functions: Features Front Curtain Sync and Rear Curtain Sync capabilities.
- Protection & Power Saving: Includes overheating protection and an automatic sleep mode to conserve battery life.
- Recycle Time: Approximately 5 seconds for quick consecutive shots.
- Guide Number: Guide No. 32 (ISO 100, 105mm) for effective illumination.
- Backlit LED Display: Built-in backlit LED display provides auxiliary lighting for video clips and clear settings visibility.
- Flexible Flash Head: Flash head can rotate 60-90 degrees horizontally and -7 to 90 degrees vertically for bounce and swivel lighting.
- Lightweight Design: Weighs approximately 150g for portability.
- Triggering Options: Supports both On-Camera and Off-Camera Flash Triggering.
- Wireless Capability: Wireless distance of up to 50 feet indoors and 33 feet outdoors.
- Light Color Temperature: Produces white light at 5600K.
- Power Source: Operates on 2 AA Alkaline or Rechargeable Ni-MH batteries.
- Flash Life: Approximately 500-1000 flashes per battery charge.
Parts Identification
Familiarize yourself with the components of your flash unit by referring to the diagram below.
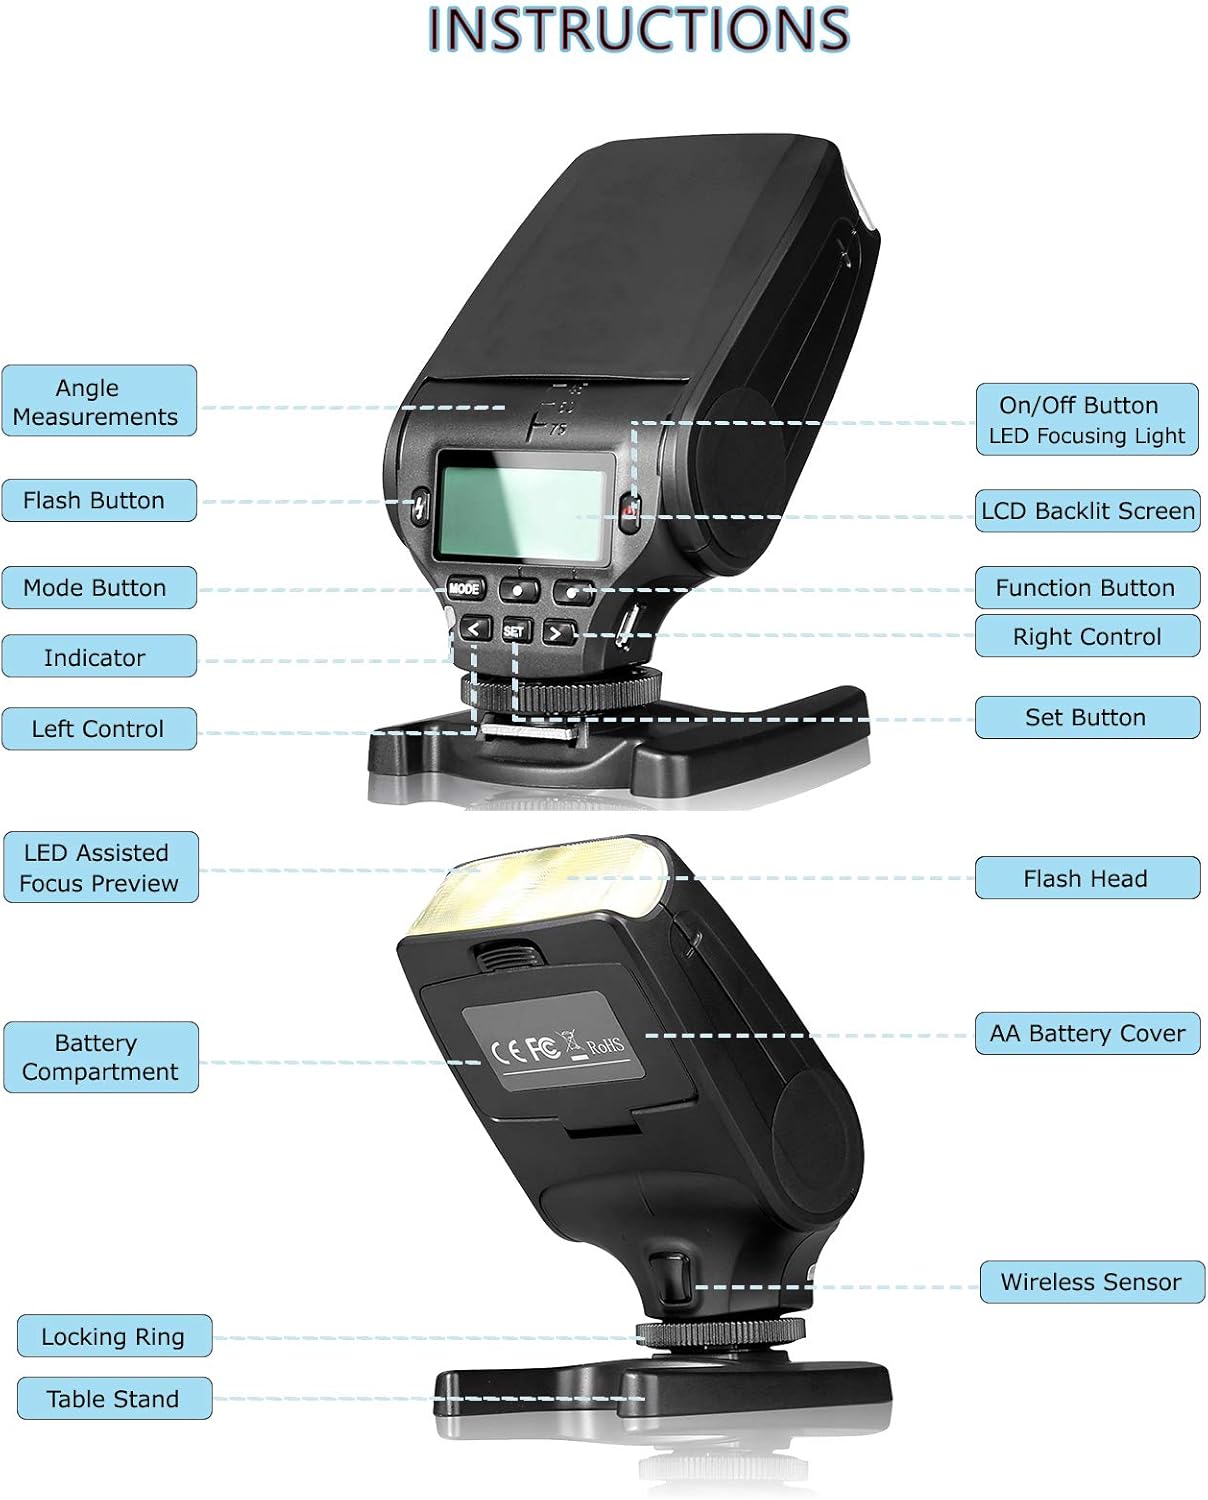
This diagram illustrates the various components of the Mini TTL Speedlite flash, including the On/Off button, LCD screen, flash head, battery compartment, and controls.
- On/Off Button: Powers the flash unit on or off.
- LED Focusing Light: Assists with focus in low-light conditions.
- LCD Backlit Screen: Displays current settings and modes.
- Function Button: Used to select various flash functions.
- Right Control: Navigates menu options or adjusts settings to the right.
- Set Button: Confirms selections or enters sub-menus.
- Angle Measurements: Indicators for flash head rotation angles.
- Flash Button: Triggers a test flash.
- Mode Button: Cycles through different flash modes (TTL, Manual, Slave, Stroboscopic).
- Indicator: Status light for flash readiness or warnings.
- Left Control: Navigates menu options or adjusts settings to the left.
- LED Assisted Focus Preview: Provides a preview of focus assistance.
- Flash Head: The light-emitting part of the flash, adjustable for direction.
- AA Battery Cover: Secures the battery compartment.
- Battery Compartment: Holds 2 AA batteries.
- Locking Ring: Secures the flash unit to the camera's hot shoe.
- Table Stand: Detachable stand for off-camera use.
- Wireless Sensor: Detects trigger signals in slave modes.
Setup
Battery Installation
- Locate the AA Battery Cover on the side of the flash unit.
- Slide the cover open or unlatch it according to its design.
- Insert two (2) AA Alkaline or Rechargeable Ni-MH batteries, ensuring correct polarity (+/-) as indicated inside the compartment.
- Close the battery cover securely.
Mounting the Flash
- Ensure your camera is powered off.
- Slide the flash unit's mounting foot into your camera's hot shoe.
- Tighten the Locking Ring clockwise until the flash is securely attached to the camera. Do not overtighten.
Operating the Flash
Power On/Off
Press and hold the On/Off Button for a few seconds to power the flash unit on or off. The LCD screen will illuminate upon power-on.
Mode Selection
Press the Mode Button repeatedly to cycle through the available flash modes: TTL, Manual, S1, S2, and Stroboscopic.
TTL Mode (Through-The-Lens)
In TTL mode, the flash automatically determines the appropriate light output based on the camera's metering system. This is ideal for quick and accurate exposures in various lighting conditions.
Manual Mode
Manual mode allows you to set the flash power output manually, typically from full power (1/1) down to lower fractions (e.g., 1/128). Use the Left/Right Control buttons to adjust the power level. This mode offers precise control over lighting.
Slave Modes (S1 & S2)
These modes allow the flash to be triggered wirelessly by another flash unit (master flash).
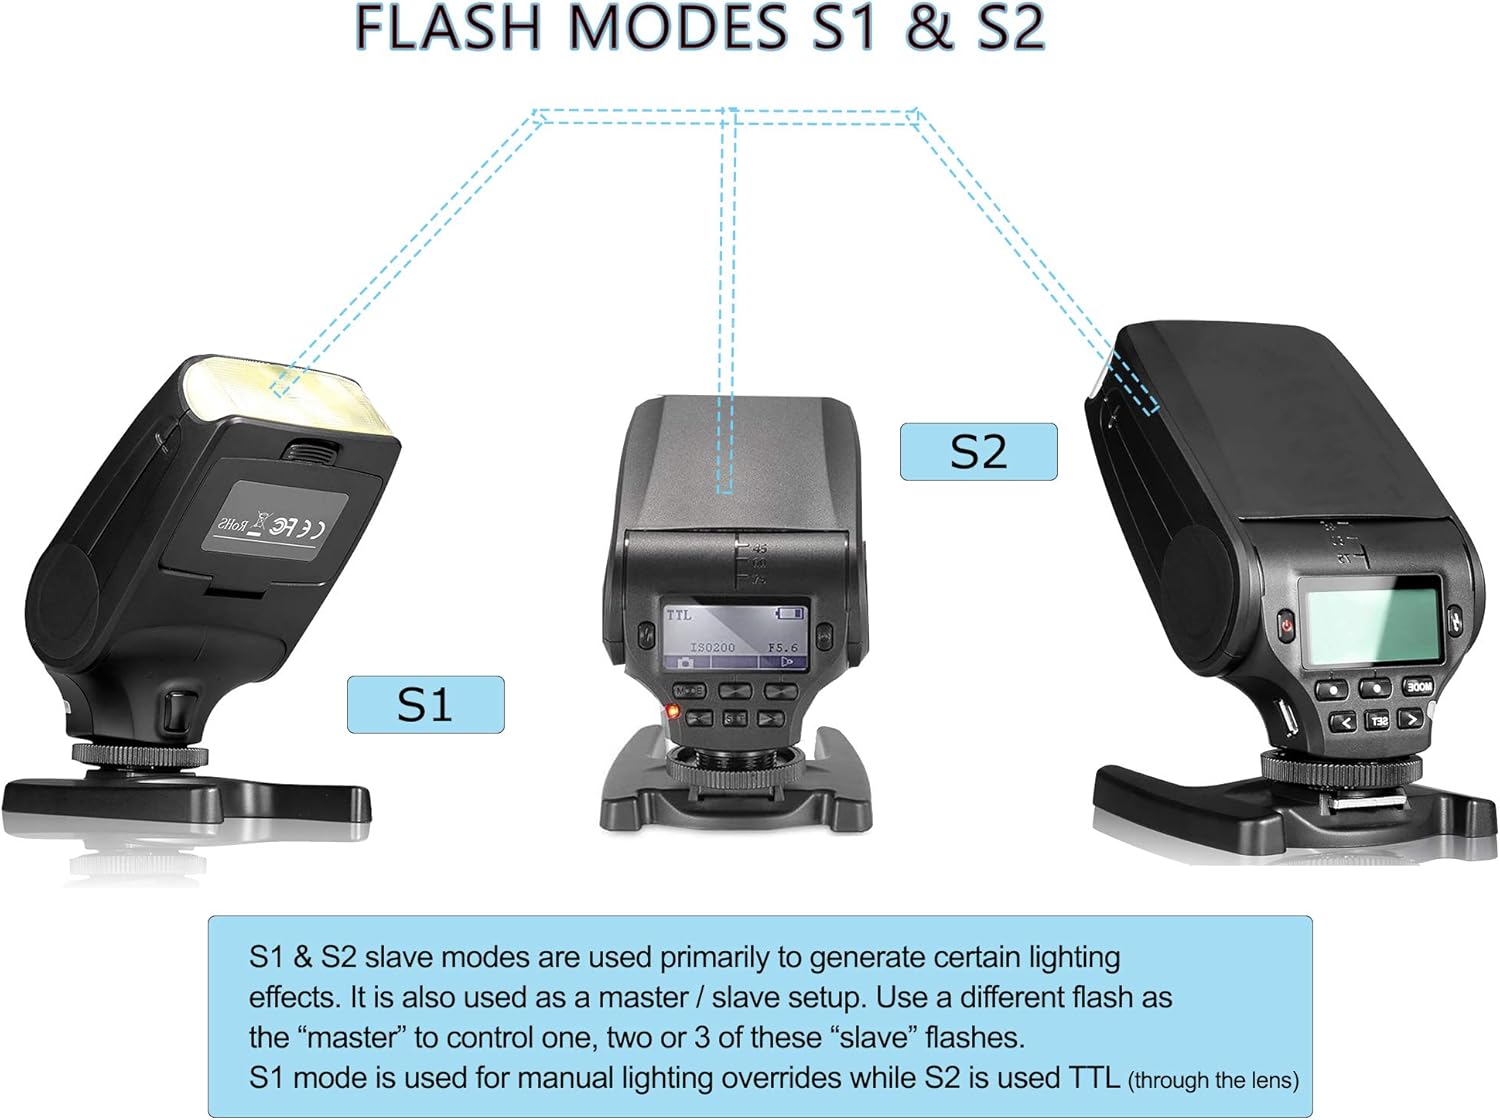
This diagram explains the S1 and S2 slave modes, where the flash can be triggered by another master flash. S1 is for manual slave triggering, and S2 is for TTL slave triggering.
- S1 Mode: The flash will fire when it detects the first flash from a master flash. This mode is suitable for master flashes that do not use a pre-flash.
- S2 Mode: The flash will ignore the pre-flash from a master flash and fire on the second, main flash. This mode is designed for master flashes that use a pre-flash for TTL metering.
Stroboscopic Mode
In Stroboscopic mode, the flash fires multiple times during a single exposure, creating a sequence of images of a moving subject. You can set the frequency and number of flashes.
Flash Head Adjustment (Bounce & Swivel)
The flash head can be adjusted to direct light for bounce or swivel effects, providing softer and more natural illumination.
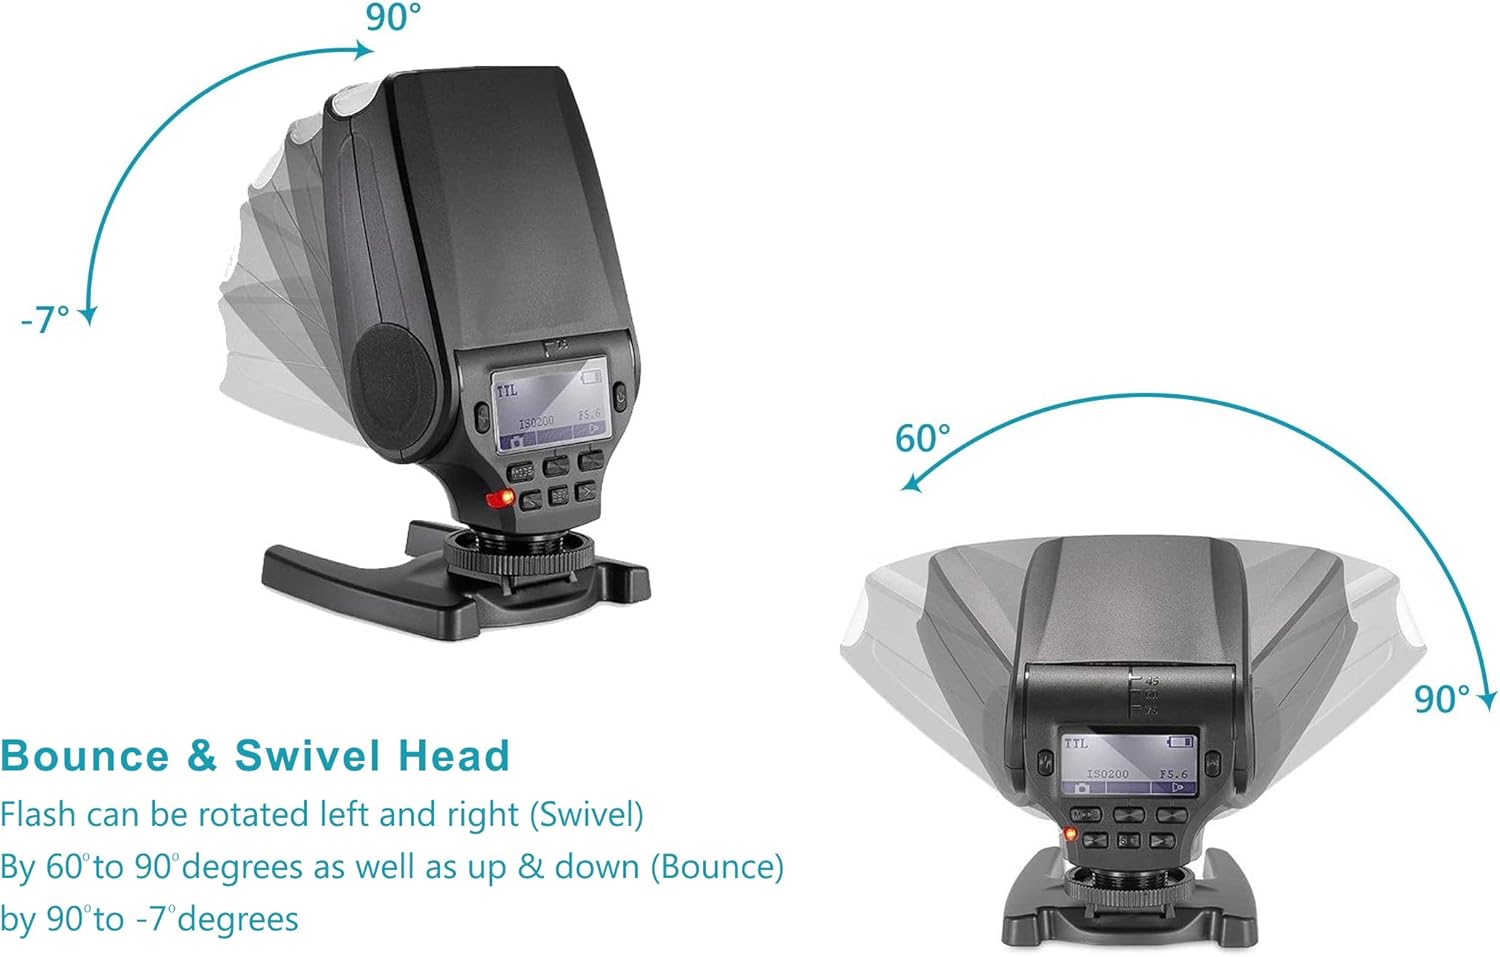
This image demonstrates the flexibility of the flash head, which can be rotated vertically from -7 to 90 degrees and horizontally from 60 to 90 degrees for bounce and swivel lighting.
- Vertical Rotation (Bounce): The flash head can be tilted upwards from -7 degrees to 90 degrees. This allows you to bounce the flash off ceilings or walls for softer light.
- Horizontal Rotation (Swivel): The flash head can be rotated horizontally from 60 degrees to 90 degrees. This is useful for bouncing light off side walls or for off-camera flash setups.
Maintenance
- Cleaning: Use a soft, dry cloth to clean the flash unit. For stubborn dirt, a slightly damp cloth can be used, followed by immediate drying. Do not use strong detergents or solvents.
- Battery Care: Remove batteries if the flash unit will not be used for an extended period to prevent leakage and damage. Store batteries in a cool, dry place.
- Storage: Store the flash unit in a dry, dust-free environment, away from direct sunlight and extreme temperatures.
Troubleshooting
- Flash Not Firing:
- Check if the flash is powered on.
- Ensure batteries are correctly inserted and have sufficient charge.
- Verify the flash is securely mounted on the camera's hot shoe.
- Check camera settings to ensure external flash is enabled.
- Weak Flash Output:
- Replace batteries with fresh ones or fully charged Ni-MH batteries.
- In Manual mode, increase the power output setting.
- Ensure the flash head is not obstructed.
- Overheating Protection Activated:
- If the flash fires rapidly, it may enter overheating protection mode. Allow the unit to cool down for several minutes before resuming use.
- LCD Screen Not Displaying:
- Ensure the flash is powered on and batteries are charged.
- If the issue persists, contact customer support.
Specifications
| Brand | Digital Nc |
| Model Number | VK630CNMULT |
| Compatibility | Canon E-TTL (all Series), Canon Hot Shoe cameras (e.g., SX50 HS, SX60 HS, G1 X Mark II, G1 X Mark III, G3 X, G5 X, All Canon EOS & EOS Rebel) |
| Guide Number | 32 (ISO 100, 105mm) |
| Directional (Bounce/Swivel) | Bounce (0 to 90 Degrees), Swivel (65 to 95 Degrees) |
| Wireless Distance | 50 Feet Indoors, 33 Feet Outdoors |
| Recycle Time | Approx. 4-5 Seconds |
| Light Color (Temp) | White 5600K |
| Shoe Type | Metal Hot Shoe Mount |
| Functions | Front Curtain Sync, Power Save Mode, Overheating Protection, Memory Functions |
| Screen | LCD Backlit Display |
| Power | 2 AA Alkaline, Or Rechargeable Ni-MH |
| Flash Life | Approximately 500-1000 Flashes Per Battery Charge |
| Interface | USB (for potential firmware updates, if applicable) |
| Weight | ~150g |
Warranty and Support
For warranty information, technical support, or service inquiries, please contact Digital Nc customer support through the retailer where the product was purchased or visit the official Digital Nc website. Please retain your proof of purchase for any warranty claims.