
1. Introduction
This manual provides detailed instructions for the installation, operation, and maintenance of your LEDLUX CL3801 Mini Tuya Smart Controller. This device is designed to control mono-color LED strips, offering smart dimming capabilities and compatibility with popular voice assistants like Amazon Alexa and Google Home.
2. Safety Information
- Ensure the power supply is disconnected before performing any installation or maintenance.
- Do not expose the device to moisture, water, or high humidity.
- Use only with compatible mono-color LED strips and appropriate 12V or 24V DC power supplies.
- Do not exceed the maximum output current of 6A.
- Keep out of reach of children.
3. Package Contents
- 1x LEDLUX CL3801 Mini Tuya Smart Controller
- 1x User Manual (this document)
4. Product Features
- Mini Tuya Smart Controller for 1-channel LED dimming.
- Supports 12V or 24V DC input/output.
- Maximum output current: 6A.
- Compatible with Amazon Alexa, Google Home, Mi, Aligenie, DuerOS Rokid.
- Operates exclusively on 2.4 GHz Wi-Fi networks (not compatible with 5 GHz).
- Compact dimensions for easy integration.
5. Specifications
| Parameter | Value |
|---|---|
| Brand | LEDLUX |
| Model | CL3801 (AP-1CH-1) |
| LED Type Compatibility | Single Color |
| Input/Output Voltage | DC 5-24V |
| Output Current | 6A/Channel (1 Channel) |
| Wi-Fi Frequency | 2.4 GHz (not 5 GHz) |
| Dimensions (approx.) | 9.4 x 5.08 x 2.54 cm |
| Weight (approx.) | 40 g |
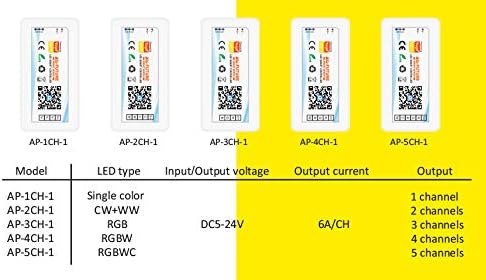
Figure 1: Specification overview for LEDLUX Smart Controller models. The CL3801 corresponds to the AP-1CH-1 model, designed for single-color LED strips with a 6A per channel output.
6. Setup
6.1 Physical Connection
- Ensure the power supply is turned off before making any connections.
- Connect the positive (+) and negative (-) terminals of your 12V or 24V DC power supply to the 'V+' and 'V-' input terminals on the controller. The input terminals are typically located on one end of the device, often labeled 'DC 5-24V'.
- Connect the positive (+) and negative (-) wires of your mono-color LED strip to the 'V+' and 'V-' output terminals on the other end of the controller. These are usually grouped together for the LED output.

Figure 2: Top view of the controller illustrating input and output connections. Ensure correct polarity for both power supply and LED strip.
6.2 App Installation
- Download the Tuya Smart or Smart Life app from your mobile device's app store (Google Play Store for Android or Apple App Store for iOS).
- Alternatively, scan the QR code provided on the product packaging or the device itself to quickly access the app download page. The direct link is https://smartapp.tuya.com/smartlife.
- Register or log in to your account within the app.

Figure 3: Product packaging displaying the QR code for the Tuya Smart Life app.
6.3 Device Pairing (Wi-Fi Connection)
- After connecting the controller and LED strip, turn on the power supply.
- The LED indicator on the controller should start blinking rapidly. If it does not, power cycle the device 3-5 times (turn off and on quickly) until the LED indicator blinks rapidly, indicating it is in pairing mode.
- Open the Tuya Smart or Smart Life app on your phone.
- Tap the '+' icon in the top right corner to add a new device.
- Select 'Lighting' from the category list, then choose 'Light Source (Wi-Fi)' or a similar option for LED controllers.
- Confirm that the indicator light is blinking rapidly in the app.
- Enter your 2.4 GHz Wi-Fi network name and password. Note: 5 GHz Wi-Fi networks are not supported.
- The app will begin searching for the device. Once found and connected, you can rename the device for easier control.
7. Operating
7.1 App Control
- Once the device is successfully paired, open the Tuya Smart or Smart Life app.
- Select your LED controller from the device list.
- You can now turn the LED strip on/off, adjust its brightness, and set schedules or timers directly from the app.
7.2 Voice Control (Alexa/Google Home)
- Ensure your LEDLUX controller is successfully connected to the Tuya Smart or Smart Life app.
- Open the Amazon Alexa app or Google Home app on your mobile device.
- Navigate to the 'Skills & Games' section (Alexa) or 'Works with Google' section (Google Home).
- Search for and enable the 'Tuya Smart' or 'Smart Life' skill/service.
- Link your Tuya Smart/Smart Life account when prompted.
- Once linked, ask Alexa or Google Assistant to 'Discover devices'.
- You can now control your LED strip using voice commands. Examples:
- "Alexa, turn on [device name]"
- "Hey Google, turn off [device name]"
- "Alexa, set [device name] to 50 percent"
- "Hey Google, dim [device name]"
8. Maintenance
- Keep the device clean and dry. Use a soft, dry cloth for cleaning.
- Ensure the controller is placed in an area with adequate ventilation to prevent overheating.
- Periodically check all electrical connections to ensure they are secure.
- Do not attempt to disassemble or repair the device yourself.
9. Troubleshooting
- Device not pairing:
- Ensure your Wi-Fi network is 2.4 GHz.
- Confirm the controller's LED indicator is blinking rapidly (pairing mode). If not, power cycle 3-5 times.
- Check that your phone is connected to the same 2.4 GHz Wi-Fi network.
- Move the controller closer to your Wi-Fi router.
- LED strip not lighting up:
- Verify the power supply is connected and functioning correctly.
- Check all wiring connections for correct polarity and secure contact.
- Ensure the LED strip itself is functional.
- Voice control not working:
- Confirm your Tuya Smart/Smart Life account is correctly linked in the Alexa or Google Home app.
- Ensure devices have been discovered by your voice assistant.
- Use the exact device name you set in the Tuya app.
10. Warranty and Support
For technical assistance, warranty claims, or any product-related inquiries, please contact LEDLUX customer service through your purchase platform or the official LEDLUX website. Please have your product model (CL3801) and purchase details ready when contacting support.