
1. Introduction
Thank you for choosing the GOCOM GO100 Kids Walkie Talkies. This two-way radio system is designed for clear communication and fun for children aged 3-12. It features a durable, child-friendly design with easy-to-use controls, making it ideal for indoor and outdoor adventures. Please read this manual thoroughly to ensure proper setup, operation, and maintenance of your walkie talkies.

Image: A single blue GOCOM GO100 walkie talkie, showcasing its compact design.
2. Package Contents
The GOCOM GO100 package includes the following items:
- 2 x GOCOM GO100 Walkie Talkies
- 2 x Lanyards (detachable)
- 2 x Belt Clips (detachable)
- 1 x Small Screwdriver (for battery compartment)
- 1 x User Manual (this document)
3. Parts and Controls
Familiarize yourself with the various parts and controls of your GOCOM GO100 Walkie Talkie:
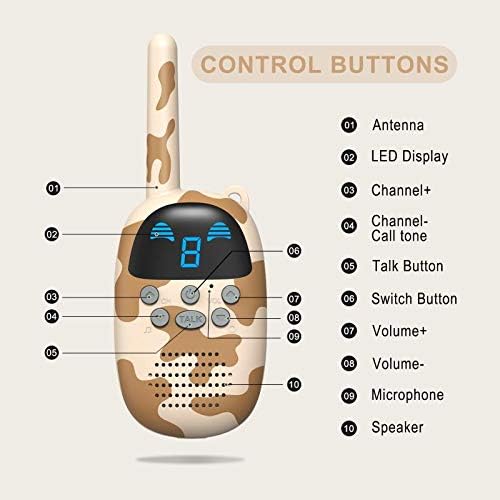
Image: Detailed diagram of the walkie talkie's components and buttons.
- Antenna: For transmitting and receiving signals.
- LED Display: Shows channel number, volume level, and other indicators.
- Channel + Button (CH+): Increases the channel number.
- Channel - / Call Tone Button (CH-): Decreases the channel number. Press and hold to activate call tone.
- Talk Button (PTT): Press and hold to transmit your voice. Release to listen.
- Switch Button (Power On/Off): Press and hold to turn the device on or off.
- Volume + Button (VOL+): Increases the speaker volume.
- Volume - Button (VOL-): Decreases the speaker volume.
- Microphone: Captures your voice during transmission.
- Speaker: Outputs received audio.
4. Setup
4.1 Battery Installation
Each GOCOM GO100 Walkie Talkie requires 3 AAA batteries (not included). Follow these steps to install the batteries:
- Locate the battery compartment on the back of the walkie talkie.
- Use the provided small screwdriver to unscrew the battery compartment cover.
- Insert 3 AAA batteries, ensuring correct polarity (+/-) as indicated inside the compartment.
- Replace the battery compartment cover and secure it with the screw.
Video: Demonstration of unboxing, battery installation, and attaching the lanyard and belt clip. (Clip from 0:00 to 1:18)
4.2 Attaching Lanyard and Belt Clip
The walkie talkies come with detachable lanyards and belt clips for convenient carrying. To attach or detach, simply snap them into the designated slots on the device. The lanyard can be worn around the neck, and the belt clip can be attached to clothing or a backpack.
5. Operating Instructions
5.1 Power On/Off
To turn the walkie talkie ON, press and hold the Switch Button until the LED display illuminates and you hear a power-on tone. To turn it OFF, press and hold the Switch Button again until the display turns off.
5.2 Adjusting Volume
Press the Volume + button to increase the speaker volume. Press the Volume - button to decrease the speaker volume. The current volume level will be shown on the LED display.
5.3 Selecting a Channel
Your GOCOM GO100 Walkie Talkies have 9 available channels. To communicate, both walkie talkies must be set to the same channel.
- Press the CH+ button to cycle through channels upwards.
- Press the CH- button to cycle through channels downwards.
- Once you reach the desired channel, stop pressing the button. The channel will be set automatically.
5.4 Transmitting and Receiving
To speak to another walkie talkie:
- Ensure both walkie talkies are on the same channel.
- Press and hold the Talk Button (PTT).
- Speak clearly into the microphone, holding the walkie talkie a few inches from your mouth.
- Release the Talk Button (PTT) to listen for a response.
To receive a message, simply ensure your walkie talkie is on the correct channel and the volume is adjusted appropriately. You do not need to press any buttons to receive.
5.5 Keypad Lock Function
The GOCOM GO100 features a keypad lock to prevent accidental channel changes or button presses. To activate the keypad lock, press and hold the Volume - button for a few seconds until a lock icon appears on the display. To unlock, press and hold the Volume - button again.
Video: Demonstration of turning on the walkie talkie, changing channels, and using the keypad lock function. (Clip from 0:00 to 1:56)
5.6 Call Tone
To send a call tone to another walkie talkie on the same channel, briefly press the CH- button. This will send an audible alert to the receiving unit.
5.7 Energy Saving Function
The walkie talkies are equipped with an energy-saving feature. If there is no operation for 1.5 hours, the device will automatically shut down to conserve battery life. The keypad also locks after 10 seconds of inactivity to prevent misoperation.

Image: Illustration of the energy-saving features, including automatic keyboard lock and shutdown.
6. Maintenance
- Clean the walkie talkies with a soft, damp cloth. Do not use abrasive cleaners or solvents.
- The device is Not Water Resistant. Avoid exposure to water, rain, or excessive moisture. It is splash-proof but not designed for submersion or heavy water exposure.
- If the walkie talkies will not be used for an extended period, remove the batteries to prevent leakage and damage.
- Store the walkie talkies in a cool, dry place away from direct sunlight and extreme temperatures.

Image: Visual reminder that the walkie talkies are splash-proof but not fully waterproof.
7. Troubleshooting
| Problem | Possible Cause | Solution |
|---|---|---|
| No power | Batteries are dead or incorrectly installed. | Replace batteries with new AAA batteries, ensuring correct polarity. |
| Cannot communicate with other walkie talkie | Different channels selected. Out of range. | Ensure both walkie talkies are on the same channel. Move closer to the other unit. |
| Poor sound quality / Static | Weak battery. Out of range. Obstructions (buildings, hills). | Replace batteries. Move closer. Find a clearer line of sight. |
| Keypad is unresponsive | Keypad lock is activated. | Press and hold the Volume - button to unlock the keypad. |
8. Specifications
| Feature | Detail |
|---|---|
| Model Number | GO100 |
| Product Dimensions | 5.51 x 2.09 x 1.42 inches |
| Item Weight | 3.17 ounces (0.09 Kilograms) |
| Batteries Required | 3 x AAA batteries (not included) |
| Number of Channels | 9 |
| Special Feature | Keypad Lock |
| Voltage | 3.7 Volts |
| Water Resistance Level | Not Water Resistant (Splash-proof only) |
| Noise Level | 35 Decibels |

Image: Illustrates the effective communication range in various environments.
9. Safety Information
- Battery Safety: Always use the correct type of batteries. Do not mix old and new batteries, or different types of batteries. Remove batteries if the device is not used for long periods. Keep batteries out of reach of small children.
- Choking Hazard: Small parts like the screwdriver, lanyards, and belt clips could be a choking hazard for very young children. Adult supervision is recommended.
- Water Exposure: This device is not waterproof. Avoid exposing it to heavy rain, submersion in water, or other liquids to prevent damage.
- Antenna Care: Do not bend or break the antenna.
- Hearing Protection: Do not hold the speaker too close to the ear when the volume is high to prevent potential hearing damage.
- Interference: Like all radio devices, these walkie talkies may experience interference from other electronic devices or strong radio signals.
10. Warranty and Support
For warranty information, technical support, or customer service inquiries, please refer to the contact information provided on the product packaging or visit the official GOCOM website. This manual does not contain specific warranty details or support contact information.


