
Introduction
Thank you for choosing the GUTINNEEN Cat Enclosure, Model AIR22. This manual provides essential information for the safe assembly, operation, and maintenance of your new catio. Please read these instructions thoroughly before beginning assembly and retain them for future reference.
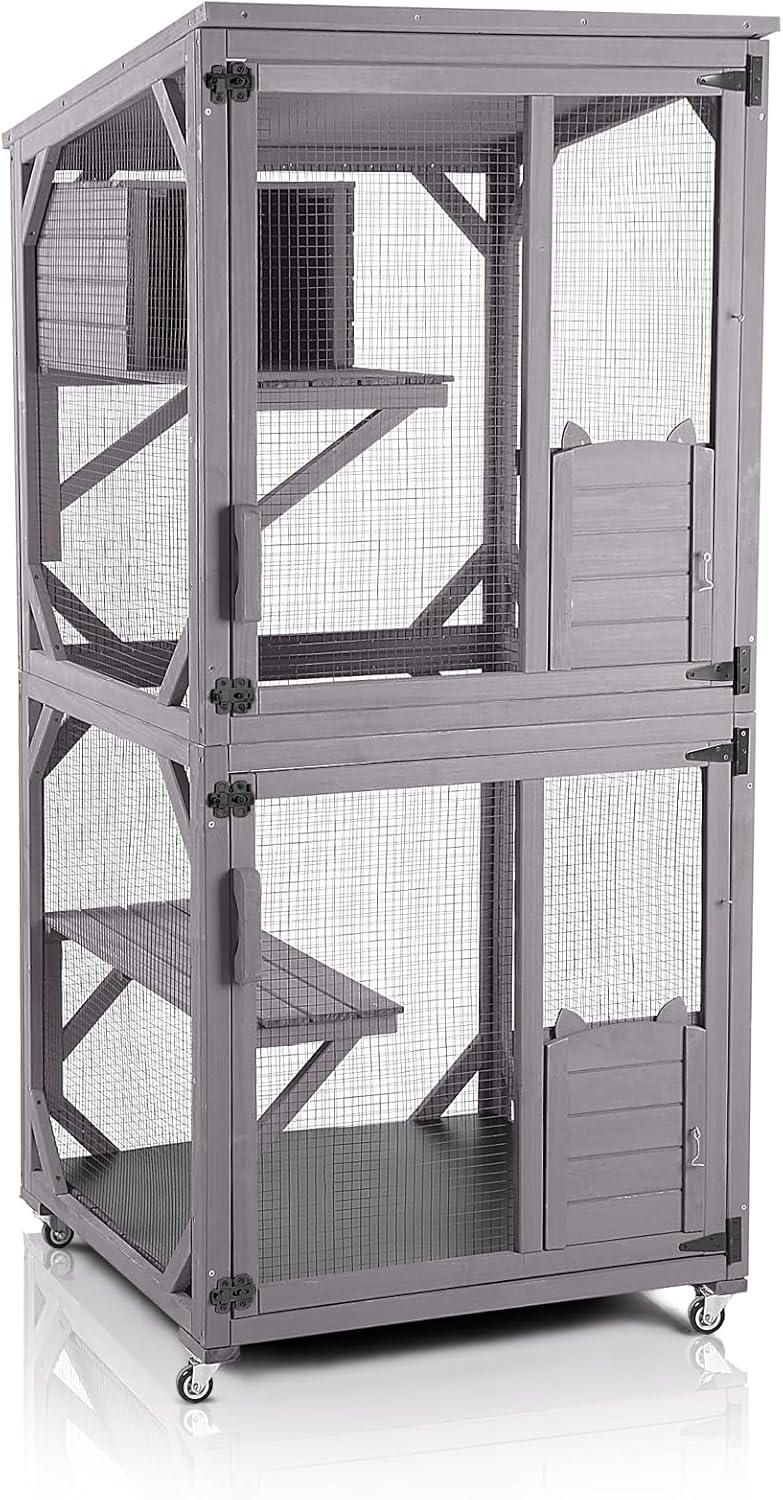
This image displays the complete GUTINNEEN Cat Enclosure, Model AIR22, showcasing its multi-tiered design, gray wooden frame, and wire mesh panels. It features a resting box and multiple platforms.
Safety Information
- Always ensure all screws and fasteners are securely tightened before allowing pets into the enclosure.
- Regularly inspect the enclosure for any signs of wear, damage, or loose components. Address any issues immediately.
- Do not overload the platforms. The enclosure is designed for 2-4 cats or small pets.
- Position the enclosure on a flat, stable surface to prevent tipping.
- Keep small children away from the enclosure during assembly to prevent injury from small parts.
- This product is intended for pet use only.
Package Contents
Verify that all components are present and undamaged before beginning assembly. Refer to the parts list provided in your packaging for specific item identification.
Typical components include:
- Wooden frame panels (various sizes)
- Wire mesh panels
- Platforms/shelves
- Resting box components
- Roof panels (asphalt-covered)
- Access doors and latches
- Removable PVC bottom layer
- Casters (wheels), including brake casters
- Hardware pack (screws, bolts, etc.)
- Assembly tools (basic wrench/screwdriver may be included, but an electric screwdriver is recommended)
Assembly Instructions
Assembly typically requires 1-2 persons and approximately 60 minutes. An electric screwdriver is recommended for quicker installation. Follow the numbered steps carefully.

This visual guide provides a simplified overview of the assembly process for the cat enclosure, detailing 19 steps. It suggests an estimated assembly time of 60 minutes with 1-2 people, recommending gloves and an electric screwdriver for efficiency.
- Unpack and Identify Parts: Carefully unpack all components and lay them out. Refer to the included parts list and diagrams to identify each piece. Note that some wooden pieces may have faint or smudged markings; cross-reference with the diagrams.
- Assemble Base Frame: Begin by connecting the base wooden panels. Ensure correct orientation as per the diagrams to accommodate the PVC layer and casters.
- Attach Casters: Secure the four casters to the bottom of the base frame. Ensure the two brake casters are positioned where they can be easily accessed for locking.
- Install Side and Back Panels: Attach the side and back wire mesh and wooden panels to the base frame.
- Insert PVC Bottom Layer: Place the removable PVC layer onto the bottom of the enclosure.
- Assemble Internal Platforms: Install the various platforms and the resting box according to the diagrams, ensuring they are level and securely fastened.
- Attach Access Doors: Secure the access doors with their hinges and latches. Ensure they open and close smoothly and latch securely.
- Install Roof: Attach the waterproof asphalt roof panels to the top frame. Ensure all screws are tightly secured to prevent displacement in windy conditions.
- Final Check: Once assembled, double-check all connections and fasteners to ensure the enclosure is stable and secure.
Connecting to a Window
The GUTINNEEN Cat Enclosure features a removable back door and a rotatable upper section to connect to a window, allowing your cat safe access to the outdoors.

This diagram demonstrates the unique feature of the catio, allowing its upper section to be rotated 180 degrees for secure connection to a house window, providing cats with outdoor access.
- Position the enclosure near a suitable window.
- Remove the designated back door panel from the upper section of the enclosure.
- Rotate the upper part of the cat house 180 degrees to align with the window opening.
- Secure the enclosure to the window frame or adjacent wall if possible, using appropriate hardware (not included) for added stability and security.
Combining Multiple Units
For a larger activity space, two GUTINNEEN Cat Enclosure units can be combined by removing a side panel from each.

This image demonstrates the modular design of the catio, where two units can be combined by removing a side panel from each, creating an expanded living space for multiple cats. A cat is shown enjoying the combined space.
- Assemble two units separately as per the standard instructions.
- Identify the side panels on each unit that will face each other when combined.
- Carefully remove these designated side panels from both units.
- Align the open sides of the two units and securely fasten them together using appropriate hardware (not included) to create a stable, continuous enclosure.
Operating Instructions
Moving the Enclosure
The enclosure is equipped with removable casters (wheels) for easy repositioning. Two of these casters have brakes for stability.

This image highlights the practical design elements of the catio, including a removable PVC layer at the bottom for simplified cleaning and robust 360-degree rotating casters, two of which are equipped with brakes for stability and easy repositioning.
- To move: Unlock the brake casters by flipping the lever. Gently push the enclosure to its desired location.
- To secure: Once in position, lock the brake casters to prevent unintended movement.
Accessing the Interior
The enclosure features multiple access doors for easy interaction with your pets and for cleaning.
- Use the latches to open and close the doors securely.
- Always ensure doors are properly latched when pets are inside to prevent escape.
Spacious Interior
The multi-tier design with platforms provides ample space for cats to climb, rest, and play.

An internal view of the cat enclosure, illustrating its spacious multi-tier design with three platforms, suitable for 2-3 cats. Key dimensions are indicated as 31.5 inches length, 31.5 inches width, and 70.9 inches height.
Product Videos
This video provides a comprehensive overview of the GUTINNEEN Outdoor Cat House, showcasing its various features, design, and how cats interact with the enclosure in an outdoor setting.
This video highlights the GUTINNEEN Catio Model AIR22, demonstrating its structure, spacious interior, and how it functions as a safe outdoor space for cats.
Maintenance
Cleaning
- The removable PVC bottom layer can be easily taken out for cleaning. Wipe it with a damp cloth and mild detergent, then rinse and dry thoroughly before returning it to the enclosure.
- Wipe down wooden surfaces with a damp cloth. Avoid harsh chemicals that could be harmful to pets.
- Clean wire mesh panels with a brush or damp cloth to remove dirt and debris.
Weather Protection
The enclosure features a waterproof asphalt roof designed to protect against rain.

This image focuses on the waterproof asphalt roof of the cat enclosure, emphasizing its durability and ability to protect the interior from adverse weather conditions. A cat is visible inside, sheltered by the roof.
- Periodically check the asphalt roof for any damage or lifting, especially after strong winds or heavy rain. Repair as needed to maintain waterproofing.
- While the wood is treated, applying an additional pet-safe sealant or stain annually can extend the life of the wood, especially in harsh outdoor conditions.
- In extreme weather conditions (e.g., hurricanes, blizzards), consider moving the enclosure to a more sheltered location or securing it to the ground to prevent damage.
Troubleshooting
| Problem | Possible Cause | Solution |
|---|---|---|
| Difficulty during assembly | Faint or smudged part markings; incorrect orientation of panels. | Carefully review the assembly diagrams. Ensure all panels are oriented correctly before tightening screws. An electric screwdriver can ease the process. |
| Enclosure feels unstable or wobbly | Loose screws; uneven ground; casters not locked. | Tighten all screws. Ensure the enclosure is placed on a level surface. Lock the brake casters. For outdoor use, consider anchoring the enclosure to the ground. |
| Doors do not close or latch properly | Misaligned hinges; bent latch components. | Adjust hinges if possible. Ensure no debris is obstructing the latch mechanism. If components are bent, contact customer support for replacements. |
| Water leakage from roof | Damaged asphalt roof; improper installation of roof panels. | Inspect the roof for cracks or gaps. Ensure roof panels are securely fastened and overlapping correctly. Apply a waterproof sealant if minor damage is found. |
Specifications
- Model: AIR22
- Product Dimensions (L x W x H): 31.5" x 31.5" x 70.9"
- Material: Fir Wood, PVC, Wire Mesh, Asphalt Roof
- Color: Gray
- Item Weight: 64.5 Pounds
- Number of Levels: 3
- Number of Doors: 4
- Special Features: Removable Wheels (2 with brakes), Removable PVC Bottom Layer, Window Connection Capability, Expandable Design
- Recommended Species: Cat
- Recommended Breed Size: Large Breeds
- Usage: Indoor, Outdoor
Warranty & Support
GUTINNEEN offers a 6-month warranty on this product, covering manufacturing defects from the date of purchase. Additionally, we provide 12-month quality support.
If you have any questions, require assistance with assembly, or encounter any issues with your GUTINNEEN Cat Enclosure, please do not hesitate to contact our experienced customer support team. We are committed to responding within 24 hours to ensure your satisfaction.
Please refer to your purchase documentation for specific contact details or visit the official GUTINNEEN website for support information.