
1. Introduction
The ROFAVEZCO EZ-SP12HVC is a 4K HDMI video capture device designed to support 4K60 UHD audio/video loop output and capture audio/video from an HDMI source. It facilitates transferring video between the capture device and your PC/notebook via USB3.0, enabling users to capture sound and movement. This device ensures stable video capture in FHD 1080P@60 fps without significantly impacting computer performance.
2. Product Overview
2.1 Key Features
- Supports HDMI 2.0 4K 60Hz 4:4:4 input and 4K 60Hz Pass-through.
- USB 3.0 capture card with HDMI loop-out and downscaling from 4K to 1080P.
- Captures 4K input at 1080p 60fps via USB 3.0 stream.
- Features UVC1.0 compliance and HDMI EDID Setting.
- HDMI Down-scaler via DIP switch for flexible resolution management.
- Compatible with Windows 7/8.1/10, Mac, and Linux OS.
- Plug and Play functionality, no driver installation required.
- Low power consumption (DC 5V).
- Built-in ESD Protection: +/- 8kV (Air-gap discharge) +/- 4kV (contact discharge).
2.2 Package Contents
Verify that all items are present in your package:
- ROFAVEZCO EZ-SP12HVC Video Capture Device
- USB 3.0 Cable
- AV Adapter
- TF Card Reader (Note: This may be an error in the product listing as the device does not have a TF card slot. Please disregard if not included.)
- Mounting Hardware (brackets and screws)
- Cable Ties

3. Setup
Follow these steps to set up your ROFAVEZCO EZ-SP12HVC video capture device:
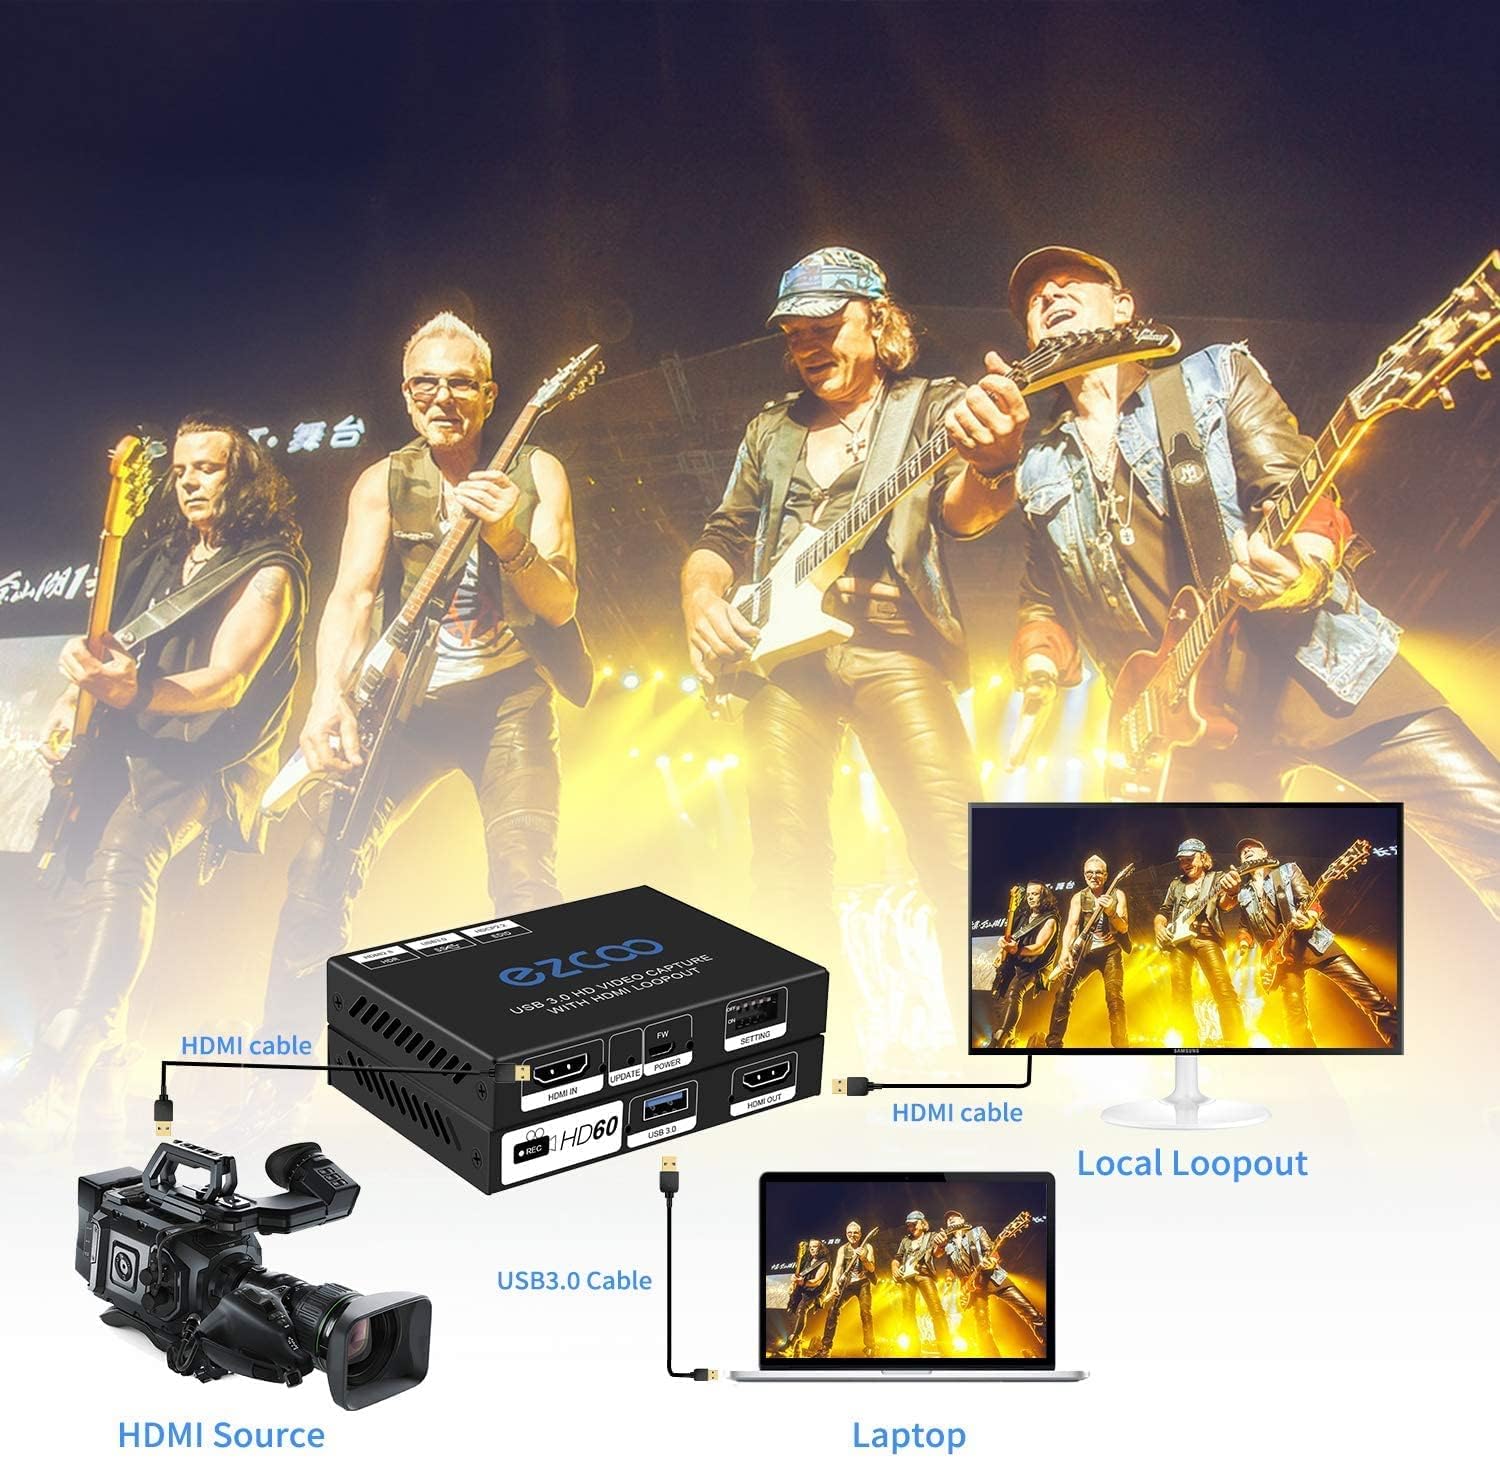
- Connect HDMI Input: Connect your HDMI source (e.g., game console, camera, PC) to the HDMI IN port on the capture device using an HDMI cable.
- Connect HDMI Output (Loopout): Connect an HDMI display (e.g., TV, monitor) to the HDMI OUT port on the capture device using an HDMI cable. This provides a pass-through signal for real-time viewing.
- Connect to Computer: Connect the capture device to your computer's USB 3.0 port using the provided USB 3.0 cable. The device will be recognized as a UVC (USB Video Class) device, requiring no additional drivers.
- Power Connection: The device is typically powered via the USB 3.0 connection. If additional power is needed, connect a Micro USB cable to the POWER port and a 5V DC power source.

4. Operation
Once connected, the EZ-SP12HVC operates as a standard UVC device. You can use various third-party software for video capture and streaming.
4.1 Using with Capture Software
Popular software like OBS Studio, AMCap, or other UVC-compatible applications can be used. Follow the software's instructions to select the EZ-SP12HVC as your video and audio input device.
- Video Input: Select the EZ-SP12HVC as your video capture device.
- Audio Input: Select the EZ-SP12HVC's audio input for embedded HDMI audio. Ensure your software is configured to record at 48kHz for optimal audio quality.
- Resolution and Frame Rate: Configure your software to capture at 1080p 60fps for best results. The device supports downscaling from 4K input to 1080p capture.

4.2 DIP Switch Settings
The device features a DIP switch for advanced configuration. The switches control HDCP, downscaling, and EDID settings. Refer to the diagram below and the markings on the device for specific configurations.

The DIP switches are typically numbered 1 to 4 or 1 to 5 (depending on the specific model, though the diagram shows 4). Each switch can be set to 'ON' or 'OFF'. The three control areas (HDCP, Downscaling, EDID combination) are independent.
- HDCP Control: Allows for stripping HDCP. If you encounter HDCP issues, set the relevant switch to 'TEST' mode as indicated on the device or in the manual.
- Downscaling: Enable this switch to downscale 4K input to 1080p for capture.
- EDID Settings: Configure EDID (Extended Display Identification Data) to ensure compatibility with your source and display. Options include learning EDID from the HDMI OUT, or specific presets like 4K@60Hz 4:2:0, 4K@60Hz 4:4:4, and 1080P@60Hz 2CH_3D_HDR.
Always consult the markings on the bottom of your device for the precise function of each DIP switch.
5. System Requirements
To ensure optimal performance, your computer should meet or exceed the following specifications:
- Operating System: Microsoft Windows 7/8.1/10, OS X (10.13 and above), Linux (2.6.38 and above)
- CPU: i3 Dual Core 2.8GHz or higher (Recommended PC: Intel Core i5-4440 3.10GHz + NVIDIA GeForce GTX 660 or higher; Laptop: Intel Core i7-4810MQ + NVIDIA GeForce GTX 870M or higher)
- RAM: 2GB or higher
- USB Port: USB 3.0 port (for full functionality and speed)
6. Troubleshooting
If you encounter issues with your EZ-SP12HVC, refer to the following common problems and solutions:
- No Video Output/Capture:
- Ensure all HDMI and USB cables are securely connected.
- Verify the HDMI source is active and outputting a signal.
- Check DIP switch settings, especially for HDCP. If experiencing HDCP issues, try setting the EDID to 'TEST' mode.
- Confirm your capture software is correctly configured to select the EZ-SP12HVC as the video input.
- No Audio or Poor Audio Quality:
- Ensure the EZ-SP12HVC's audio input is selected in your capture software.
- Verify the audio settings in your software are set to 48kHz.
- Check the audio output settings on your HDMI source.
- If using a front USB port on your PC, try a rear USB 3.0 port, as some front ports may have insufficient power or bandwidth, potentially causing audio stutter.
- Choppy Video or Lag:
- Ensure your computer meets the recommended system requirements, especially CPU and GPU.
- Confirm the device is connected to a USB 3.0 port. USB 2.0 ports will not provide sufficient bandwidth.
- Close unnecessary applications running in the background to free up system resources.
- If using a USB hub, try connecting the device directly to the computer's USB 3.0 port.
- Device Runs Warm:
- It is normal for the device to become warm during operation. Ensure it has adequate ventilation and is not covered.
- Compatibility Issues with Specific Software (e.g., Microsoft Teams):
- Some applications may have specific requirements or limitations. Check the application's settings for video input and resolution options.
7. Specifications
| Feature | Detail |
|---|---|
| Model Name | EZ-SP12HVC |
| Input Interface | 1x HDMI Input (4096x2160p, 3840x2160p, 1920x1080p, 1280x720p) |
| Output Interface | 1x HDMI Loop-through Out (Up to 4K 60Hz), 1x USB3.0 UVC Video Audio (Up to 1080p 60Hz) |
| Hardware Interface | USB 3.0 |
| Video Capture Resolution | 1080p |
| Operating System Compatibility | Linux, Windows, OS X |
| Compatible Devices | Personal Computer, Game Consoles (PS3, PS4, Xbox One, Xbox 360, Wii U, Wii) |
| Power Source Type | DC 5V (via USB 3.0 or optional Micro USB) |
| Material Type | Metal |
| Product Dimensions | 10.2 x 7.3 x 1.7 cm |
| Item Weight | 200 g |
8. Firmware Upgrade
The device includes an 'UPDATE' port (often labeled 'FW') for firmware upgrades. Firmware updates can provide performance enhancements, bug fixes, or new features. To perform a firmware upgrade:
- Visit the official ROFAVEZCO or EZCOO website to check for available firmware updates for the EZ-SP12HVC model.
- Download the firmware file and any accompanying upgrade tools or instructions.
- Connect your computer to the 'UPDATE' or 'FW' port on the device using a suitable cable (usually Micro USB).
- Follow the specific instructions provided with the firmware download carefully. Incorrect firmware installation can damage the device.
9. Warranty and Support
For technical support, warranty information, or any questions not covered in this manual, please contact the seller or manufacturer directly. You can typically find contact information on the product's purchase page or the manufacturer's official website.
When contacting support, please provide your product model (EZ-SP12HVC) and a detailed description of the issue you are experiencing.