
Introduction
This manual provides essential instructions for the safe and effective operation of your TIGERKING 3.7 Cu Ft Large Home Safe. Please read all instructions carefully before use and retain this manual for future reference. This safe is designed to protect your valuables with its robust steel construction, digital keypad, and dual alarm system.

Image: The TIGERKING 3.7 Cu Ft Home Safe with its door open, displaying the internal dimensions, the small lock box, and the removable shelf. The exterior dimensions are also indicated.
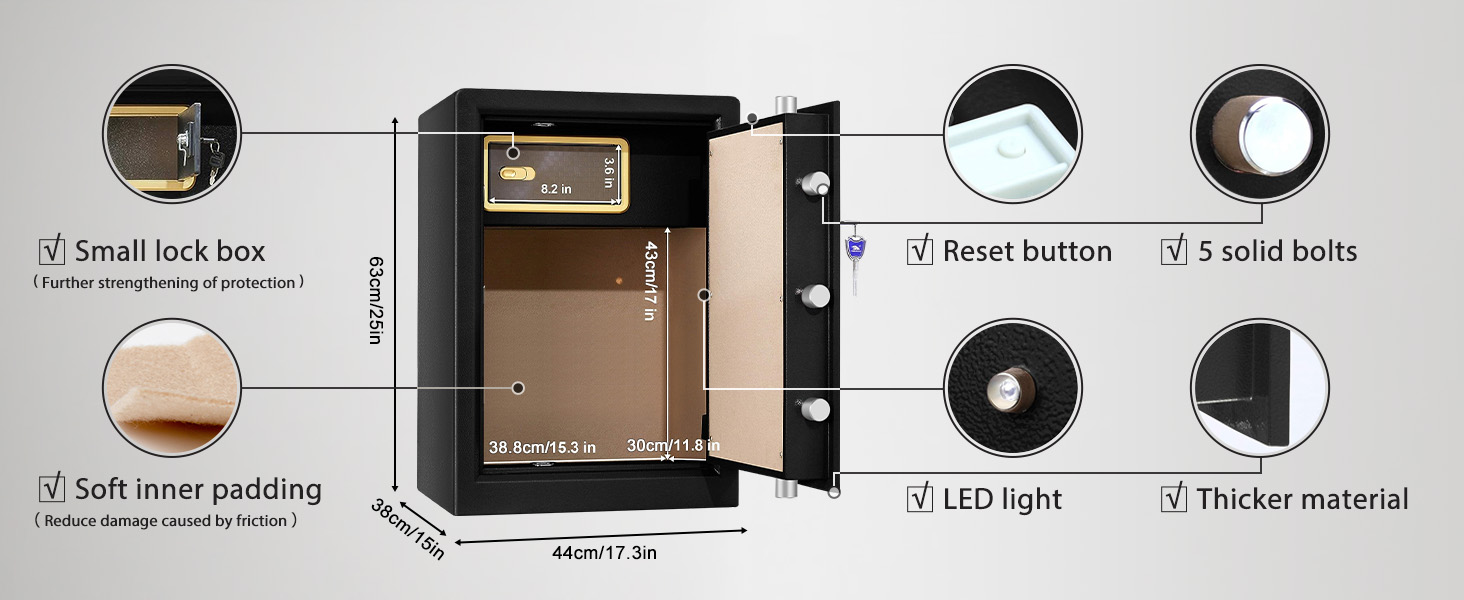
Image: A detailed diagram illustrating the internal and external dimensions of the TIGERKING safe, including the small lock box, soft inner padding, reset button, solid bolts, LED light, and thicker material.
Setup
1. Initial Opening
Upon receiving your safe, you will need to open it for the first time using the master key and an emergency key. The master key is a blue key, and the emergency key is a black key.
- Insert the master key into the keyhole on the left side of the digital keypad.
- Insert the emergency key into the emergency keyhole on the right side of the digital keypad.
- Turn both keys simultaneously to unlock the safe.
- Rotate the handle to open the safe door.
Video: Instructions on how to open the safe for the first time using the master key and emergency key.

Image: A visual guide illustrating the two primary methods for opening the safe: Master Key + Personal Code, and Master Key + Emergency Key.
2. Battery Installation
The safe requires 4 AA batteries (not included) for the digital keypad to function. The battery compartment is located inside the safe door.
- Open the safe door.
- Locate the battery compartment cover on the inside of the door.
- Remove the cover and insert 4 AA batteries, ensuring correct polarity.
- Replace the battery compartment cover.
Video: Demonstrates how to install batteries and open the safe with a dead battery using the external battery box.
3. Setting User Code
You can program a personal code of 1-8 digits for daily access.
- With the safe door open, press the red reset button located inside the safe (usually near the hinge or battery compartment). The keypad will beep, and the display will show "SET".
- Enter your desired 1-8 digit code on the keypad.
- Press the "#" key to confirm. The display will show "GOOD" to indicate successful programming.
Video: A step-by-step guide on how to set up your personal code for the safe.
Video: Instructions on how to set up the user code for the safe's digital keypad.
4. Setting Date and Time
The safe's digital display can show the current date and time.
- Press the "*" key followed by "0" on the keypad.
- Enter the current year (YYYY), month (MM), day (DD), hour (HH), and minute (MM).
- Press the "#" key to confirm.
Video: A guide on how to set the date and time on the safe's digital display.
5. Dual Alarm System Setup
The safe features a dual alarm system that activates under specific conditions.
- The alarm will sound for 60 seconds if three incorrect entries are made consecutively.
- A violent vibration or impact can also activate the alarm system.
- To disable the alarm, enter the correct code or use the master key.
Video: Instructions on how to set up and understand the dual alarm system.

Image: An illustration demonstrating the dual alarm system, which triggers upon severe vibration or three incorrect password entries.
6. Mounting the Safe
The safe can be securely fixed to a wall using the pre-drilled holes and expansion bolts provided.
- Choose a suitable location for installation.
- Mark the drilling points through the pre-drilled holes at the back of the safe.
- Drill holes in the wall at the marked points.
- Insert the expansion bolts into the drilled holes.
- Align the safe with the bolts and tighten them securely.

Image: A three-step diagram showing how to install the safe by fixing it to a wall using expansion bolts.
Operating Instructions
1. Opening with Master Key + Personal Code
This is the standard method for opening the safe after you have set your personal code.
- Insert the master key into the keyhole on the left side of the digital keypad.
- Enter your 1-8 digit personal code on the keypad.
- Press the "#" key to confirm. The display will show "OPEN".
- Turn the master key and rotate the handle to open the safe door.
Video: Demonstrates how to use the master key and personal code to open the safe.
2. Secure Display Feature
To prevent others from seeing your code as you enter it, activate the secure display feature.
- Dial "*" before entering your personal code.
- Enter your personal code. The digits will not be shown on the screen.
- Press "#" to confirm and open the safe.
3. Using the Removable Shelf and Lock Box
The safe includes a removable shelf and an internal lock box for organized storage.
- The removable shelf can be adjusted up or down to accommodate items of various sizes. Simply lift and reposition the shelf on the desired supports.
- The interior lock box provides an additional layer of security for smaller, highly valuable items. It has its own key for access.

Image: The safe's interior demonstrating the flexibility of the removable shelf, shown both with and without items, to accommodate different storage needs.

Image: A side-by-side comparison showing the safe's interior with the removable shelf installed and removed, highlighting its adaptability for storing various items.
Maintenance
1. Battery Replacement
Replace the batteries annually or when the low battery indicator appears on the display to ensure continuous operation of the digital keypad. Always use high-quality AA alkaline batteries.
2. Key Management
Store your master keys and emergency keys in a secure location away from the safe. Do not store them inside the safe itself. It is recommended to keep emergency keys off-site.
3. Cleaning
Clean the exterior of the safe with a soft, damp cloth. Avoid using abrasive cleaners or solvents that could damage the finish.
Troubleshooting
| Problem | Possible Cause | Solution |
|---|---|---|
| Safe does not open with code. | Incorrect code entered; batteries are low or dead. | Re-enter the correct code. Replace batteries. If batteries are dead, use the external battery box or emergency key. |
| Keypad is unresponsive. | Dead batteries. | Connect the external battery box to the port on the keypad and try again, or use the emergency key. |
| Alarm sounds unexpectedly. | Three incorrect code entries; violent vibration detected. | Enter the correct code or use the master key to disarm the alarm. Avoid strong impacts to the safe. |
| Safe door does not close properly. | Obstruction in the door frame; bolts are not fully retracted. | Check for any obstructions. Ensure the handle is fully rotated to retract the bolts before closing. |
Video: Demonstrates how to open the safe if the batteries are dead, using the external battery box.
Specifications
| Feature | Detail |
|---|---|
| Brand | TIGERKING |
| Model Number | 63XH-1(B) |
| Exterior Dimensions (D x W x H) | 15"D x 17.3"W x 25"H |
| Interior Dimensions (D x W x H) | 11.8"D x 17"W x 20.8"H |
| Capacity | 3.7 cubic feet |
| Weight | Approximately 66 lbs |
| Material | Alloy Steel |
| Lock Type | Electronic Combination Lock, Key |
| Special Features | Alarm System, Anti-Theft, Combination Lock, Removable Shelf, Sensor Light |
| Mounting Type | Wall Mount |
| Included Components | 2 x Blue Master Key, 2 x Emergency Keys, 2 x Expansion Bolts, Battery Box, User Manual |
| Alarm | Vibration |
| Water Resistance Level | Not Water Resistant |

Image: A detailed view highlighting the safe's construction, including the 0.4-inch solid steel door plate, five 1-inch diameter solid live bolts, the reset button in the inner battery compartment, and an LED light.

Image: A visual comparison illustrating that the TIGERKING safe weighs up to 70 pounds, making it difficult to move easily, compared to lighter alternatives.
Warranty and Support
Warranty Information
TIGERKING provides a one-year warranty for this safe. This warranty covers manufacturing defects and ensures free return and exchange policy within the warranty period.
Customer Service
For any questions, issues, or support needs, TIGERKING offers 24-hour online customer service. Please refer to the contact information provided in the packaging or on the official TIGERKING website for assistance.