1. Introduction
This manual provides essential information for the safe and effective installation, operation, and maintenance of the Trane TWE036C140B0 OEM Time Delay Relay. This component is designed for use in compatible American Standard and Trane HVAC systems. Please read this manual thoroughly before proceeding with any installation or service.
2. Safety Information
WARNING: Electrical shock hazard. Disconnect all power to the unit before installing or servicing this component. Installation and service should only be performed by a qualified HVAC technician.
- Always wear appropriate personal protective equipment (PPE) when working with electrical components.
- Ensure the power supply matches the relay's specifications (24 VAC coil voltage).
- Verify all connections are secure and correct before restoring power.
- Do not bypass any safety devices.
3. Product Overview
The Trane TWE036C140B0 is an Original Equipment Manufacturer (OEM) time delay relay, including a PC board, designed for specific American Standard and Trane HVAC applications. It features a 2-second on-delay function, crucial for controlling various system operations such as fan motor activation.

Figure 1: Top-down view of the Trane TWE036C140B0 Time Delay Relay, showing the black relay housing, green circuit board, and metal mounting bracket.
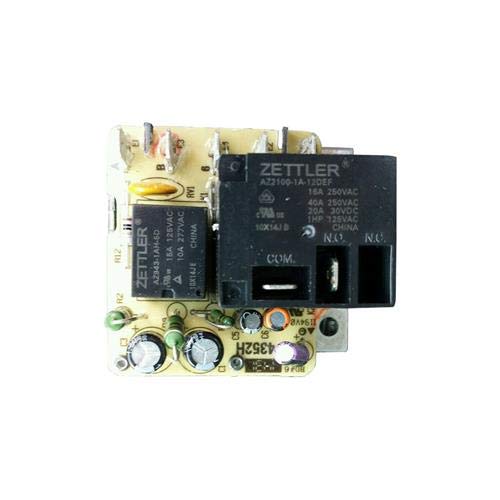
Figure 2: Close-up view of a compatible Zettler relay (AZ2100-1A-12DEF) mounted on a circuit board, illustrating the component's design.
This relay is a critical component for ensuring proper sequencing and protection within the HVAC system. It is compatible with various Trane and American Standard units, and also serves as a replacement for several other relay models (e.g., AZ2100-1A-12DEF, RLY1169, RLY02807).

Figure 3: An image indicating the product is an Official Trane OEM Component, ensuring quality and compatibility.
4. Setup and Installation
Installation of the TWE036C140B0 time delay relay requires knowledge of HVAC electrical systems. It is strongly recommended that a certified HVAC technician performs the installation.
4.1 Pre-Installation Steps
- Disconnect Power: Turn off all electrical power to the HVAC unit at the main breaker or disconnect switch. Verify power is off using a multimeter.
- Access Component: Locate and open the control panel or access area where the existing relay is installed.
- Document Connections: Take clear photos or make a detailed diagram of the wiring connections to the existing relay before removal. Note the position and color of each wire.
- Verify Compatibility: Confirm that the new TWE036C140B0 relay is the correct replacement part for your specific HVAC system model. Refer to your system's service manual or consult a Trane representative.
4.2 Installation Procedure
- Remove Old Relay: Carefully disconnect all wires from the old relay. Unmount the old relay from its position.
- Mount New Relay: Securely mount the new TWE036C140B0 relay in the same location as the old one, ensuring it is stable.
- Connect Wiring: Reconnect the wires to the new relay according to your documented connections. Ensure each wire is firmly attached to the correct terminal.
- Inspect Connections: Double-check all wiring for correctness and security. Ensure no bare wires are exposed or touching other terminals.
- Close Access Panel: Securely close any access panels or control boxes.
4.3 Post-Installation
- Restore Power: Restore electrical power to the HVAC unit.
- Test Operation: Initiate a call for heating or cooling to observe the system's operation. Verify that the time delay function operates as expected (e.g., fan motor starts after a 2-second delay).
- Monitor System: Listen for any unusual noises and observe the system's performance for a short period to ensure stable operation.
5. Operating Instructions
The Trane TWE036C140B0 time delay relay operates automatically within the HVAC system. Its primary function is to introduce a precise 2-second 'on-delay' in the activation of a controlled component, typically a fan motor. This delay helps prevent short-cycling, reduces electrical stress on components, and ensures proper system sequencing.
- When the HVAC system's control board sends a signal to activate the component connected to this relay, the relay will wait for approximately 2 seconds before closing its contacts and allowing power to flow.
- This delay is factory-set and does not require user adjustment.
- The relay functions as an intermediary switch, responding to low-voltage control signals (24 VAC) to manage higher voltage loads (up to 240 VAC).
6. Maintenance
The Trane TWE036C140B0 time delay relay is a sealed electronic component and generally requires no routine maintenance. However, periodic inspection of the relay and its connections during regular HVAC system servicing is recommended.
- Visual Inspection: During annual HVAC maintenance, visually inspect the relay for any signs of physical damage, discoloration from overheating, or loose connections.
- Connection Integrity: Ensure all wire connections to the relay terminals remain tight and free from corrosion.
- Environmental Conditions: Ensure the relay is not exposed to excessive moisture, dust, or extreme temperatures beyond its operating limits, which could shorten its lifespan.
If any issues are observed, consult a qualified HVAC technician for diagnosis and potential replacement.
7. Troubleshooting
If your HVAC system is experiencing issues related to component activation or timing, the time delay relay might be a factor. Always ensure power is disconnected before inspecting components.
Common Symptoms of a Faulty Time Delay Relay:
- Component Not Activating: If a fan motor or other controlled component fails to turn on when commanded, and other controls are functioning, the relay may be faulty.
- Component Activating Immediately: If a component that should have a delay (e.g., fan) turns on instantly without the expected 2-second delay, the relay's time delay function may have failed.
- Intermittent Operation: The controlled component turns on and off erratically.
- No Click Sound: A functioning relay typically makes an audible 'click' when it energizes. If no click is heard when the control signal is applied, the relay may not be receiving power or may be internally faulty.
Troubleshooting Steps (for Qualified Technicians):
- Verify Control Voltage: Check for 24 VAC at the relay's coil terminals when the system calls for the component to activate.
- Check Load Voltage: With power disconnected, check the continuity across the relay's power contacts. With power restored and the relay energized, check for voltage across the load terminals after the delay.
- Inspect for Damage: Look for any visible signs of burning, melting, or corrosion on the relay or its terminals.
If the relay is determined to be faulty, it must be replaced with an identical or compatible OEM part. Do not attempt to repair a damaged relay.
8. Specifications
| Specification | Value |
|---|---|
| Model Number | TWE036C140B0 (also TRANE_RLY02807_ver12) |
| Brand | Trane / American Standard OEM |
| Type | Time Delay Relay (includes PC board) |
| Time Delay | 2 Seconds (On-Delay) |
| Power Pole Rating | 7 FLA, 36 RLA at 240VAC |
| Pilot Pole Rating | 25 VA at 24 VAC |
| Coil Voltage | 24 Volts AC |
| Current Rating | 36 Amps |
| Contact Type | Normally Open |
| Connector Type | Through Hole |
| Mounting Type | PCB Mount |
| Operation Mode | Automatic |
| Wattage | 36 watts |
| Item Weight | 13 ounces |
9. Warranty and Support
As an OEM component, the Trane TWE036C140B0 time delay relay is typically covered by the warranty terms of the original HVAC system or the specific warranty provided by the seller at the time of purchase. Please retain your proof of purchase.
- For warranty claims or technical support, please contact the authorized Trane dealer or the seller from whom you purchased this component.
- Always provide the model number (TWE036C140B0) and the serial number of your HVAC unit when seeking support.


