GTMEDIA V7 Pro User Manual
DVB-S/S2/S2X + DVB-T/T2 Combo Receiver
1. Introduction
Thank you for choosing the GTMEDIA V7 Pro Combo Receiver. This device is designed to provide high-definition digital television reception from both satellite (DVB-S/S2/S2X) and terrestrial (DVB-T/T2) sources. It supports HEVC main 10 (10-bit) decoding, features a card reader for compatible TV cards, and includes a USB WiFi antenna for network connectivity. This manual will guide you through the setup, operation, and troubleshooting of your new receiver.
Please read this manual carefully before operating the device and keep it for future reference.
2. Safety Information
- Ensure the power supply voltage matches the requirements specified on the device.
- Do not expose the receiver to rain or moisture to prevent fire or electric shock.
- Do not block ventilation openings. Ensure adequate space around the device for proper airflow.
- Do not open the casing. Refer all servicing to qualified personnel.
- Disconnect the power plug from the wall outlet if the device will not be used for a long period.
- Avoid placing the device near heat sources or in direct sunlight.
3. Product Overview
3.1 Package Contents
Verify that all items are present in the package:
- GTMEDIA V7 Pro Receiver
- Remote Control
- Power Adapter
- USB WiFi Antenna
- User Manual
- HDMI Cable
- Product Warranty Card

Figure 3.1: GTMEDIA V7 Pro Package Contents
This image displays the complete contents of the GTMEDIA V7 Pro box, including the main receiver unit, remote control, power adapter, USB WiFi antenna, HDMI cable, and the user manual.
3.2 Device Components
Familiarize yourself with the front and rear panels of the GTMEDIA V7 Pro receiver.

Figure 3.2: GTMEDIA V7 Pro Front View
The front panel of the GTMEDIA V7 Pro receiver, showing the brand logo, model name, and the digital LED display.

Figure 3.3: GTMEDIA V7 Pro Rear Panel
This image illustrates the rear panel of the receiver, highlighting various connection ports including LNB IN, ANT IN, HD OUT (HDMI), AV OUT, RF TO TV, USB ports, DC 12V power input, and the power switch.

Figure 3.4: GTMEDIA V7 Pro Dimensions
This image provides the physical dimensions of the GTMEDIA V7 Pro receiver: 180mm (7.09in) in length, 125mm (4.92in) in width, and 30mm (1.18in) in height.
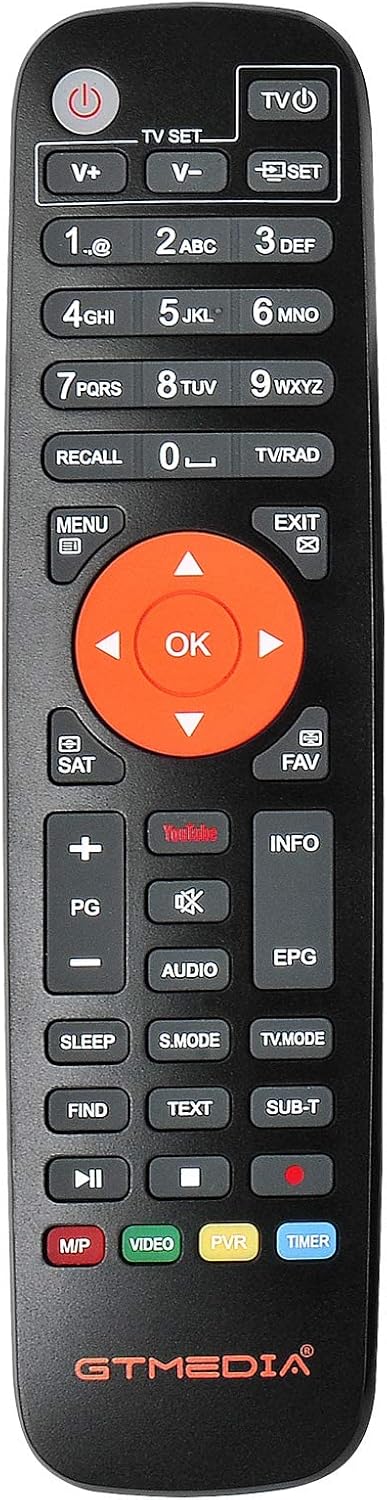
Figure 3.5: GTMEDIA V7 Pro Remote Control
A detailed view of the GTMEDIA V7 Pro remote control, showing all buttons for navigation, channel control, volume, media playback, and special functions.
4. Setup
4.1 Connecting the Receiver
- Satellite Antenna Connection: Connect your satellite dish LNB cable to the "LNB IN" port on the rear panel.
- Terrestrial Antenna Connection: Connect your terrestrial antenna cable to the "ANT IN" port on the rear panel.
- TV Connection: Connect an HDMI cable from the "HD OUT" port on the receiver to an HDMI input on your TV. Alternatively, use the AV OUT port for older TVs.
- USB WiFi Antenna: Insert the provided USB WiFi antenna into one of the "USB" ports.
- Power Connection: Connect the power adapter to the "DC 12V" port on the receiver, then plug the adapter into a wall outlet.
- Power On: Flip the power switch on the rear panel to the "ON" position.
4.2 Initial Setup Wizard
Upon first power-on, the receiver will guide you through an initial setup wizard:
- Language Selection: Select your preferred language for the menu and on-screen display.
- Region/Time Zone: Set your local region and time zone.
- Antenna Setup (Satellite):
- Select the satellite(s) you wish to receive (e.g., Astra 19.2°E, EUTELSAT 5°W).
- Ensure your satellite dish is correctly oriented. Check signal quality and intensity indicators on screen.
- Perform a channel scan for the selected satellite(s).
- Antenna Setup (Terrestrial):
- Select your country/region for DVB-T/T2 scanning.
- Perform an automatic channel scan for terrestrial channels.
4.3 Inserting a TV Card (e.g., Fransat, Tivùsat)
The GTMEDIA V7 Pro features a card reader for compatible TV cards (card not supplied). To insert your card:
- Locate the "CA CARD" slot on the side of the receiver.
- Gently insert your TV card into the slot with the chip facing downwards and towards the receiver's interior, as shown in Figure 4.1.
- Ensure the card is fully seated. Some users have reported improved card recognition by placing a thin, inactive card or spacer underneath the main card to ensure proper contact with the reader's pins.
- After insertion, navigate to the "Conditional Access" or "Card Reader" menu in the receiver settings to verify card recognition.

Figure 4.1: Smart Card Insertion
This image demonstrates the correct orientation and method for inserting a smart card into the CA CARD slot on the side of the GTMEDIA V7 Pro receiver.
4.4 Firmware Update (Recommended)
It is highly recommended to update the receiver's firmware to the latest version for optimal performance, channel sorting, and compatibility. Firmware updates are typically downloaded from the GTMEDIA official website and installed via USB.
- Visit the official GTMEDIA support website and download the latest firmware file for the V7 Pro model.
- Copy the downloaded firmware file (usually a .bin or .abs file) to the root directory of a USB flash drive. Ensure the USB drive is formatted to FAT32. (Note: Some users have reported success with NTFS format if FAT32 does not work).
- Insert the USB flash drive into one of the USB ports on the receiver.
- Navigate to the "Tools" or "System Upgrade" menu in the receiver settings.
- Select "USB Upgrade" and choose the firmware file from your USB drive.
- Follow the on-screen prompts to start the upgrade process. Do not power off the receiver during the upgrade.
- The receiver will restart automatically after the upgrade is complete.
5. Operating Instructions
5.1 Basic Navigation and Channel Selection
- Use the CH+/CH- buttons on the remote control to change channels.
- Use the VOL+/VOL- buttons to adjust the volume.
- Press the OK button to display the channel list. Use the arrow keys to navigate and OK to select.
- Press the MENU button to access the main menu for settings and features.
- The EXIT button returns to the previous screen or live TV.
5.2 Electronic Program Guide (EPG)
The receiver supports a 7-day Electronic Program Guide (EPG).
- Press the EPG button on the remote control to view the program guide.
- Navigate through channels and time slots using the arrow keys.
- Select a program to view its details or set a reminder/recording (if PVR is enabled).
5.3 Media Playback (USB)
The GTMEDIA V7 Pro supports media playback from a USB storage device.
- Insert a USB flash drive or external hard drive into one of the USB 2.0 ports.
- Navigate to the "Multimedia" or "USB" section in the main menu.
- You can play various media formats including images (JPG, BMP, PNG, GIF), audio (WMA, MP3), and videos (TS, Mkv, MP4, Avi, Flv, f4v, m2ts, MOV, 3gp).
5.4 PVR (Personal Video Recorder) and Timeshift
Record live TV programs or pause live TV using the PVR and Timeshift functions.
- Ensure a USB storage device with sufficient free space is connected.
- Recording: Press the REC button on the remote control to start recording the current program. Press it again to stop. You can also schedule recordings via the EPG.
- Timeshift: Press the PAUSE button during live TV to activate Timeshift. The program will pause and continue recording to the USB device. You can then use the play, fast forward, and rewind buttons.
- Recorded files can be accessed and played back from the "PVR" or "Recorded Files" section in the Multimedia menu.
5.5 Network Connection and Features
With the USB WiFi antenna connected, you can access network features.
- Go to the "Network" or "Internet" settings in the main menu.
- Select "WiFi Manager" and connect to your wireless network by entering the password.
- The receiver supports various network protocols, including CS protocol for viewing certain channels. Ensure your service is active.
5.6 Remote Control Programming (TV SET)
The GTMEDIA V7 Pro remote control has programmable buttons (TV SET section) to control basic functions of your television, such as power, volume, and input source.
- Press and hold the "SET" button on the GTMEDIA remote until the red LED light stays solid.
- Point your TV's original remote control directly at the GTMEDIA remote (infrared emitters facing each other, about 1-3 cm apart).
- Press the button on the GTMEDIA remote you wish to program (e.g., TV POWER). The red LED will flash slowly.
- While the LED is flashing, press and hold the corresponding button on your TV's original remote (e.g., TV Power button).
- The red LED on the GTMEDIA remote will flash three times and then stay solid, indicating successful learning.
- Repeat for other buttons (e.g., TV VOL+, TV VOL-, TV INPUT).
- Once finished, press the "SET" button again to exit programming mode. The red LED will turn off.

Figure 5.1: Remote Control Learning Function
This diagram illustrates the process of programming the GTMEDIA remote control by aligning it with an original TV remote and transferring infrared signals for key functions like power and volume.
6. Troubleshooting
| Problem | Possible Cause / Solution |
|---|---|
| No picture/sound on TV. |
|
| "No Signal" message. |
|
| TV card not recognized or channels scrambled. |
|
| Cannot connect to WiFi. |
|
| Incorrect channel order after scan. |
|
| Remote control not responding. |
|
7. Care and Maintenance
- Cleaning: Use a soft, dry cloth to clean the exterior of the receiver. Do not use liquid cleaners or aerosols.
- Ventilation: Ensure the ventilation slots are not blocked to prevent overheating.
- Storage: If storing the device for an extended period, disconnect it from power and store it in a cool, dry place.
8. Specifications
| Feature | Detail |
|---|---|
| Model | V7 PRO |
| Tuner Type | DVB-S/S2/S2X + DVB-T/T2 Combo |
| Video Decoding | H.265 HEVC Main 10 (10-bit) |
| Resolution | 1080p Full HD |
| Card Reader | Yes (for compatible TV cards) |
| Connectivity | HDMI, USB (2 ports), Wi-Fi (via included USB dongle) |
| USB Features | PVR, TIMESHIFT, Media Playback (JPG, BMP, PNG, GIF, WMA, MP3, TS, Mkv, MP4, Avi, Flv, f4v, m2ts, MOV, 3gp), Firmware Upgrade |
| Voltage | 18 Volts (DC 12V input) |
| Dimensions | Approx. 180mm x 125mm x 30mm |
9. Warranty and Support
For warranty information, please refer to the Product Warranty Card included in your package. For technical support, firmware updates, or further assistance, please visit the official GTMEDIA website or contact their customer service. Information regarding support contacts can often be found in the receiver's "Settings" > "Tools" > "Information" menu.


