
BuTure BR600
BuTure BR600 Portable Car Jump Starter User Manual
Model: BR600
1. Product Overview
The BuTure BR600 is a powerful and versatile portable car jump starter designed to provide emergency starting power for 12V vehicles. It also functions as a portable power bank with wireless charging capabilities and a multi-mode LED flashlight. This manual provides essential information for safe and effective use of your device.
Key Features:
- Powerful Jump Starting: Delivers 2500A peak current to start all gasoline engines and up to 8.0L diesel engines.
- High Capacity Battery: 27000mAh lithium battery for multiple jump starts and device charging.
- Wireless Charging: Integrated 10W wireless charging pad for compatible smartphones.
- Portable Power Bank: Equipped with USB 1 (Quick Charge 3.0: 5V 3A / 9V 2A / 12V 1.5A), USB 2 (5V 2.4A), and USB-C (5V 3A) outputs for charging various electronic devices.
- Smart Protection Clamps: Features intelligent protection against short circuits, overheating, over-voltage, over-charge, deep discharge, over-current, and reverse polarity.
- Multi-mode LED Flashlight: Includes Flashlight, Strobe, SOS, and Warning Light modes for emergencies.
- Durable Design: Operates effectively in extreme temperatures, including cold winter conditions.
2. Package Contents
Please check the package contents upon opening. If any items are missing or damaged, contact customer support.

Image: Contents of the BuTure BR600 package.
- 1 x BuTure BR600 Jump Starter
- 1 x Smart Jumper Cables
- 1 x USB-C Cable
- 1 x EC5 Cigarette Lighter Adapter
- 1 x User Manual
- 1 x Storage Case
3. Important Safety Information
Read all safety warnings and instructions before using this product. Failure to follow these instructions may result in electric shock, fire, and/or serious injury.
- Do not immerse the product in water or expose it to rain.
- Do not open or disassemble the product. There are no user-serviceable parts inside.
- Keep out of reach of children.
- Use only the provided smart jumper cables.
- Do not jump start a frozen battery.
- Ensure proper polarity connection (red clamp to positive, black clamp to negative).
- Do not connect the positive and negative clamps together.
- If the product becomes excessively hot during use, discontinue use immediately.
- Store the product in a cool, dry place away from direct sunlight.
- Wear eye protection and gloves when jump starting a vehicle.
- Consult your vehicle's owner's manual for specific jump-starting procedures.

Image: The BuTure BR600 features multiple protection modes for safe operation, including error detection and intelligent indicators.
4. Charging the BuTure BR600
Before first use, fully charge the jump starter. It is recommended to recharge the device every 3-6 months to maintain battery health, even if not in use.
4.1. Charging via USB-C Input
- Connect the provided USB-C cable to the USB-C input port on the jump starter.
- Connect the other end of the USB-C cable to a USB wall adapter (not included) or a car charger.
- The LED indicator lights will illuminate and flash to show the charging status. All four lights will be solid when fully charged.
4.2. Battery Level Indicator
The LED indicator lights on the device show the remaining battery capacity:
- 4 lights: 75% - 100%
- 3 lights: 50% - 75%
- 2 lights: 25% - 50%
- 1 light: 0% - 25% (Recharge immediately)

Image: The BuTure BR600 features a 27000mAh battery designed for long standby times, up to 12 months.
5. Jump Starting a Vehicle
Ensure the jump starter is at least 50% charged (2 LED lights) before attempting to jump start a vehicle.
- Prepare the Vehicle: Turn off the vehicle's ignition and all accessories (headlights, radio, air conditioning, etc.). Engage the parking brake.
- Connect Jumper Cables:
- Insert the blue plug of the smart jumper cables into the 12V jump start port on the BuTure BR600. Ensure a firm connection.
- Connect the RED positive (+) clamp to the vehicle's positive (+) battery terminal.
- Connect the BLACK negative (-) clamp to the vehicle's negative (-) battery terminal.
- The smart clamp indicator light will show the connection status. Refer to the smart clamp manual for specific light indications.
- Start the Vehicle: Once the smart clamp indicator shows a safe connection, start your vehicle's engine. If the vehicle does not start immediately, wait 20-30 seconds before trying again. Do not crank the engine for more than 3 seconds per attempt.
- Remove Jumper Cables: As soon as the vehicle starts, disconnect the BLACK negative (-) clamp first, then the RED positive (+) clamp from the vehicle battery. Finally, unplug the smart jumper cables from the BuTure BR600.
Important: If the smart clamp indicates an error (e.g., reverse polarity), correct the connection before attempting to start the vehicle.

Image: Illustration of connecting the BuTure BR600 to a car battery for jump starting.
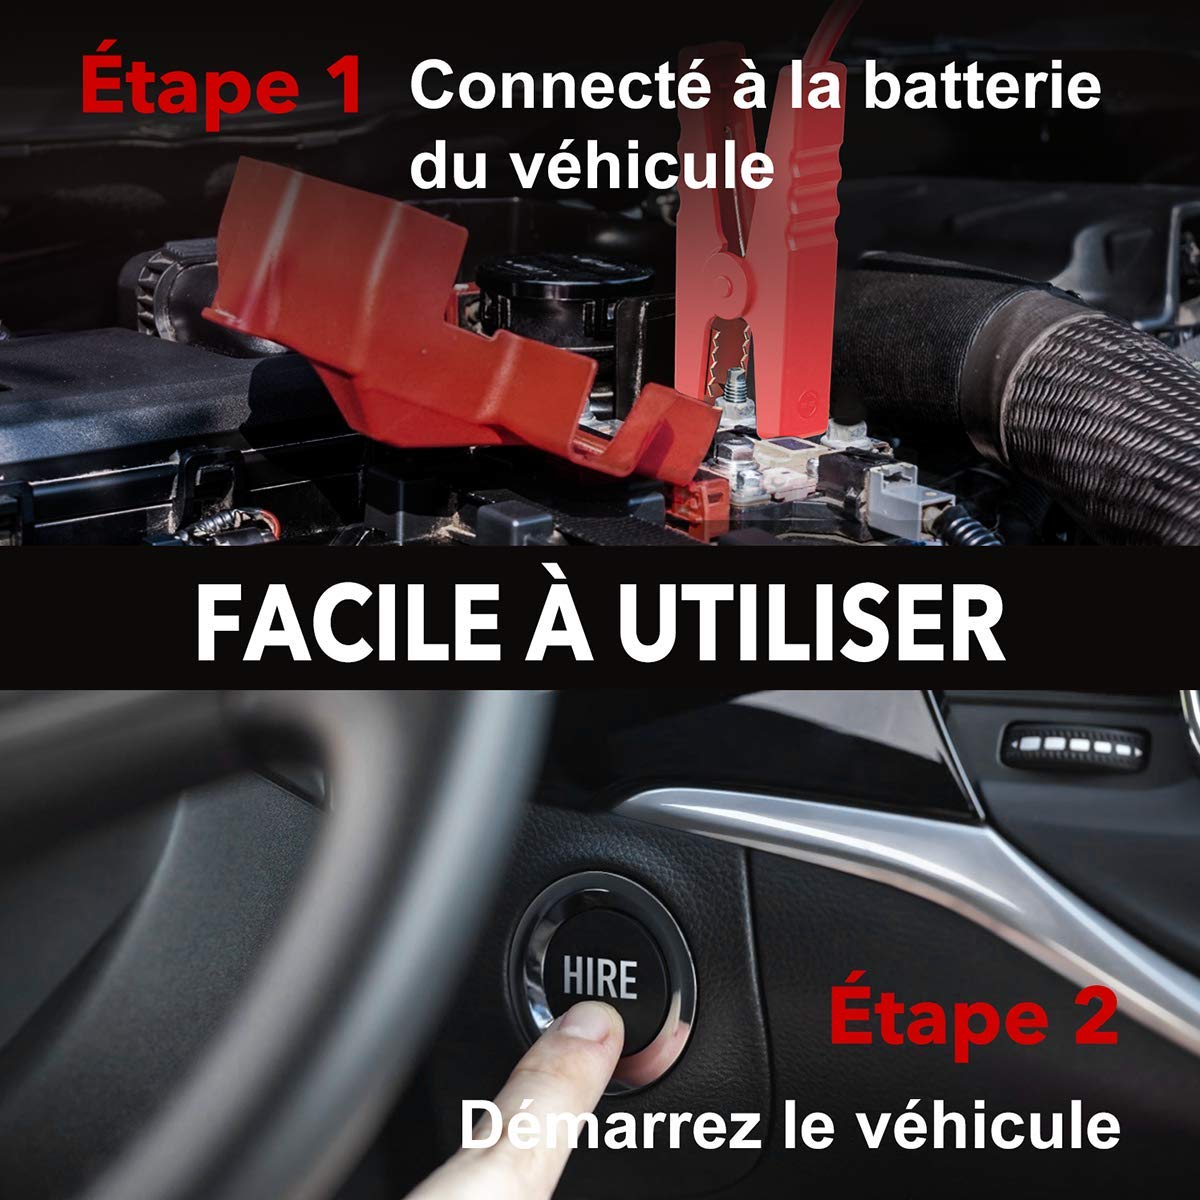
Image: Step-by-step guide showing how to connect the jump starter to the vehicle battery and then start the vehicle.

Image: The BuTure BR600 is designed to perform reliably even in cold winter temperatures down to -20°C.
6. Operating Other Functions
6.1. Using as a Power Bank (USB Output)
The BuTure BR600 can charge various electronic devices via its USB output ports.
- Connect your device's USB charging cable to either the USB 1 (Quick Charge 3.0) or USB 2 port on the jump starter.
- The jump starter will automatically begin charging your device.
6.2. Wireless Charging
For devices compatible with 10W wireless charging:
- Place your wireless charging compatible device (e.g., smartphone) on the wireless charging pad located on the top surface of the jump starter.
- Ensure the device is centered on the pad for optimal charging.
- The wireless charging indicator light will illuminate to confirm charging is active.

Image: The BuTure BR600 offers both 10W wireless charging and Quick Charge 3.0 USB output for multiple devices.
6.3. LED Flashlight
The built-in LED flashlight has multiple modes for different situations.
- Press and hold the power button for 3 seconds to turn on the flashlight (steady light mode).
- Press the power button again to cycle through modes: Strobe → SOS → Warning Light → Off.
- Press and hold the power button again for 3 seconds to turn off the flashlight from any mode.

Image: The BuTure BR600 features an ultra-bright LED flashlight with Flash, SOS, Strobe, and Warning light modes for various emergencies.
7. Maintenance
- Cleaning: Use a soft, dry cloth to clean the device. Do not use abrasive cleaners or solvents.
- Storage: Store the jump starter in a cool, dry place between 0°C and 45°C (32°F and 113°F). Avoid direct sunlight and high humidity.
- Recharging: Recharge the device every 3-6 months to prevent battery degradation, even if not in use.
- Battery Life: The internal lithium battery is designed for long life, but like all rechargeable batteries, its capacity will decrease over time.
8. Troubleshooting
| Problem | Possible Cause | Solution |
|---|---|---|
| Jump starter does not turn on. | Battery is completely discharged. | Charge the jump starter for several hours. |
| Vehicle does not start. |
|
|
| Smart clamp indicator shows error. | Reverse polarity, short circuit, or other fault. | Disconnect clamps, check connections, and reconnect ensuring correct polarity (Red to +, Black to -). Refer to smart clamp manual for specific error codes. |
| Wireless charging not working. |
|
|
9. Specifications
| Model | BR600 |
| Peak Current | 2500A |
| Battery Capacity | 27000mAh |
| Start Voltage | 12V |
| USB Output 1 (QC3.0) | 5V/3A, 9V/2A, 12V/1.5A |
| USB Output 2 | 5V/2.4A |
| USB-C Input/Output | 5V/3A |
| Wireless Charging Output | 10W |
| Operating Temperature | -20°C to 60°C (-4°F to 140°F) |
| Dimensions (L x W x H) | 24.5 x 15.4 x 9.6 cm |
| Weight | 1.21 kg |
| Battery Composition | Lithium Metallic |
10. Warranty and Customer Support
BuTure products are designed and manufactured to the highest quality standards. This product comes with a standard manufacturer's warranty. For detailed warranty information, product support, or technical assistance, please refer to the warranty card included in your package or visit the official BuTure website.
If you encounter any issues or have questions regarding your BuTure BR600, please contact our customer support team. Provide your model number (BR600) and purchase details for faster service.
Related documentsBR600


Ask a question about this manual
Ask about setup, troubleshooting, compatibility, parts, safety, or missing instructions. Manuals+ will review the question and use this page’s manual context to help answer it.