Miroco Electric Milk Frother MI-MF002 User Manual
Model: MI-MF002
1. Important Safeguards
Read all instructions before using this appliance. Failure to follow these instructions may result in electric shock, fire, or serious injury.
- Do not immerse the base or power cord in water or other liquids.
- This appliance is not intended for use by persons (including children) with reduced physical, sensory or mental capabilities, or lack of experience and knowledge, unless they have been given supervision or instruction concerning use of the appliance by a person responsible for their safety.
- Children should be supervised to ensure that they do not play with the appliance.
- Unplug from outlet when not in use and before cleaning. Allow to cool before putting on or taking off parts, and before cleaning the appliance.
- Do not operate any appliance with a damaged cord or plug or after the appliance malfunctions, or has been damaged in any manner.
- The use of accessory attachments not recommended by the appliance manufacturer may result in fire, electric shock or injury to persons.
- Do not use outdoors.
- Do not let cord hang over edge of table or counter, or touch hot surfaces.
- Do not place on or near a hot gas or electric burner, or in a heated oven.
- Always attach plug to appliance first, then plug cord into the wall outlet. To disconnect, turn any control to "off", then remove plug from wall outlet.
- Do not use appliance for other than intended use.
- Extreme caution must be used when moving an appliance containing hot liquids.
- Avoid contact with moving parts.
- Do not overfill the frother.
- Ensure the lid is securely in place before operating.
2. Product Components
Familiarize yourself with the parts of your Miroco Electric Milk Frother.

Image: The Miroco Electric Milk Frother MI-MF002, showing its sleek black design and transparent lid.
- A. Frother Base: Contains the heating element and motor.
- B. Frothing Jug: Stainless steel jug with non-stick interior.
- C. Transparent Lid: Allows observation of the frothing process.
- D. Frothing Whisk (2 types): One for frothing, one for heating/stirring.
- E. Cleaning Brush: For easy cleaning of the jug interior.
- F. Power Button/Indicator: Controls operation and displays status.
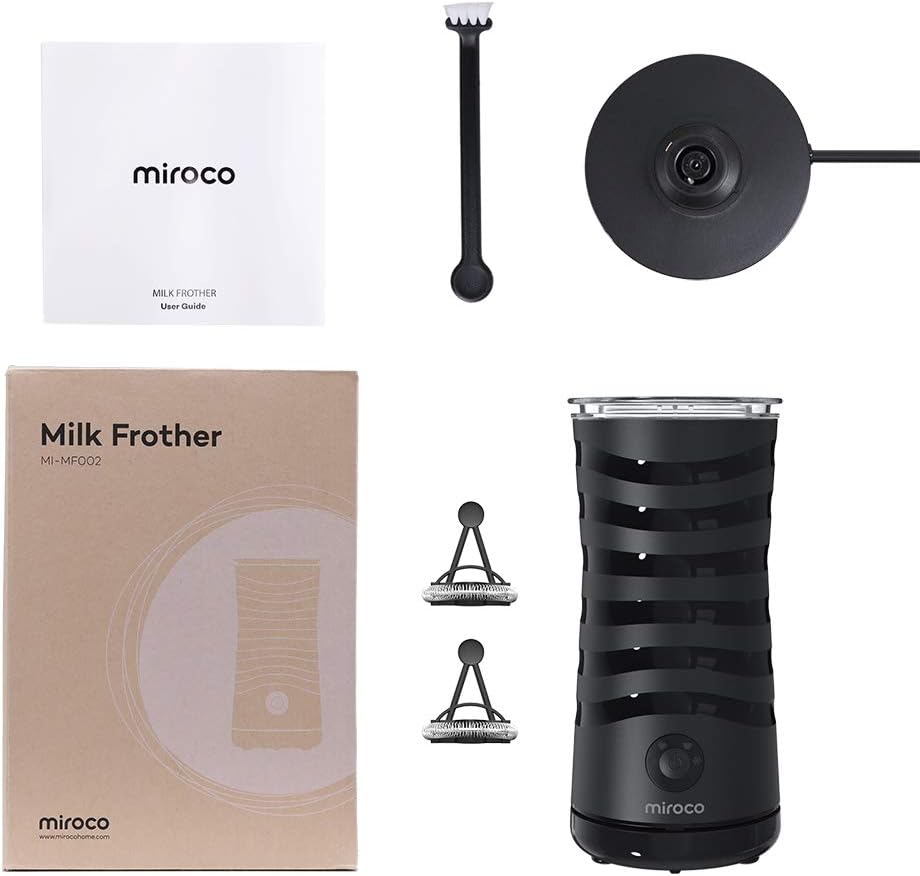
Image: An exploded view of the Miroco Milk Frother MI-MF002, showing the frother unit, power base, two frothing whisks, cleaning brush, and user manual.
3. Setup and First Use
- Unpacking: Carefully remove all packaging materials. Retain packaging for future storage or transport.
- Initial Cleaning: Before first use, clean the frothing jug and whisks with warm soapy water. Rinse thoroughly and dry. Wipe the exterior of the frother base with a damp cloth. Do not immerse the base in water.
- Whisk Placement: Select the appropriate whisk for your desired function (frothing or heating). Place the whisk securely onto the shaft at the bottom of the frothing jug. Ensure it clicks into place.
- Power Connection: Place the frother base on a flat, stable, heat-resistant surface. Plug the power cord into a standard electrical outlet.
4. Operating Instructions
The Miroco Milk Frother MI-MF002 offers four functions: Hot Fluffy Foam, Hot Dense Foam, Heat Milk, and Froth Cold Milk. Use the single button to cycle through these options.

Image: Close-up of the Miroco Milk Frother's control panel, illustrating the single button operation and indicator lights for Hot Fluffy Foam, Hot Dense Foam, Heat Milk, and Froth Cold Milk.
4.1 Milk Filling Guidelines
Always observe the MIN and MAX fill lines inside the frothing jug to prevent overflow or insufficient frothing.

Image: Interior view of the Miroco Milk Frother jug, showing the 'MAX' fill line for heating milk (240 ml / 8.1 oz) and the 'MAX' fill line for frothing hot & cold milk (115 ml / 3.9 oz), along with the 'MIN' fill line.
- Heating Milk: Max fill line at 240 ml (8.1 oz).
- Frothing Hot & Cold Milk: Max fill line at 115 ml (3.9 oz).
- Always fill above the MIN line.
4.2 Step-by-Step Operation
- Add Milk: Pour the desired amount of cold milk into the frothing jug, ensuring it is between the MIN and appropriate MAX fill lines.
- Select Whisk: Ensure the correct whisk is installed for your desired outcome. The spring whisk is for frothing, the plain whisk is for heating/stirring.
- Secure Lid: Place the transparent lid securely on the frothing jug.
- Place on Base: Position the frothing jug onto the power base.
- Choose Function: Press the power button repeatedly until the indicator light for your desired function illuminates.
- Start: The frother will begin operation automatically. The indicator light will remain lit during the process.
- Completion: The frother will automatically stop when the process is complete, and the indicator light will turn off.
- Serve: Carefully remove the frothing jug from the base and pour the frothed or heated milk.
Note: For best results, use fresh, cold milk (around 4-6°C / 39-43°F). Whole milk generally produces the best foam.
5. Cleaning and Maintenance
Regular cleaning ensures optimal performance and extends the life of your Miroco Milk Frother.

Image: A hand pouring water into the Miroco Milk Frother jug, demonstrating the ease of cleaning its non-stick interior.
- Unplug: Always unplug the frother from the power outlet before cleaning.
- Cool Down: Allow the frother to cool down completely after use.
- Remove Whisk: Carefully remove the whisk from the bottom of the frothing jug.
- Hand Wash Jug and Whisk: Wash the frothing jug and whisks with warm, soapy water using the provided cleaning brush. The non-stick interior makes cleaning easy. Rinse thoroughly and dry immediately.
- Clean Lid: Wash the transparent lid with warm, soapy water, rinse, and dry.
- Wipe Base: Wipe the exterior of the frother base with a soft, damp cloth. Do not immerse the base or power cord in water.
- Storage: Store the frother in a clean, dry place. Ensure the whisks are stored safely, preferably inside the frother or in a designated spot to avoid loss.
Important: Do not use abrasive cleaners, metal scouring pads, or harsh chemicals on any part of the frother, as this can damage the surfaces.
6. Troubleshooting
If you encounter issues with your Miroco Milk Frother, refer to the following table for common problems and solutions.
| Problem | Possible Cause | Solution |
|---|---|---|
| Frother does not turn on. | Not plugged in; power outage; frother not properly seated on base. | Ensure the power cord is securely plugged into a working outlet. Check the power supply. Ensure the frothing jug is correctly placed on the power base. |
| Milk does not froth or froths poorly. | Incorrect whisk used; milk level too high/low; milk type not suitable; milk not cold enough. | Ensure the frothing whisk (with spring) is used. Check milk levels are between MIN and frothing MAX line. Use fresh, cold whole milk for best results. |
| Milk overflows. | Milk level too high. | Do not exceed the MAX fill line for frothing (115 ml) or heating (240 ml). |
| Milk is not hot enough. | Incorrect function selected; frother stopped prematurely. | Ensure the 'Heat Milk' or 'Hot Foam' function is selected. Allow the frother to complete its cycle automatically. |
| Burning smell or milk sticking to bottom. | Insufficient milk; frother not cleaned properly. | Ensure milk is above the MIN line. Clean the frothing jug thoroughly after each use to prevent residue buildup. |
If the problem persists, please contact Miroco customer support.
7. Specifications
| Feature | Detail |
|---|---|
| Brand | Miroco |
| Model Number | MI-MF002 |
| Power / Wattage | 400 watts |
| Material | Stainless Steel (interior) |
| Product Dimensions | 10.01 x 10.01 x 19.1 cm |
| Item Weight | 900 g |
| Recommended Uses | Cappuccinos, Lattes, Hot Chocolate, Milkshakes, Home Use |
| Included Components | Frothing Cup, Cleaning Brush, 2 Whisks |
| Product Care Instructions | Hand Wash |
| Power Source | Corded Electric |
8. Warranty and Support
Miroco products come with a standard manufacturer's warranty. Please refer to the warranty card included in your product packaging for specific terms and conditions.
For technical support, troubleshooting assistance, or warranty claims, please contact Miroco Customer Service:
- Website: www.miroco.com (Check for regional support contact information)
- Email: Refer to your warranty card or product packaging.
- Phone: Refer to your warranty card or product packaging.
Please have your model number (MI-MF002) and purchase date ready when contacting support.


