1. Introduction
This manual provides detailed instructions for the installation, operation, and maintenance of your Hugolog Electronic Keypad Deadbolt Lock. Please read this manual thoroughly before installation and use to ensure proper function and security.

Image 1.1: Front and back view of the Hugolog Electronic Keypad Deadbolt Lock.
2. Key Features
- High Security Material: Constructed from high-hardness aluminum alloy, offering anti-collision and anti-smashing properties. FCC SDOC certified for enhanced safety.
- Easy Installation: Designed for simple installation with a screwdriver, suitable for door thicknesses of 35-50mm and standard door hole diameters (38/54mm). Adjustable bolt side distance (60mm/70mm).
- Keypad Security: Features a keypad that locks for three minutes after ten consecutive incorrect PIN code attempts. Buttons are rated for 250,000 presses with clear visibility.
- Status Indicators: Provides low battery alerts (below 20%) and features backlit keys for visibility in low-light conditions.
- Waterproof Design: IP54 waterproof rating allows for daily outdoor use, though not recommended for severe external environments.
- Keyless Convenience: Offers motorized auto-locking and supports up to 20 user PIN codes.
- Password Privacy Protection: Includes an anti-peep virtual PIN code feature to safeguard against unauthorized viewing of your code.

Image 2.1: Overview of Assure Lock features.

Image 2.2: Backlit keypad and battery compartment.
3. Package Contents
Verify that all components are present before beginning installation:
- Exterior Assembly (Keypad)
- Interior Assembly (Thumb Turn)
- Deadbolt Latch
- Mounting Plate
- Strike Plate
- Reinforcement Plate
- Backup Keys (2)
- Mounting Screws (various sizes)
- Rotation Shaft
- Installation Guide & Template
Note: Batteries are not included. 4 AA alkaline batteries are required.
4. Installation Guide
Before you begin, ensure your door is prepared according to the provided template for drilling if necessary. The lock is suitable for door thicknesses of 35-50mm, door hole diameters of 38/54mm, and an adjustable bolt side distance of 60mm/70mm.
4.1 Pre-Installation Check
Watch this video for important information before starting the installation process:
Video 4.1: Important considerations before installation.
4.2 Step-by-Step Installation
For a detailed visual guide on installation and product composition, refer to the video below:
Video 4.2: Detailed deadbolt installation and product composition.
- Install the Deadbolt Latch: Insert the deadbolt latch into the door edge. Ensure the bolt is in the retracted (unlocked) position. Be careful about the direction of the bolt. Secure with two screws.
- Attach Exterior Assembly: Pass the cable from the exterior assembly through the door hole under the bolt. Ensure the tailpiece is kept in a horizontal position.
- Install Mounting Plate: Place the mounting plate over the exterior assembly, ensuring the cable and tailpiece pass through the correct openings. Secure the mounting plate to the exterior assembly with screws. Make sure the exterior assembly is vertically aligned.
- Install Interior Assembly: Place the rotation shaft in the hole of the interior assembly. Attach the cable assembly to the interior assembly PCB. Ensure the thumb turn is vertical. Install the interior assembly onto the inside mounting plate. Secure using screws through the interior assembly onto the mounting plate.
- Test Operation: Test if the deadbolt works smoothly by turning the thumb turn and using the backup key.
- Insert Batteries: Keep your lock in the "unlock" status. Insert 3 AA batteries into the battery pack. Keep holding the reset button with a clip, then insert the last battery and continue holding the reset button for another 3 seconds. If reset is successful, the latch bolt will extend on its own to learn the orientation of the door. Install the battery cover.
5. Operation
5.1 Default Master PIN Code
The default Master PIN Code is 12345678. It is highly recommended to change this code immediately after installation for security purposes.

Image 5.1: Choose between code or key for entry.
5.2 Changing the Master PIN Code
To change the Master PIN Code, follow these steps:
- Enter Master Mode: Press ** + [Master PIN Code] + #. Wait for 2 green lights and 2 beeps.
- Press 1.
- Enter New Master PIN Code: Enter your new Master PIN Code (4-10 digits) + #. Wait for 2 green lights and 2 beeps.
- Confirm New Master PIN Code: Enter the same new Master PIN Code + #. Wait for 2 green lights and 2 beeps. Success.
For a visual demonstration, please watch this video:
Video 5.2: How to change the master code.
5.3 Adding User PIN Codes
You can add up to 20 user PIN codes. To add a user PIN code:
- Enter Master Mode: Press ** + [Master PIN Code] + #. Wait for 2 green lights and 2 beeps.
- Press 2.
- Enter New User PIN Code: Enter your new User PIN Code (4-10 digits) + #. Wait for 2 green lights and 2 beeps.
- Confirm New User PIN Code: Enter the same new User PIN Code + #. Wait for 2 green lights and 2 beeps. Success.
For a visual demonstration, please watch this video:
Video 5.3: How to add a user PIN code.
5.4 Unlocking and Locking
- To Unlock: Enter a valid User PIN Code or Master PIN Code, then press #. The deadbolt will retract.
- To Lock: Press any key on the keypad for 2 seconds, or use the thumb turn from the inside.
- Auto Re-lock: In Auto Re-lock mode, the bolt will extend automatically 30 seconds after unlocking.
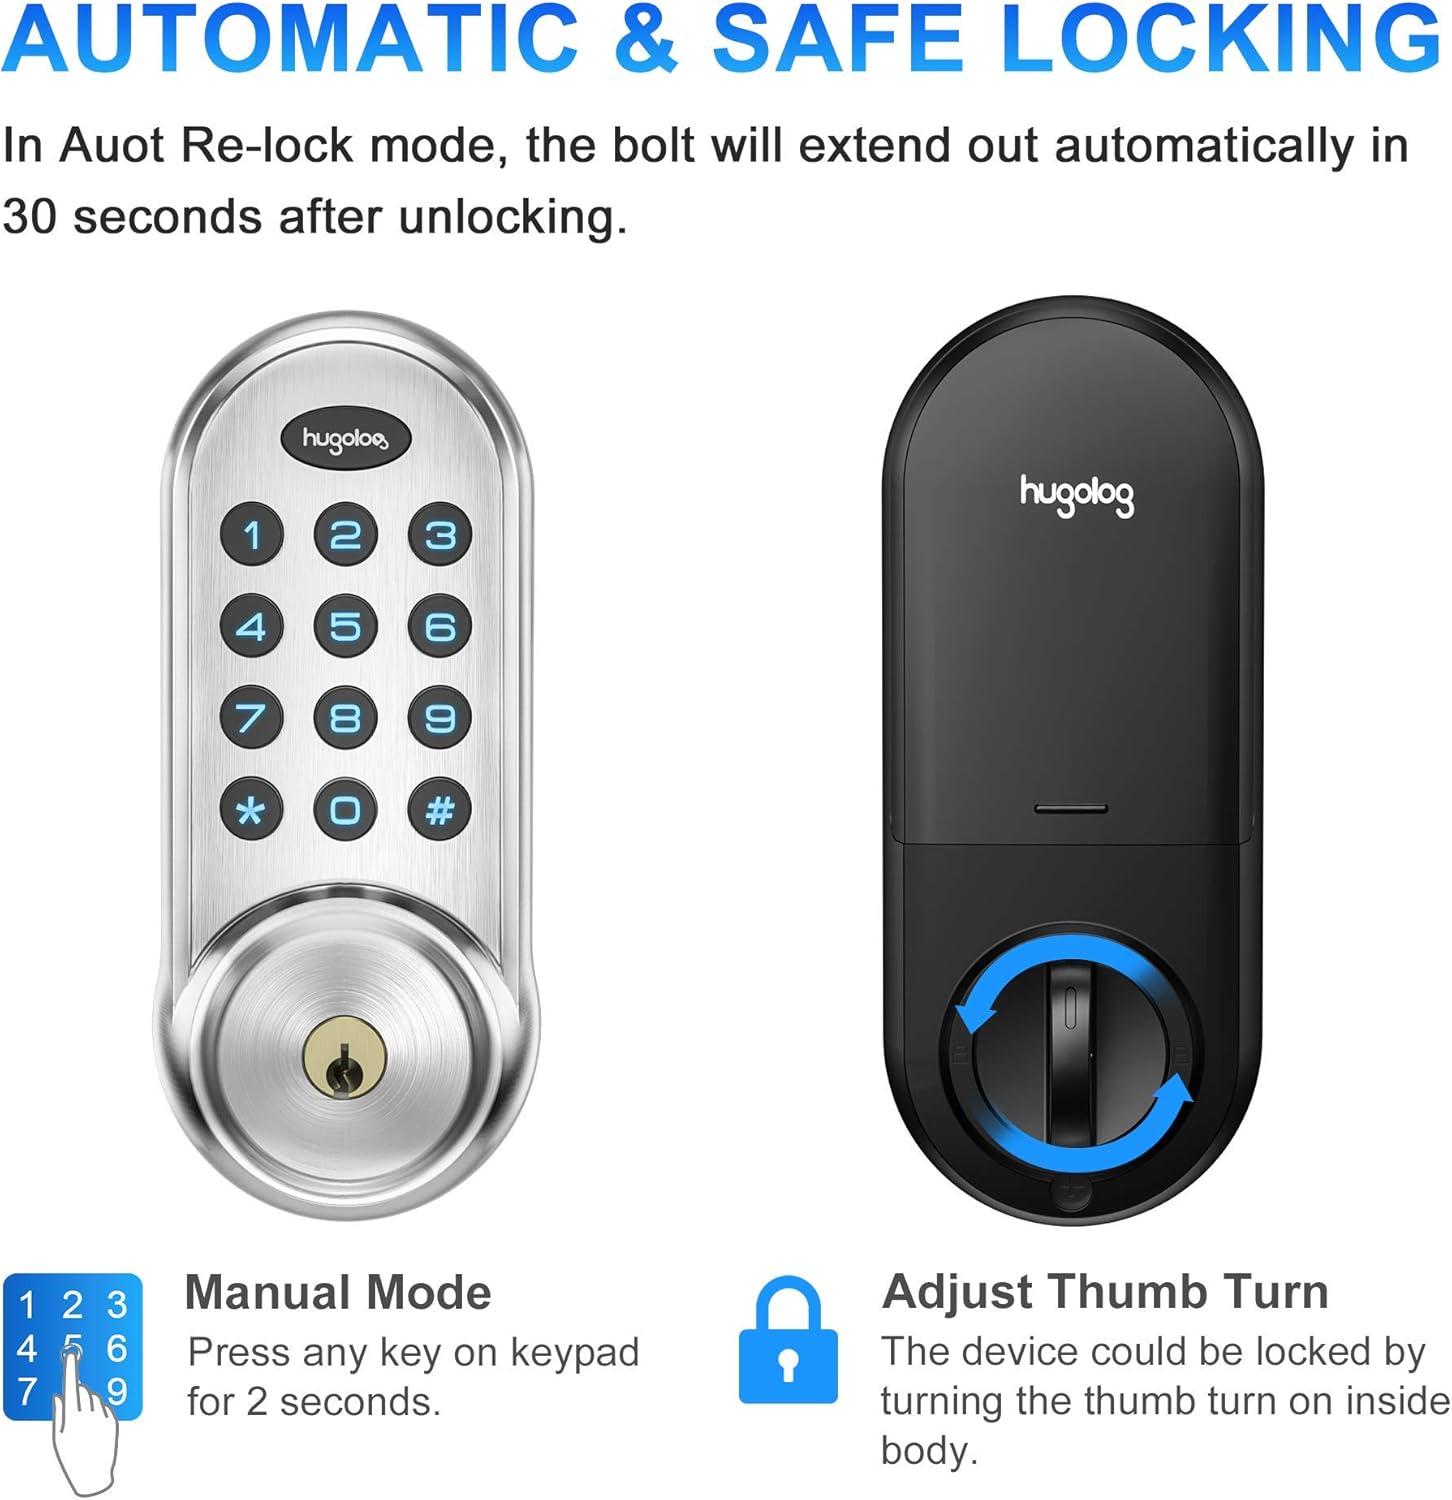
Image 5.4: Automatic and manual locking options.
5.5 Password Privacy Protection (Anti-Peep)
To prevent others from guessing your code, you can enter random digits before or after your actual PIN code. The lock will still recognize the correct sequence within the longer entry.

Image 5.5: Anti-peep virtual PIN code for enhanced security.
6. Maintenance
6.1 Battery Replacement
The lock will provide a continuous red flash on the keypad when the battery level is low (below 20%). Replace all four AA alkaline batteries promptly to ensure continuous operation.
6.2 Cleaning
Clean the keypad and lock body with a soft, dry cloth. Avoid using abrasive cleaners or solvents that could damage the finish or electronic components.
7. Troubleshooting
- Lock Jammed: If the deadbolt jams, the lock will alternate beeping about every 2 seconds with a long beep sound. This often indicates an installation issue where the bolt is not moving freely. Ensure the door frame and strike plate are properly aligned and the bolt can extend and retract without obstruction.
- Keypad Lockdown: If 10 consecutive incorrect PIN code attempts are made, the keypad will be locked down for 3 minutes. During this time, all keypad operations will be restricted. You can disable the lockdown by unlocking the door with a mechanical key or by using the thumb turn from the inside.
- Low Battery Indication: When the panel is woken up, red flashes continuously, indicating that the battery is low. Replace batteries immediately.
- No Response from Keypad: Check battery installation and ensure batteries are fresh. If the issue persists, perform a factory reset.
8. Specifications
| Feature | Detail |
|---|---|
| Brand | Hugolog |
| Model Name | HU01-SNL |
| Item Model Number | 711731000176 |
| Lock Type | Keypad Deadbolt |
| Material | High-hardness Aluminum Alloy, Metal |
| Color | Satin Nickel |
| Item Dimensions (L x W x H) | 2.89 x 1.42 x 7.09 inches |
| Item Weight | 2.5 pounds |
| Door Thickness Compatibility | 35-50mm |
| Door Hole Diameter Compatibility | 38/54mm |
| Backset (Side Distance of Bolt) | Adjustable 60mm/70mm |
| Power Source | 4 AA Alkaline Batteries (not included) |
| Voltage | 1.5 Volts |
| Waterproof Rating | IP54 |
| Certification | FCC SDOC |
| Connectivity Protocol | Wi-Fi (Note: Product description mentions Wi-Fi, but features do not detail smart home integration. Refer to product packaging for specific smart features.) |
9. Warranty and Support
For warranty information and customer support, please refer to the documentation included with your product or visit the official Hugolog website. Contact information for technical assistance is typically provided in the product packaging.


