
1. Introduction
The RecPro RP-1031 RV 12 Volt Macerator Pump is designed for efficient and hygienic waste evacuation from RVs, motorhomes, and campers. Featuring a flexible impeller and durable 316 stainless steel double-cut blades, this portable pump ensures swift disposal with a flow rate of 12 GPM (45 LPM). Its robust design and easy maintenance features make waste management simpler for recreational vehicle owners.
2. Safety Information
- Always wear appropriate personal protective equipment (PPE) such as gloves and eye protection when handling sewage.
- Ensure the pump is securely connected to both the RV waste outlet and the discharge hose before operation to prevent leaks.
- Verify that the power source is 12V DC and that all electrical connections are secure and free from damage.
- Do not operate the pump dry. Ensure there is liquid in the tank before starting the pump.
- Keep children and pets away from the operating area.
- Disconnect power before performing any maintenance or cleaning.
3. Package Contents
Verify that all items are present before proceeding with installation and operation:
- RecPro RP-1031 Macerator Pump
- Power Cable with On/Off Switch and Battery Clamps
- 1-inch Barbed Hose Outlet Adapter
- 3-inch RV Connector
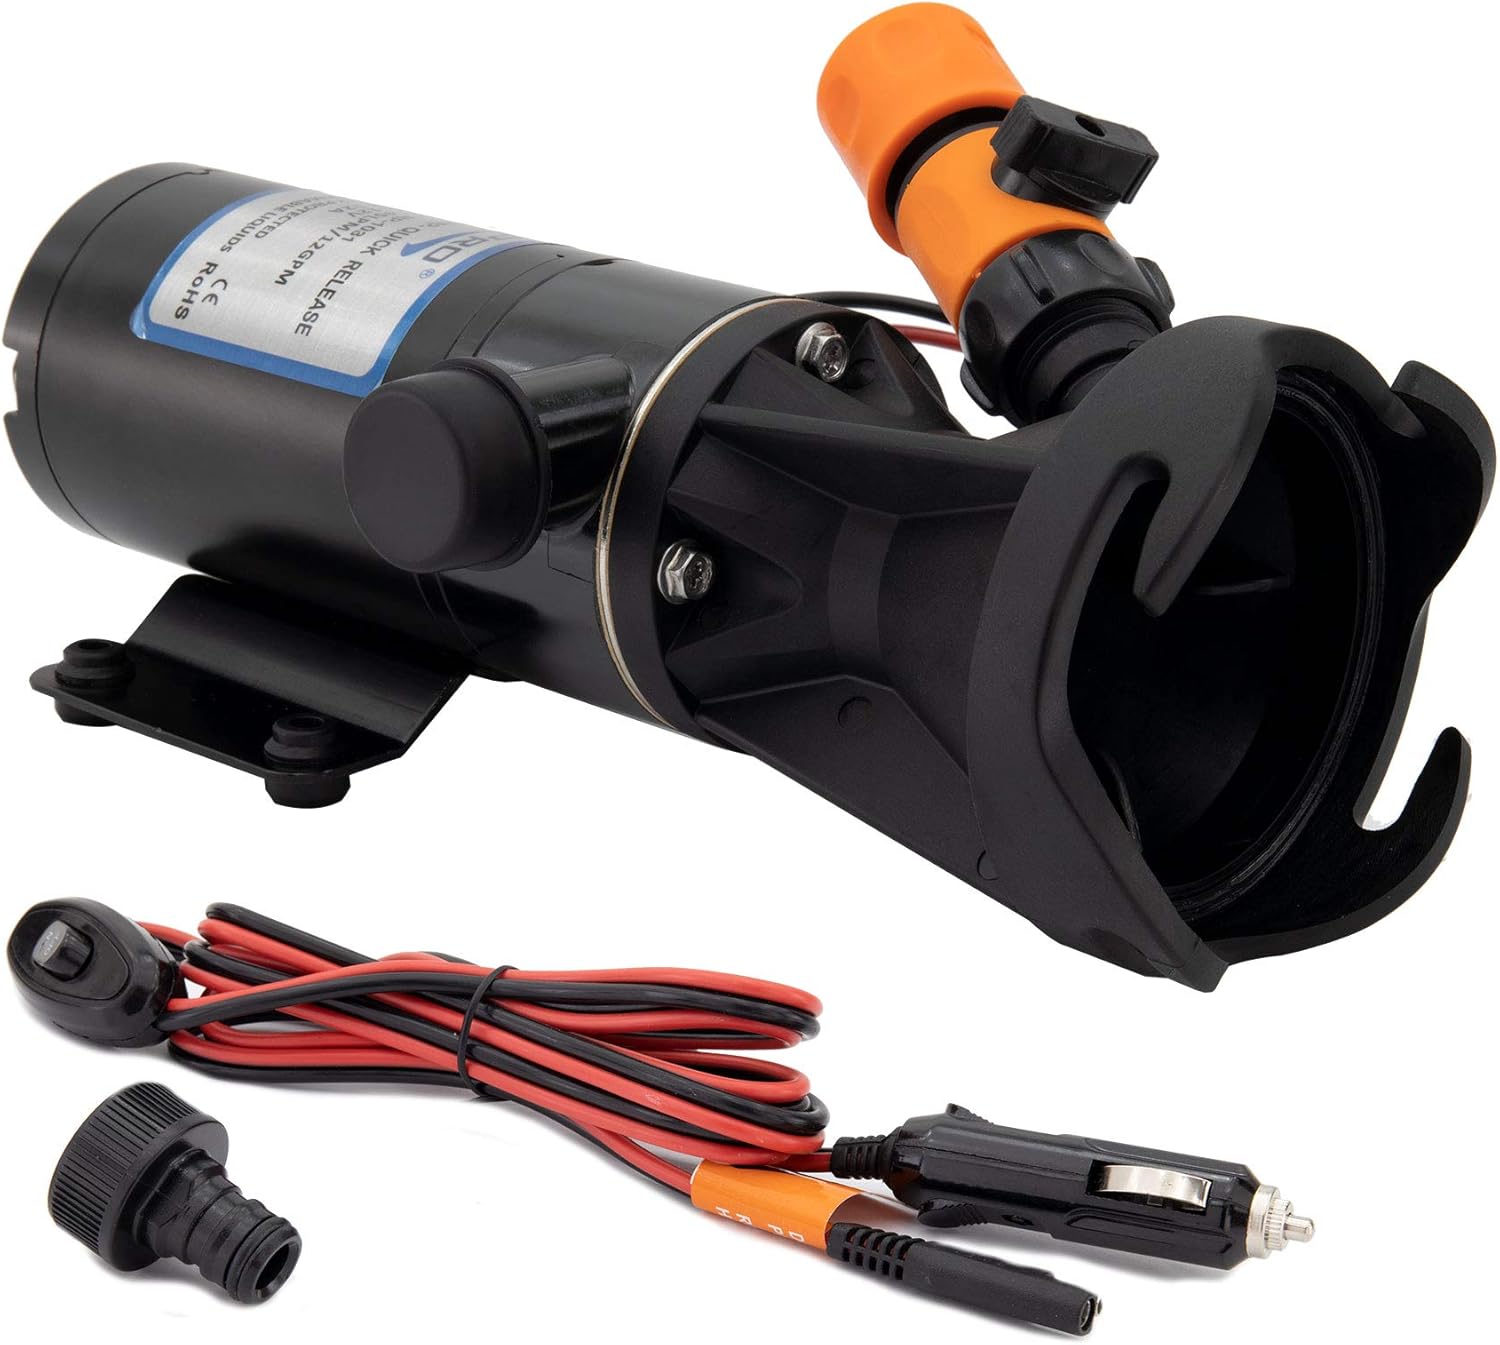
Figure 3.1: RecPro Macerator Pump with labeled components.
4. Setup
Follow these steps for proper setup of your RecPro Macerator Pump:
- Connect to RV Waste Outlet: Attach the 3-inch RV connector of the macerator pump to your RV's waste outlet. Ensure a secure and leak-free connection. Some connections may require firm pressure to seat properly.
- Attach Discharge Hose: Connect a 1-inch ID discharge hose to the 1-inch barbed hose outlet on the pump. Secure it with a hose clamp (not included) to prevent disconnections during operation.
- Connect Power: Connect the provided 12V DC power cable to a suitable 12V power source (e.g., RV battery). Ensure correct polarity (red to positive, black to negative). The power cable includes an in-line on/off switch for convenient operation.
- Position Discharge: Route the discharge hose to a designated dump station or appropriate waste disposal site. Ensure the hose is free of kinks and obstructions.

Figure 4.1: Macerator pump connected to RV waste outlet.

Figure 4.2: Quick release connection for discharge hose.
Video: Easy to Hook Up RecPro RV Macerator Pump
This video demonstrates the simple steps to connect and set up your RecPro RV Macerator Pump for use.
5. Operating Instructions
Once the pump is set up, follow these steps for waste disposal:
- Open RV Waste Valves: Open the black tank valve first, followed by the gray tank valve, to allow waste to flow into the macerator pump.
- Activate Pump: Turn on the macerator pump using the in-line switch on the power cable. The pump will begin to grind and discharge the waste.
- Monitor Flow: Observe the flow through the discharge hose. The pump is designed for continuous operation until the tanks are empty.
- Freshwater Rinse: After emptying the tanks, close the RV waste valves. Connect a freshwater hose to the pump's freshwater rinse port (if applicable) and open the valve to flush the pump and discharge hose. This helps maintain hygiene and prevents odors.
- Deactivate Pump: Once flushing is complete and the discharge runs clear, turn off the macerator pump.
- Disconnect: Close the freshwater rinse valve, disconnect the freshwater hose, and then disconnect the discharge hose and power cable.
6. Maintenance
Regular maintenance ensures optimal performance and longevity of your macerator pump:
- Rinse After Each Use: Always perform a freshwater rinse through the pump and discharge hose after each use to clear any remaining waste and prevent buildup.
- Inspect Connections: Periodically check all hose and power connections for wear, leaks, or damage. Replace any worn components immediately.
- Clean Exterior: Wipe down the exterior of the pump with a damp cloth to remove dirt and grime.
- Storage: Store the pump in a clean, dry place when not in use. Ensure all hoses are drained and coiled neatly.
7. Troubleshooting
If you encounter issues with your RecPro Macerator Pump, refer to the following common problems and solutions:
| Problem | Possible Cause | Solution |
|---|---|---|
| Pump does not turn on. | No power, faulty switch, loose connection. | Check 12V power source, ensure switch is in 'ON' position, verify all electrical connections are secure. |
| Low flow or no discharge. | Clogged impeller, kinked hose, low voltage. | Disconnect power, inspect impeller for obstructions, check discharge hose for kinks, verify adequate 12V power. |
| Pump is running but no waste is moving. | RV waste valves closed, air lock, impeller damage. | Ensure RV waste valves are open, check for air in the system, inspect impeller for damage (contact support if damaged). |
| Leaking at connections. | Loose connections, worn seals, damaged hose. | Tighten all connections, inspect and replace worn seals or damaged hoses. |
If troubleshooting steps do not resolve the issue, please contact RecPro customer support.
8. Specifications
| Feature | Detail |
|---|---|
| Brand | RecPro |
| Model Number | RP-1031 |
| Power Source | Corded Electric |
| Voltage | 12 Volts DC |
| Maximum Flow Rate | 12 Gallons Per Minute (45 LPM) |
| Maximum Current Draw | 12 Amps |
| Maximum Lifting Height | 11 Feet |
| Product Dimensions | 11.5"L x 4.5"W x 5.25"H |
| Item Weight | 6.3 Pounds |
| Material | Stainless Steel (blades) |
| Color | Black |
| RV Connector Size | 3 inches |
| Hose Outlet Size | 1-inch barbed |
9. Warranty and Support
RecPro stands behind the quality of its products. For specific warranty details, please refer to the warranty card included with your purchase or visit the official RecPro website. If you require technical assistance, have questions about installation, or need to report a defect, please contact RecPro customer support through their website or the contact information provided in your product packaging.


