
1. Introduction
This manual provides detailed instructions for the installation, operation, and maintenance of your REOLINK RLC-510A 5MP Security PoE IP Camera. This camera is designed for both indoor and outdoor surveillance, offering advanced features for comprehensive security monitoring.

The RLC-510A camera is equipped with smart person, vehicle, and animal detection, minimizing false alarms and providing accurate alerts. It delivers exceptional 5MP Super HD video quality and robust night vision capabilities.
Video 1.1: A brief introduction to the RLC-510A camera, highlighting its key features and design.
2. Key Features
- Smart Person/Vehicle/Animal Detection: Advanced algorithms identify genuine threats, reducing false alarms from minor movements. Animal detection requires the latest firmware.
- Exceptional 5MP Super HD: Captures 5-megapixel videos at 30 frames per second (fps) for clear and detailed footage.
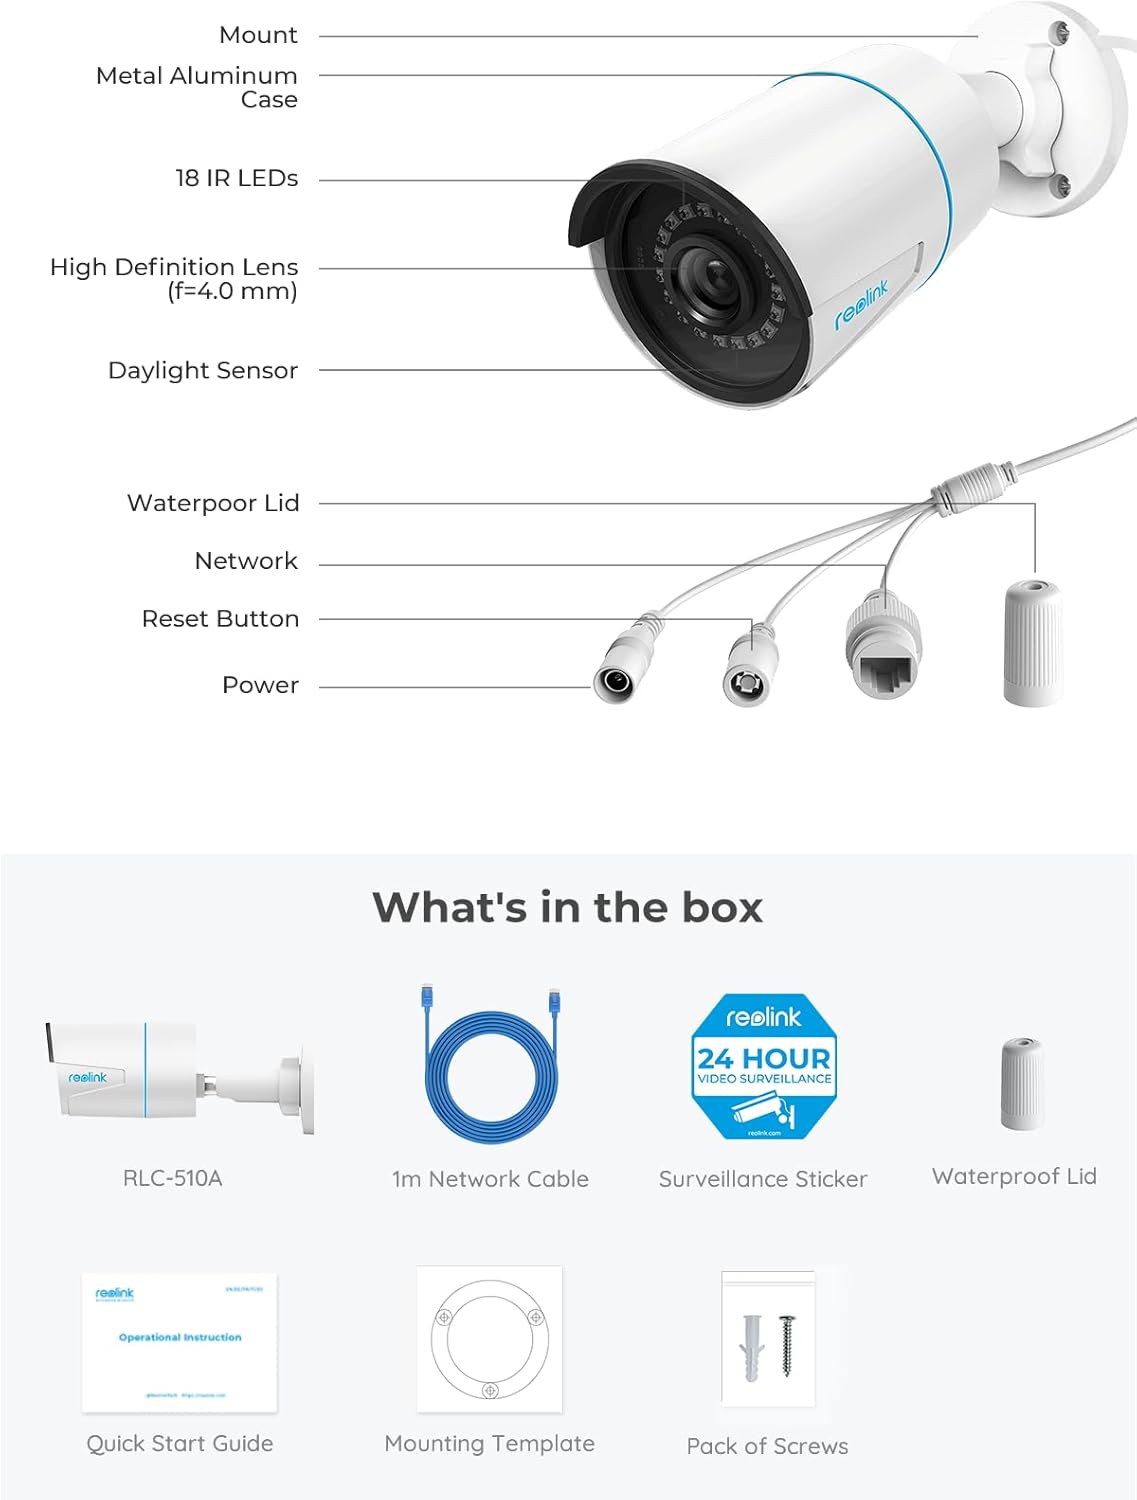
- 100ft IR Night Vision: Equipped with 18 IR lights and 3D-DNR technology for clear night vision up to 100 feet.
- Multiple Recording Options: Supports 24/7 recording or motion-detected videos to a microSD card (up to 256GB, not included), FTP server, NAS, or Reolink PoE NVRs (not included).
- Free App and Remote Access: Access your camera locally or remotely via the free Reolink App (iOS, Android) and PC Client (Windows, Mac).
- Time-Lapse Function: Create time-lapse videos to condense long events into short clips (only works on Reolink App).
- Weatherproof Design: Suitable for outdoor use with an IP67 rating, operating in temperatures from -10°C/14°F to 55°C/131°F.


Video 2.1: RLC-510A - 5MP Super HD Details Day & Night. This video demonstrates the camera's high-definition capabilities in various lighting conditions.
3. What's in the Box
The REOLINK RLC-510A package includes the following items:
- RLC-510A Camera
- 1x 1M Network Cable (for testing purposes)
- Surveillance Sticker
- Waterproof Lid
- Quick Start Guide
- Mounting Template
- Pack of Screws

4. Setup Guide
4.1 Initial Setup (PoE Connection)
The RLC-510A is a Power over Ethernet (PoE) camera, meaning it receives both power and data through a single Ethernet cable. This simplifies installation.
- Connect to PoE Switch/NVR: Connect one end of an Ethernet cable to the camera's network port. Connect the other end to a PoE switch or a Reolink PoE NVR. Ensure the PoE device provides sufficient power (IEEE802.3af).
- Alternative Power (Optional): If not using PoE, connect a DC 12V power adapter (not included) to the camera's power input.
- Mount the Camera: Use the provided mounting template and screws to securely install the camera in your desired location. Ensure the camera is positioned to cover the area you wish to monitor.
4.2 App Installation
To access and manage your camera, download the free Reolink App or PC Client:
- For Mobile Devices: Search for "Reolink" on the App Store (iOS) or Google Play (Android) and install the application.
- For PC/Mac: Download the Reolink Client software from the official Reolink website.
Follow the in-app instructions to add your camera to the application. This typically involves scanning a QR code on the camera or manually entering its UID.
5. Operating Instructions
5.1 Live View
Once your camera is added to the Reolink App/Client, you can view the live feed from your property anytime, anywhere. Simply select the camera from your device list to start streaming.

5.2 Playback
Access recorded footage by navigating to the playback section in the app. You can filter recordings by date, time, and event type (e.g., motion detection, person/vehicle detection).
5.3 Smart Detection Configuration
Configure the smart detection settings to receive alerts only for relevant events:
- Open camera settings in the app.
- Go to "Detection Alarm" or "Smart Detection".
- Enable/disable detection for Person, Vehicle, and Animal.
- Adjust sensitivity and draw detection zones to fine-tune alerts.
5.4 Recording Settings
Manage how your camera records footage:
- MicroSD Card: Insert a microSD card (up to 256GB) into the camera's slot for local storage. Configure continuous or motion-triggered recording.
- NVR/NAS/FTP: If using a Reolink NVR, Network Attached Storage (NAS), or File Transfer Protocol (FTP) server, configure recording paths and schedules through the Reolink Client or NVR interface.
5.5 Time-Lapse Function
The time-lapse feature allows you to capture long-term events and condense them into short, viewable videos. This is ideal for monitoring construction projects, plant growth, or weather changes.
Video 5.2: Stunning Time-Lapse Videos. This video showcases various time-lapse recordings captured by Reolink cameras, demonstrating the feature's versatility.
To use time-lapse, access the feature within the Reolink App and set your desired interval and duration.
5.6 Google Assistant Integration
Control your RLC-510A camera hands-free using Google Assistant. You can ask Google to show you the live feed from your camera on compatible smart displays or TVs.

Video 5.3: Control home security camera system with Google Assistant. This video demonstrates how to link and control your Reolink camera using Google Assistant voice commands.
6. Maintenance
6.1 Cleaning the Camera
Regularly clean the camera lens and housing to ensure optimal performance. Use a soft, damp cloth to wipe away dust and dirt. Avoid abrasive cleaners or solvents that could damage the camera.
6.2 Firmware Updates
Keep your camera's firmware updated to benefit from new features, performance improvements, and security enhancements. Firmware updates can be performed via the Reolink App or Client. Follow the on-screen instructions carefully during the update process.
6.3 Storage Management
If using a microSD card, periodically check its status and manage recordings to prevent it from filling up. You can configure the camera to overwrite old footage automatically or manually delete files through the app.
7. Troubleshooting
If you encounter issues with your RLC-510A camera, refer to the following common problems and solutions:
- No Power/No Image: Ensure the PoE connection is secure and the PoE switch/NVR is functioning correctly. If using a power adapter, verify it's properly connected and providing 12V DC.
- Frequent False Alarms: Adjust the smart detection sensitivity settings in the app. Define specific detection zones to exclude areas with irrelevant motion (e.g., swaying trees).
- Poor Night Vision: Check if the IR lights are obstructed. Ensure the camera lens is clean.
- Cannot Connect to App: Verify your network connection. Ensure the camera is powered on and connected to the network. Try restarting the camera and your router.
For more detailed troubleshooting or persistent issues, please consult the official Reolink User Guide PDF or contact Reolink customer support.
8. Specifications
| Feature | Specification |
|---|---|
| Model Name | RLC-510A |
| Video Capture Resolution | 5 MP (2560 x 1920) |
| Frame Rate | 30 fps |
| Night Vision Range | 100 Feet |
| Detection Type | Human, Vehicle, Animal |
| Connectivity Technology | Wired (Power over Ethernet) |
| Storage | Micro SD (up to 256 GB) |
| Indoor/Outdoor Usage | Outdoor, Indoor |
| Weatherproof Rating | IP67 |
| Operating Voltage | 12 Volts (DC) |
| Dimensions (L x W x H) | 2.64 x 7.33 x 7.33 inches |
| Item Weight | 1.36 pounds |
9. Warranty Information
REOLINK products typically come with a limited warranty. For specific warranty terms and conditions, including duration and coverage, please refer to the warranty card included in your product packaging or visit the official REOLINK website. Retain your proof of purchase for warranty claims.
10. Support
For further assistance, technical support, or to download the latest software and firmware, please visit the official REOLINK support page:
You can also find the comprehensive User Manual (PDF) and Instructions for Use (IFU) (PDF) via the following links:


