PowerA 1518809-01 Wired Controller Instruction Manual
Model: 1518809-01 | Brand: PowerA
1. Introduction
This manual provides comprehensive instructions for the PowerA 1518809-01 Wired Controller. It covers setup, operation, maintenance, and troubleshooting to ensure optimal performance and longevity of your device. Please read this manual thoroughly before using the controller.
2. Package Contents
- PowerA 1518809-01 Wired Controller
- Detachable USB Cable
- Instruction Manual (this document)
3. Compatibility
The PowerA 1518809-01 Wired Controller is compatible with the following platforms:
- Xbox One
- Xbox Series S
- Xbox Series X
- Windows 10/11 PCs
4. Controller Features
Familiarize yourself with the various components and controls of your PowerA Wired Controller.

Image 4.1: Front View of the Controller. This image displays the front of the PowerA 1518809-01 wired controller, highlighting the layout of the A, B, X, Y buttons, D-pad, left and right analog sticks, View button, Menu button, Share button, and the central Xbox button. The volume control slider is also visible below the Xbox button.
- A, B, X, Y Buttons: Standard action buttons.
- D-Pad: Directional pad for precise input.
- Left/Right Analog Sticks: For movement and camera control.
- View Button: Accesses in-game menus or system features.
- Menu Button: Accesses game or system menus.
- Share Button: Captures screenshots or video clips (Xbox Series X|S, Windows).
- Xbox Button: Powers on/off the console or opens the Xbox Guide.
- Left/Right Bumpers (LB/RB): Shoulder buttons.
- Left/Right Triggers (LT/RT): Analog triggers for acceleration/braking or firing.
- Volume Control: A dedicated slider for adjusting audio output volume.
- Advanced Gaming Buttons: Two programmable buttons located on the underside of the controller.
- Trigger Locks: Two 3-way switches, one for each trigger, to adjust trigger travel distance.

Image 4.2: Back View of the Controller. This image shows the rear of the PowerA 1518809-01 wired controller, displaying regulatory compliance markings and the location of the two advanced gaming buttons on the grips.
5. Setup
5.1 Connecting to Xbox Console (Xbox One, Xbox Series S, Xbox Series X)
- Ensure your Xbox console is powered on.
- Connect the detachable USB cable to the port on the top of the PowerA controller.
- Plug the other end of the USB cable into an available USB port on your Xbox console.
- The controller will automatically connect and the Xbox button will illuminate, indicating a successful connection.
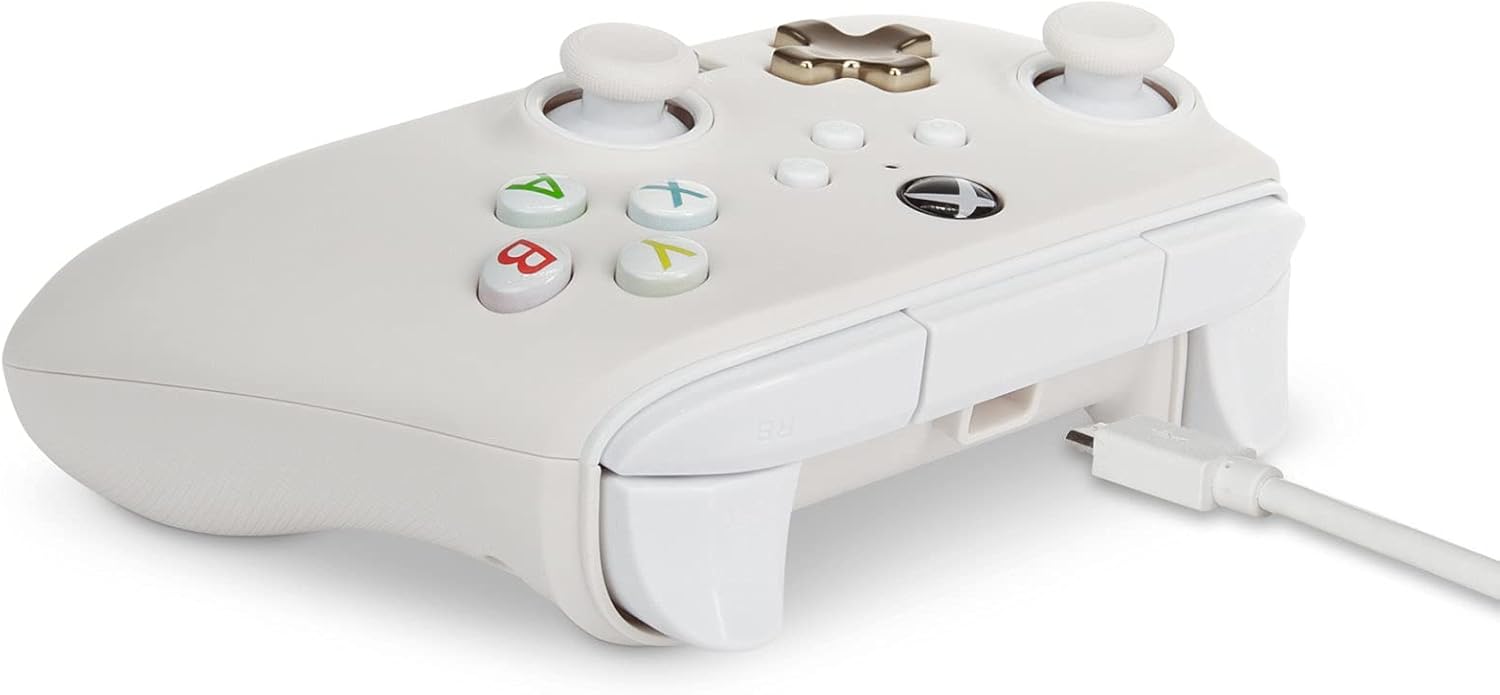
Image 5.1: USB Cable Connection. This image illustrates the side view of the PowerA 1518809-01 wired controller, showing the detachable USB cable securely plugged into the controller's port.
5.2 Connecting to Windows PC
- Ensure your Windows PC is powered on.
- Connect the detachable USB cable to the port on the top of the PowerA controller.
- Plug the other end of the USB cable into an available USB port on your PC.
- Your PC should automatically detect and install the necessary drivers. The Xbox button on the controller will illuminate once connected.
- If drivers do not install automatically, ensure your Windows operating system is up to date.
6. Operating Instructions
6.1 Basic Gameplay
Once connected, the controller functions as a standard Xbox controller. Refer to your game's instructions for specific button assignments and controls.
6.2 Programming Advanced Gaming Buttons
The controller features two programmable buttons on the underside for enhanced gameplay. These buttons can be mapped to any standard controller button (A, B, X, Y, LB, RB, LT, RT, Left Stick Click, Right Stick Click, D-pad).
- Press and hold the Program Button (usually a small button on the back or bottom) for 2 seconds. The LED indicator will begin to flash.
- Press the Advanced Gaming Button (left or right) you wish to program. The LED indicator will flash rapidly.
- Press the standard button (e.g., A, B, X, Y, etc.) you want to assign to the Advanced Gaming Button. The LED indicator will stop flashing, signaling successful programming.
- To clear a programmed button, repeat steps 1-2, then press the Program Button again.
6.3 Volume Control
Use the dedicated volume slider located on the controller to adjust the audio output volume for connected headsets.
6.4 Trigger Locks
The controller includes 3-way trigger lock switches for both the Left and Right Triggers. These switches allow you to reduce the travel distance of the triggers, providing faster response times in certain games (e.g., first-person shooters). Adjust the switch to your preferred setting.
7. Maintenance and Care
- Cleaning: Use a soft, dry cloth to clean the controller. Avoid abrasive cleaners or solvents.
- Storage: Store the controller in a cool, dry place away from direct sunlight and extreme temperatures.
- Handling: Avoid dropping the controller or subjecting it to strong impacts. Do not pull on the cable excessively.
- Disassembly: Do not attempt to disassemble the controller, as this will void the warranty.
8. Troubleshooting
8.1 Controller Not Responding
- Ensure the USB cable is securely connected to both the controller and the console/PC.
- Try connecting the controller to a different USB port.
- Restart your console or PC.
- Test the controller on another compatible device if possible to rule out a device-specific issue.
8.2 Strong Vibrations
- Some games may have intense vibration feedback. Check the in-game settings for vibration intensity options.
- On Xbox, you can adjust vibration intensity through the console's accessory settings.
8.3 Buttons or Sticks Not Functioning Correctly
- Ensure no debris is lodged around the buttons or sticks.
- If Advanced Gaming Buttons are programmed, ensure they are mapped correctly or clear them to test standard functionality.
- Update your PC's drivers or console's firmware if available.
9. Specifications
| Model Number | 1518809-01 |
| Connectivity | Wired USB |
| Compatibility | Xbox One, Xbox Series S, Xbox Series X, Windows |
| Dimensions (L x W x H) | 15.6 x 10.7 x 6.5 cm (6.14 x 4.21 x 2.56 inches) |
| Weight | 204.12 grams (0.45 lbs) |
10. Support and Warranty
10.1 Customer Support
For further assistance, technical support, or product inquiries, please visit the official PowerA support website or contact their customer service department. Contact information can typically be found on the PowerA official website.
You may also find helpful resources and FAQs at www.powera.com/support.
10.2 Product Warranty
This PowerA controller comes with a limited warranty. Please refer to the warranty information provided with your product packaging or visit the official PowerA website for details regarding warranty terms, conditions, and registration procedures. Keep your proof of purchase for warranty claims.


