
Introduction
This manual provides essential information for the safe and effective operation, assembly, and maintenance of your DEWALT 12-Inch Single Bevel Compound Miter Saw (DWS715) and DEWALT Compact Miter Saw Stand (DWX724). Please read all instructions carefully before use to ensure proper function and to prevent injury.

Image: The DEWALT DWS715 12-inch miter saw and the DEWALT DWX724 compact miter saw stand shown together.
Safety Information
Always follow basic safety precautions to reduce the risk of fire, electric shock, and personal injury. Keep this manual for future reference.
- Read all instructions: Familiarize yourself with the tool's operation and safety guidelines.
- Wear eye protection: Always wear safety glasses or goggles.
- Use hearing protection: Prolonged exposure to noise can cause hearing damage.
- Secure workpiece: Always clamp or otherwise secure the material being cut.
- Keep hands clear: Never place hands near the cutting blade.
- Disconnect power: Unplug the saw before making adjustments, changing blades, or performing maintenance.
- Maintain a clean work area: Cluttered areas invite accidents.
- Ensure proper lighting: Operate tools in well-lit areas.
- Do not overreach: Maintain proper footing and balance at all times.
- Use the correct blade: Ensure the blade is sharp, clean, and appropriate for the material being cut.
Components and Features
DEWALT DWS715 Miter Saw
The DWS715 miter saw is designed for precise crosscuts and miter cuts in various materials. Key features include:
- 15 Amp Motor: Delivers 4,000 RPM for powerful and efficient cutting.
- Stainless Steel Miter Detent Plate: Provides repeatable accuracy with 11 positive stops.
- Cam Miter Lock: Allows for quick and accurate miter angle adjustments.
- Tall Sliding Fences: Supports 5-1/2 inches of base molding vertically and 5-1/2 inches of crown molding vertically nested.
- Bevel Capacity: Up to 48 degrees to the left.
- Lightweight Design: Facilitates portability.
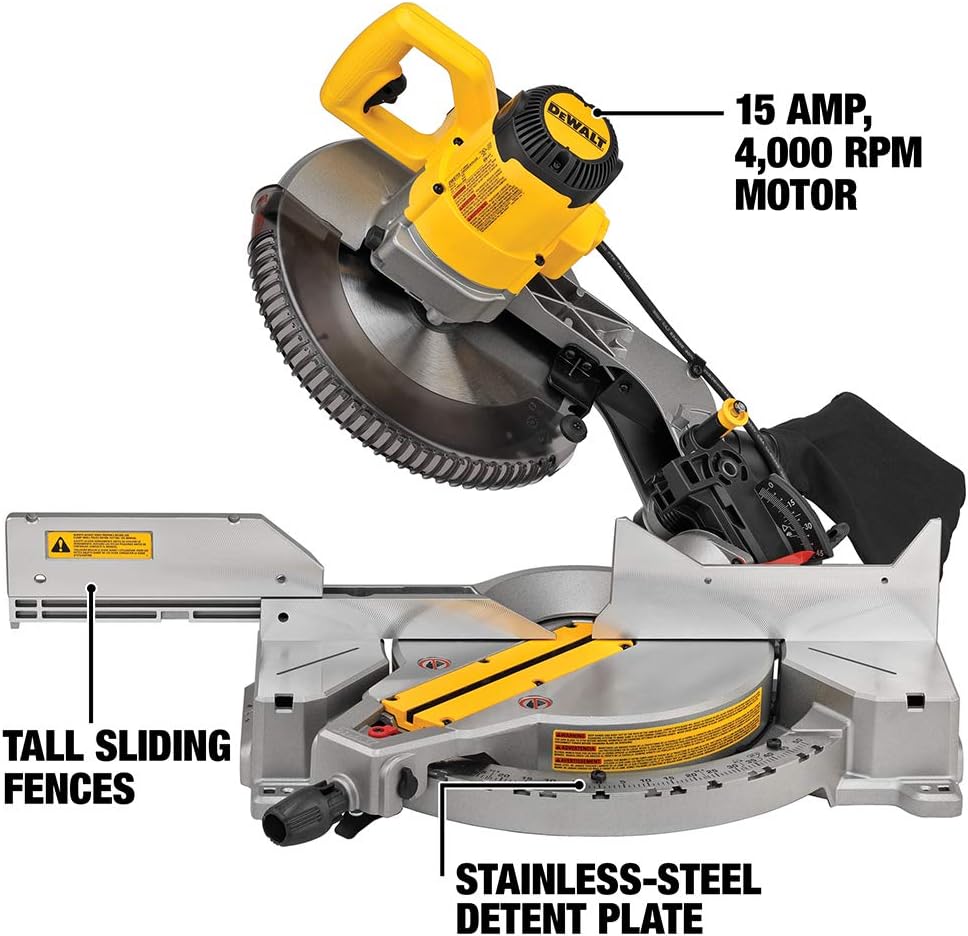
Image: The DEWALT DWS715 miter saw highlighting the 15 Amp, 4,000 RPM motor, tall sliding fences, and stainless-steel detent plate.

Image: The DEWALT DWS715 miter saw, indicating that it includes a carbide blade, dust bag, blade wrench, vertical clamp, and comfortable side handles in the base.
DEWALT DWX724 Miter Saw Stand
The DWX724 compact miter saw stand provides a stable and portable platform for your miter saw. Key features include:
- Universal Design: Compatible with most brands of miter saws.
- Lightweight Aluminum Construction: Weighs 29.8 lbs for easy transport.
- Extendable Beam: The 40-inch beam extends to support up to 10 feet of material.
- High Weight Capacity: Supports up to 500 lbs.
- Folding Legs: For compact storage and easy setup.
- Leg Lock Levers: Enable fast and easy setup and breakdown.
- Tool Mounting Brackets: Allow for secure and easy attachment of the miter saw.
- Work Stops/Supports: Repositionable along the rail to support long workpieces.
- Non-Marring Feet: On tool mounts to protect work surfaces.

Image: The DEWALT DWX724 compact miter saw stand in its folded, compact configuration.
Setup and Assembly
Assembling the DWX724 Miter Saw Stand
- Unpack Components: Remove all parts from the packaging and verify against the parts list in the stand's specific manual.
- Unfold Legs: Release the leg lock levers and extend the legs until they lock into place. Ensure all four legs are securely locked.
- Attach Work Supports: Slide the work stops/supports onto the main beam. These can be adjusted later.
- Attach Tool Mounting Brackets: Secure the tool mounting brackets to the stand's beam according to the stand's manual.
Mounting the DWS715 Miter Saw to the DWX724 Stand
Before mounting, ensure the miter saw is unplugged.
- Position Brackets: Place the miter saw on the tool mounting brackets, aligning the saw's mounting holes with the slots on the brackets.
- Secure Saw: Use the provided hardware (bolts, washers, nuts) to securely fasten the miter saw to the mounting brackets. Tighten all fasteners firmly.
- Adjust Position: Once mounted, the saw and brackets can be slid along the stand's beam to achieve the desired working position.

Image: The DEWALT DWS715 miter saw securely mounted onto the DWX724 compact miter saw stand.

Image: The DEWALT DWS715 miter saw mounted on the DWX724 stand, with the stand's material supports extended to accommodate longer workpieces.
Operating Instructions
General Operation
- Power Connection: Connect the miter saw to a suitable power outlet.
- Workpiece Placement: Place the material to be cut firmly against the fence and the saw table.
- Secure Workpiece: Use a clamp to hold the workpiece securely in place.
- Starting the Saw: Depress the trigger switch to start the motor. Allow the blade to reach full speed before beginning the cut.
- Making the Cut: Slowly lower the saw blade through the workpiece. Maintain a steady, controlled feed rate.
- Completing the Cut: Once the cut is complete, release the trigger switch and allow the blade to stop completely before raising the saw head.
Adjusting Miter Angles
- Unlock Miter: Loosen the cam miter lock handle.
- Set Angle: Rotate the miter arm to the desired angle, using the stainless steel detent plate for common angles or the scale for precise settings.
- Lock Miter: Tighten the cam miter lock handle to secure the miter arm in position.
Adjusting Bevel Angles
- Unlock Bevel: Locate and loosen the bevel lock knob, typically at the rear of the saw.
- Set Angle: Tilt the saw head to the desired bevel angle (up to 48 degrees left).
- Lock Bevel: Tighten the bevel lock knob to secure the saw head.
Adjusting Fences
The tall sliding fences can be adjusted to provide maximum support for various cutting operations, including vertical base and crown molding.
- Loosen Fence Knobs: Loosen the knobs that secure the fence sections.
- Slide Fences: Slide the fence sections outward to accommodate wider material or inward for standard cuts. Ensure they do not interfere with the blade path.
- Tighten Fence Knobs: Securely tighten the fence knobs.
Maintenance
Regular maintenance ensures the longevity and safe operation of your DEWALT tools. Always disconnect power before performing any maintenance.
- Blade Changes:
- Unplug the saw.
- Use the provided blade wrench to loosen the arbor bolt while holding the blade lock button.
- Carefully remove the old blade and install the new blade, ensuring the teeth are oriented correctly.
- Tighten the arbor bolt securely.
- Cleaning:
- Regularly clean dust and debris from the saw, especially around the motor vents, blade guard, and miter scale.
- Use a dry cloth or compressed air. Do not use solvents.
- Empty the dust bag frequently.
- Lubrication: Refer to the specific product manual for any recommended lubrication points. Generally, DEWALT tools are designed for minimal user lubrication.
- Inspection:
- Inspect the power cord for damage.
- Check all fasteners for tightness.
- Ensure blade guard operates smoothly.
Troubleshooting
This section addresses common issues you might encounter. For more complex problems, contact DEWALT service.
| Problem | Possible Cause | Solution |
|---|---|---|
| Saw does not start | No power, faulty switch, tripped circuit breaker. | Check power connection, test outlet, reset breaker, inspect cord. |
| Blade binds or smokes | Dull blade, incorrect blade for material, improper feed rate, workpiece not secured. | Replace blade, use correct blade, reduce feed rate, secure workpiece firmly. |
| Inaccurate cuts | Miter/bevel not locked, fence not square, blade deflection. | Ensure all locks are tight, check fence for squareness, inspect blade for damage. |
| Excessive vibration | Loose blade, damaged blade, loose mounting bolts. | Check blade tightness, replace damaged blade, tighten all mounting hardware. |
Specifications
DEWALT DWS715 Miter Saw
- Power Source: Corded Electric
- Amperage: 15 Amps
- No-Load Speed: 4000 RPM
- Blade Diameter: 12 Inches
- Bevel Capacity: 48 Degrees (Left)
- Miter Detents: 11 Positive Stops
- Fence Height: 5-1/2 Inches (Vertical Base Molding), 5-1/2 Inches (Vertical Crown Molding Nested)
- Blade Material: Stainless Steel (typically refers to the blade's core or general material, actual cutting edge is carbide)
- Model Number: DWS715
DEWALT DWX724 Miter Saw Stand
- Material: Aluminum
- Weight: 29.8 lbs
- Beam Length (Collapsed): 40 Inches
- Beam Length (Extended): Up to 10 Feet
- Weight Capacity: 500 lbs
- Model Number: DWX724
Warranty and Support
DEWALT provides comprehensive warranty coverage for its products.
- DWS715 Miter Saw: Limited Lifetime Warranty
- DWX724 Miter Saw Stand: 3-Year Limited Warranty
For detailed warranty information, service, or technical support, please refer to the official DEWALT website or contact DEWALT customer service. Keep your proof of purchase for warranty claims.
Online Support: www.dewalt.com


