
eXuby B08DX95HN4
eXuby Tiny Shock Collar User Manual
Model: B08DX95HN4
1. Introduction
Thank you for choosing the eXuby Tiny Shock Collar. This device is designed to assist in training small dogs (5-15 lbs) by providing sound, vibration, and static stimulation to correct unwanted behaviors. Please read this manual thoroughly before use to ensure proper operation and the safety of your pet.
Important Safety Information
- This product is intended for use with healthy dogs weighing between 5 and 15 lbs. Do not use on puppies under 6 months old.
- Do not use this collar on aggressive dogs. If your dog exhibits aggressive behavior, consult a professional dog trainer.
- Avoid leaving the collar on the dog for more than 12 hours per day to prevent skin irritation.
- Regularly check your dog's neck for signs of irritation or sores. If irritation occurs, discontinue use until the skin heals.
- The static stimulation is designed to be a deterrent, not to cause harm. Always start with the lowest intensity level and gradually increase if necessary.
- This is not an automatic bark collar; it requires manual operation via the remote.
2. Package Contents
Please verify that all items listed below are included in your package:
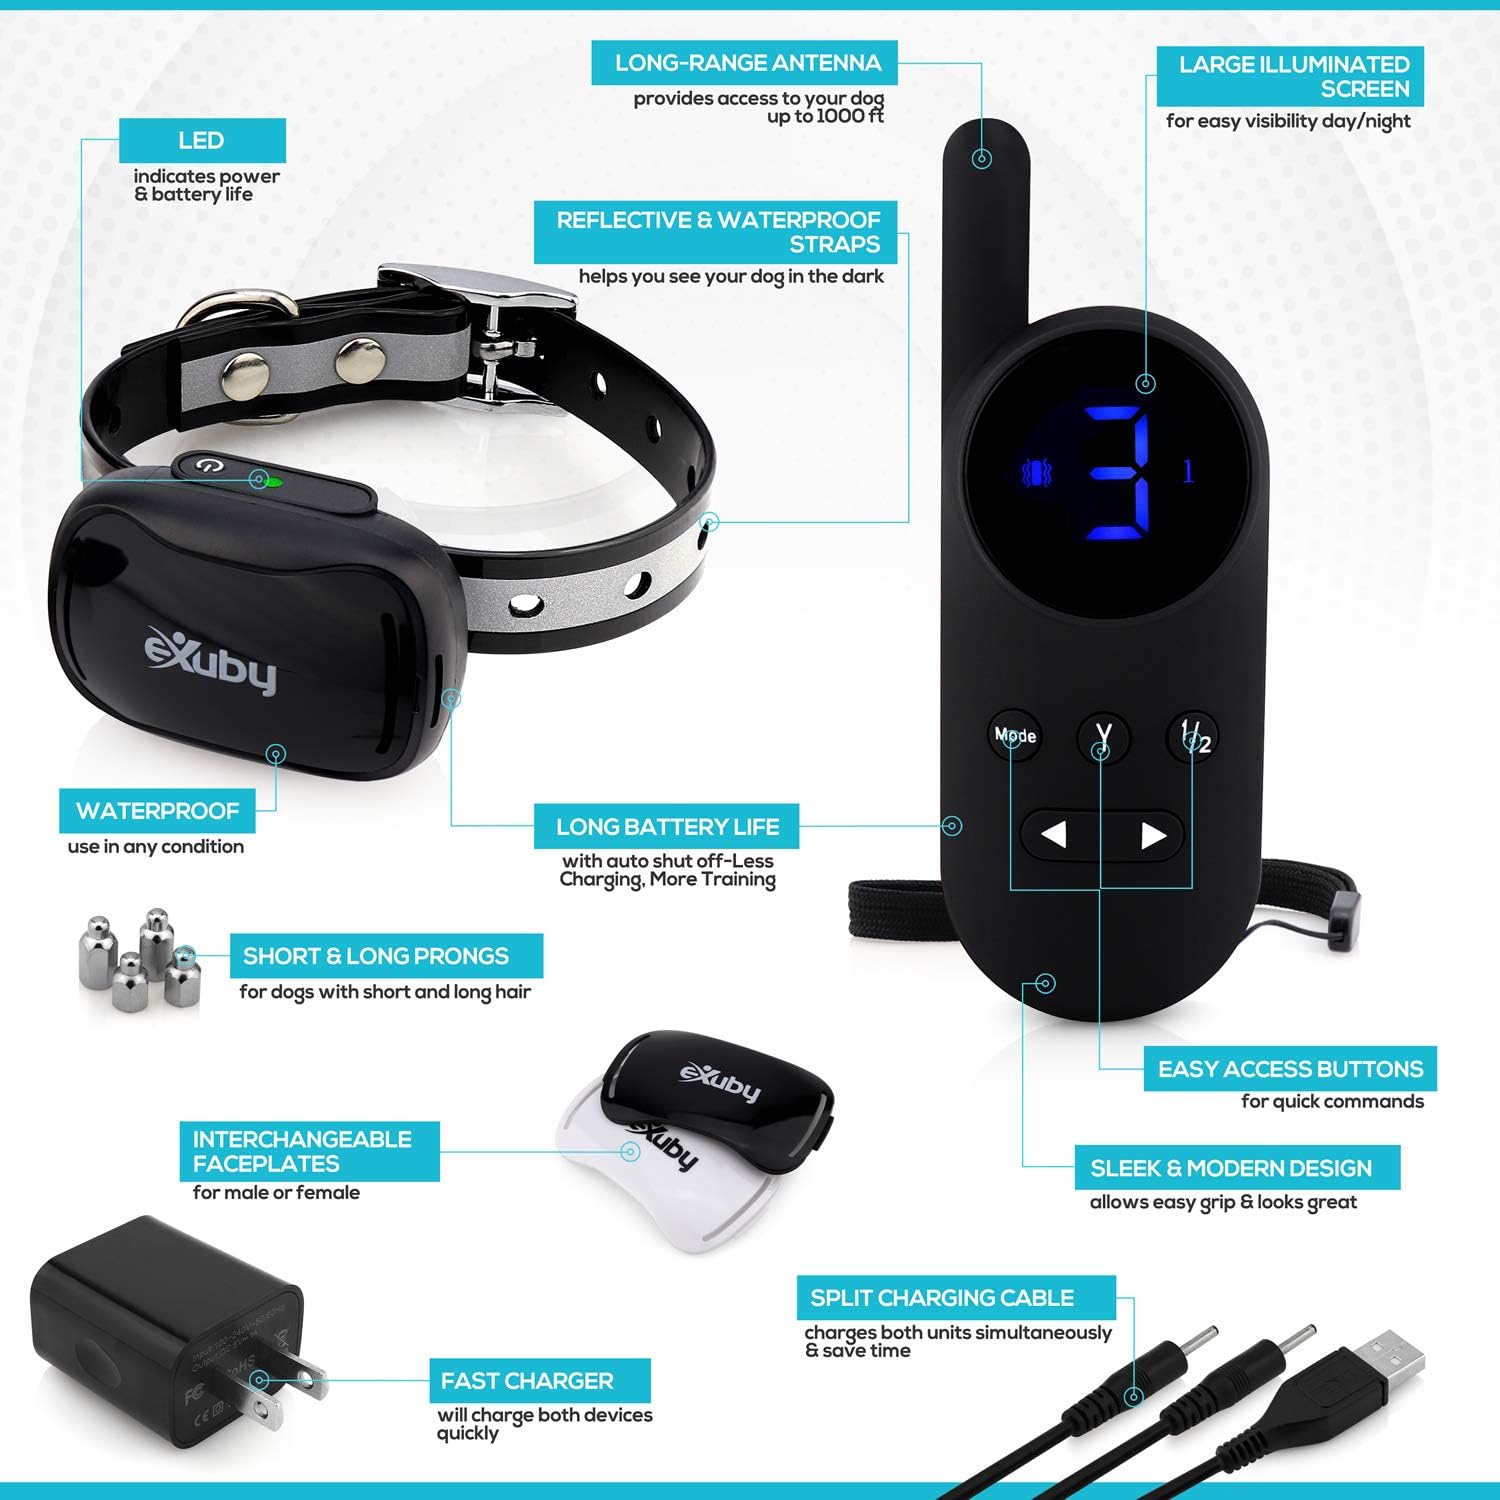
- eXuby Tiny Shock Collar Receiver
- Remote Transmitter
- Adjustable Collar Strap
- Long and Short Contact Points (2 pairs)
- Silicone Conductive Covers (2 pairs)
- USB Split Charging Cable
- Power Adapter
- Test Light Tool
- Interchangeable Faceplates (Black, Blue, Pink)
- Wrist Strap for Remote
- User Manual (this document)

3. Components Overview
Collar Receiver
- Contact Points: Deliver static stimulation. Choose based on dog's fur length.
- Charging Port: For recharging the receiver battery.
- LED Indicator: Shows power status and battery life.
- Power Button: Turns the receiver on/off.
- Interchangeable Faceplate: Allows for personalization.
Remote Transmitter
- LCD Display: Shows mode, intensity level, and battery status.
- Mode Button: Cycles through Sound, Vibration, and Shock modes.
- Y Button: Activates the selected correction mode.
- Up/Down Buttons: Adjusts intensity levels (1-9).
- 1/2 Button: Switches between controlling Collar 1 or Collar 2 (if applicable).
- Charging Port: For recharging the remote battery.

4. Setup
4.1 Charging the Devices
Before first use, fully charge both the collar receiver and the remote transmitter. The devices use Lithium Ion batteries.
- Connect the USB split charging cable to the charging ports on both the receiver and the remote.
- Plug the USB cable into the power adapter and then into a standard wall outlet.
- The LED indicator on the receiver will glow red during charging and turn green when fully charged. The remote's battery icon on the LCD will show charging status.
- Charging typically takes 2-3 hours.
4.2 Attaching Contact Points
Select the appropriate contact points based on your dog's fur length:
- Use short contact points for dogs with short fur.
- Use long contact points for dogs with thick or long fur.
Screw the chosen contact points firmly onto the receiver. You may also place the silicone conductive covers over the contact points for added comfort, especially if using static stimulation.
4.3 Fitting the Collar
Proper fit is crucial for effective and safe operation.
- Position the receiver on your dog's neck so that the contact points are underneath, making direct contact with the skin.
- The collar should be snug, but not too tight. You should be able to fit one finger comfortably between the collar strap and your dog's neck.
- If the collar is too loose, the stimulation may not be consistent. If it's too tight, it could cause skin irritation.

5. Operating Instructions
5.1 Powering On/Off
- Receiver: Press and hold the power button on the receiver until the LED indicator flashes. To turn off, press and hold the power button until the LED turns off.
- Remote: Press any button to wake up the remote. It will automatically go into standby mode after a period of inactivity.
5.2 Pairing the Remote and Receiver
The devices are usually pre-paired from the factory. If re-pairing is needed:
- Ensure both devices are fully charged and turned off.
- Turn on the remote.
- Press and hold the power button on the receiver until the LED indicator flashes rapidly.
- Within 10 seconds, press the 'Y' button on the remote. The receiver's LED will stop flashing and remain solid, indicating successful pairing.
5.3 Selecting Modes and Intensity Levels
The remote offers three correction modes: Sound, Vibration, and Static Stimulation (Shock).
- Press the Mode button on the remote to cycle through the modes. The selected mode will be displayed on the LCD.
- Use the Up/Down arrow buttons to adjust the intensity level for Vibration and Static Stimulation modes (levels 1-9). Sound mode has a fixed intensity.
- Press the Y button to deliver the selected correction.
5.4 Training Guidelines
- Start Low: Always begin with the lowest intensity level for vibration or static stimulation. Observe your dog's reaction and increase only if necessary. The goal is to get their attention, not to cause pain.
- Consistency: Use the collar consistently for specific behaviors you want to correct.
- Timing: Deliver the correction immediately as the unwanted behavior occurs. This helps your dog associate the correction with the action.
- Positive Reinforcement: Always pair corrections with positive reinforcement when your dog performs the desired behavior.
- Short Sessions: Keep training sessions short and positive.
6. Maintenance
6.1 Cleaning
- Regularly clean the collar strap and receiver with a damp cloth.
- Clean the contact points to ensure good conductivity.
- Ensure devices are dry before charging or storing.
6.2 Battery Care
- Charge the devices when the battery indicator is low.
- For long-term storage, charge the batteries to about 50% and store in a cool, dry place. Recharge every few months to prevent deep discharge.
7. Troubleshooting
| Problem | Possible Cause | Solution |
|---|---|---|
| Collar not responding to remote | Not paired; low battery; out of range | Re-pair devices; charge batteries; move closer to dog. |
| No static stimulation | Contact points not touching skin; intensity too low; faulty contact points | Adjust collar fit; increase intensity; ensure contact points are clean and secure. Use test light. |
| Short range | Obstacles; interference; low battery | Move to an open area; avoid strong electromagnetic fields; charge batteries. |
| Skin irritation on dog's neck | Collar too tight; worn too long; allergic reaction | Loosen collar; remove collar for several hours daily; consult vet if irritation persists. |
8. Specifications
| Feature | Detail |
|---|---|
| Product Dimensions | 2 x 1 x 2 inches (Receiver) |
| Item Weight | 12 ounces (total package) |
| Battery Type | Lithium Ion (included) |
| Material | Thermoplastic Polyurethane |
| Color | Black (with interchangeable faceplates) |
| Target Audience | Dogs (Toy Breeds, Small Breeds 5-15 lbs) |
| Intensity Levels | 9 (Vibration & Shock) |
| Modes | Sound, Vibration, Shock |

9. Warranty and Support
eXuby products are designed for quality and durability. For specific warranty information or technical support, please refer to the warranty card included in your package or visit the official eXuby website. You can also contact eXuby customer service directly for assistance.
Visit the eXuby Store: eXuby Official Store
10. Official Product Videos
No official product videos from the seller were found in the provided data.
Ask a question about this manual
Ask about setup, troubleshooting, compatibility, parts, safety, or missing instructions. Manuals+ will review the question and use this page’s manual context to help answer it.