
Baseus ACDJS-01
Baseus Heyo Rotation Countdown Timer User Manual
Model: ACDJS-01
1. Product Overview
The Baseus Heyo Rotation Countdown Timer is a versatile digital timer designed for various scenarios, including kitchen cooking, study, work, and exercise. It features an intuitive rotary adjustment, a clear LCD display, and intelligent energy-saving functions.

Image 1.1: Front view of the Baseus Heyo Rotation Countdown Timer, showcasing its sleek design and clear digital display.
2. Key Features
- Intuitive Rotary Adjustment: Easily set time by rotating the outer ring, supporting both countdown and count-up functions.
- Clear LCD Digital Display: Large, easy-to-read numbers for minutes and seconds.
- Adjustable Volume: Three volume settings (Loud, Low, Mute) to suit different environments.
- Intelligent Energy Saving: The display dims after 5 seconds of inactivity and shuts down after another 5 seconds to conserve battery life.
- Magnetic Backing: Allows for convenient placement on metallic surfaces like refrigerators or whiteboards.
- Durable Material: Constructed from Acrylonitrile Butadiene Styrene for longevity.

Image 2.1: Demonstrates the easy rotation mechanism for efficient timing adjustments.

Image 2.2: Illustrates the adjustable volume settings located on the back of the timer.
3. Setup
3.1. Package Contents
- Baseus Heyo Rotation Countdown Timer (1 unit)
- User Manual (this document)
- Note: AAA batteries are not included and must be purchased separately.
3.2. Battery Installation
- Locate the battery compartment on the back of the timer.
- Open the battery cover.
- Insert three (3) AAA batteries, ensuring correct polarity (+/-).
- Close the battery cover securely. The LCD display will light up, indicating successful installation.

Image 3.1: View of the battery compartment, showing where to insert three AAA batteries.
4. Operating Instructions
4.1. Power On/Off
The timer automatically powers on when batteries are installed. It enters an energy-saving mode after 5 seconds of inactivity and fully shuts down after another 5 seconds of no operation. To reactivate, simply rotate the dial or press the "O" button.
4.2. Setting the Timer (Countdown)
- Adjusting Time: Rotate the outer ring clockwise to increase the time (minutes and seconds) and counter-clockwise to decrease it. The adjustable range is 00:00 to 99:55.
- Start Countdown: Once the desired time is set, press the "O" button on the front of the timer to begin the countdown.
- Pause/Resume: Press the "O" button again during a countdown to pause it. Press it once more to resume.
- Reset: To reset the timer to 00:00, press and hold the "O" button for approximately 3 seconds.
- Alarm: When the countdown reaches 00:00, the timer will sound an alarm according to the selected volume setting.
4.3. Using as a Stopwatch (Count-up)
- Ensure the timer display is at 00:00. If not, reset it by holding the "O" button.
- Press the "O" button to start counting up from 00:00.
- Press the "O" button again to pause the count-up.
- Press and hold the "O" button to reset the stopwatch.
4.4. Adjusting Volume
On the back of the timer, there is a switch to adjust the alarm volume. Select from three modes:
- Loud: For noisy environments or when a strong alert is needed.
- Low: For quiet environments or subtle alerts.
- Mute: The display will blink when the time is up, providing a silent notification. Ideal for libraries, offices, or study areas.
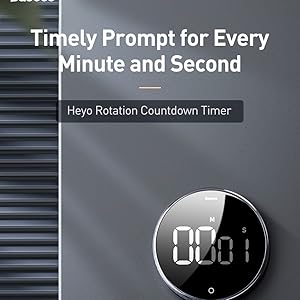
Image 4.1: The timer can be conveniently placed on magnetic surfaces for easy visibility.

Image 4.2: The timer is suitable for various settings, including professional and educational environments.
5. Maintenance
- Cleaning: Wipe the timer with a soft, dry cloth. Do not use abrasive cleaners or immerse in water.
- Battery Replacement: Replace batteries when the display becomes dim or the timer functions erratically. Always use new AAA batteries.
- Storage: Store the timer in a cool, dry place when not in use for extended periods. Remove batteries if storing for more than a month to prevent leakage.
- Avoid Extreme Conditions: Do not expose the timer to extreme temperatures, direct sunlight, or high humidity.
6. Troubleshooting
| Problem | Possible Cause | Solution |
|---|---|---|
| Display is blank or dim. | Low or dead batteries; incorrect battery installation. | Replace with new AAA batteries, ensuring correct polarity. |
| Timer does not start/stop. | "O" button not pressed firmly; timer in sleep mode. | Press the "O" button firmly. Rotate the dial to wake the timer from sleep mode. |
| Alarm is not sounding. | Volume set to Mute; low battery. | Check the volume switch on the back and set it to Loud or Low. Replace batteries if needed. |
| Numbers are incorrect or flickering. | Faulty unit; very low battery. | Replace batteries. If the problem persists, contact customer support. |
7. Specifications
- Model Number: ACDJS-01
- Brand: Baseus
- Material: Acrylonitrile Butadiene Styrene (ABS)
- Color: Black
- Dimensions: 5 cm (Depth) x 5 cm (Width) x 3 cm (Height)
- Item Weight: 150 Grams
- Timing Range: 00:00 - 99:55
- Power Source: 3 x AAA Batteries (not included)
- Number of Settings: 4 (referring to volume settings and timing modes)
- Country of Origin: China
- UPC: 738633769932
8. Warranty and Support
Baseus products are manufactured with high-quality standards. For warranty information and customer support, please refer to the warranty card included with your purchase or visit the official Baseus website. Please retain your purchase receipt for warranty claims.
Manufacturer: Baseus, Store2508, Dankuni, West Bengal
Importer/Packer: MP International - Authorised Distributor
For technical assistance or inquiries, please contact your local distributor or the seller.
Related documentsACDJS-01


Ask a question about this manual
Ask about setup, troubleshooting, compatibility, parts, safety, or missing instructions. Manuals+ will review the question and use this page’s manual context to help answer it.