
Introduction
Welcome to your new Lightbiz LED Closet Lights. This manual provides essential information for safe operation, installation, and maintenance of your Model X200 puck lights. Please read thoroughly before use.
Safety Information
- Read all instructions before use.
- Do not expose to water or excessive moisture. This product is for indoor use only.
- Keep out of reach of children.
- Use only the provided charging cables.
- Do not attempt to disassemble or modify the product.
Package Contents
- 6 x Lightbiz LED Puck Lights (Model X200)
- 1 x Remote Control
- 3 x USB Charging Cables (Type-C)
- 6 x Adhesive Metal Sheets
- 1 x User Manual (this document)
Product Features
- Motion Sensor: Automatic illumination upon detecting movement within 10ft, auto-off after 20 seconds of no motion.
- Dimmable: 4 brightness levels (10%, 40%, 80%, 100%) and stepless dimming via remote control.
- USB Rechargeable: Built-in 1000mAh battery, fully charges in approximately 2 hours.
- Easy Installation: Built-in magnet for direct attachment to metal surfaces or use with adhesive metal sheets for non-metal surfaces.
- Timing Function: Set auto-off timer for 10, 30, 60, or 120 minutes.
- Remote Control: Manage power, brightness, and timer settings conveniently.
Setup and Installation
- Initial Charging: Before first use, fully charge all puck lights using the provided USB cables. A red indicator light signifies charging, and it will turn green when fully charged.
- Mounting - Method 1 (Magnetic Surface): Directly attach the puck light to any ironwork surface. The built-in magnet will secure it.
- Mounting - Method 2 (Non-Magnetic Surface):
- Clean the desired surface thoroughly to ensure optimal adhesion.
- Peel off the adhesive backing from a metal sheet.
- Stick the metal sheet firmly onto the cleaned surface.
- Attach the puck light magnetically to the installed metal sheet. This allows for easy removal for charging.

Image: Rear view of the puck light with its magnetic base and a separate adhesive metal plate for versatile mounting.

Image: Visual guide demonstrating direct magnetic attachment to a metal surface and using an adhesive metal sheet for non-metal surfaces.
Video: Demonstrates the easy installation process of the Lightbiz puck lights, including magnetic attachment and use of adhesive plates.
Operating Instructions
Power Modes
- ON Mode: The light remains continuously on. Control brightness and timer with the remote.
- OFF Mode: The light is off.
- AUTO Mode (Motion Sensor): The light automatically turns on when motion is detected within 10 feet in dark conditions and turns off after approximately 20 seconds of no motion.
Remote Control Functions
- ON/OFF: Power the lights on or off.
- Brightness Adjustment: Use '+' and '-' buttons for stepless dimming. Use preset buttons (10%, 40%, 80%, 100%) for quick brightness selection.
- Timer Settings: Set auto-off timer for 10, 30, 60, or 120 minutes.

Image: The remote control unit with buttons for power, brightness levels (10%, 40%, 80%, 100%), and timer functions (10, 30, 60, 120 minutes).
Image: Illustration of the motion sensor's 120-degree detection angle and 10-foot range.
Video: Demonstrates the remote control in action, showing dimming and timer functions for the puck lights.
Charging
The Lightbiz LED Puck Lights feature a built-in 1000mAh rechargeable battery, offering energy efficiency and long service life.
- Connect the provided USB charging cable to the light's charging port and a compatible USB power source (e.g., computer, USB charger, power bank).
- The indicator light will be red during charging and turn green when fully charged.
- A full charge typically takes approximately 2 hours.
- Important: Avoid charging for more than 12 hours to prolong battery life. Do not use the light while it is charging.
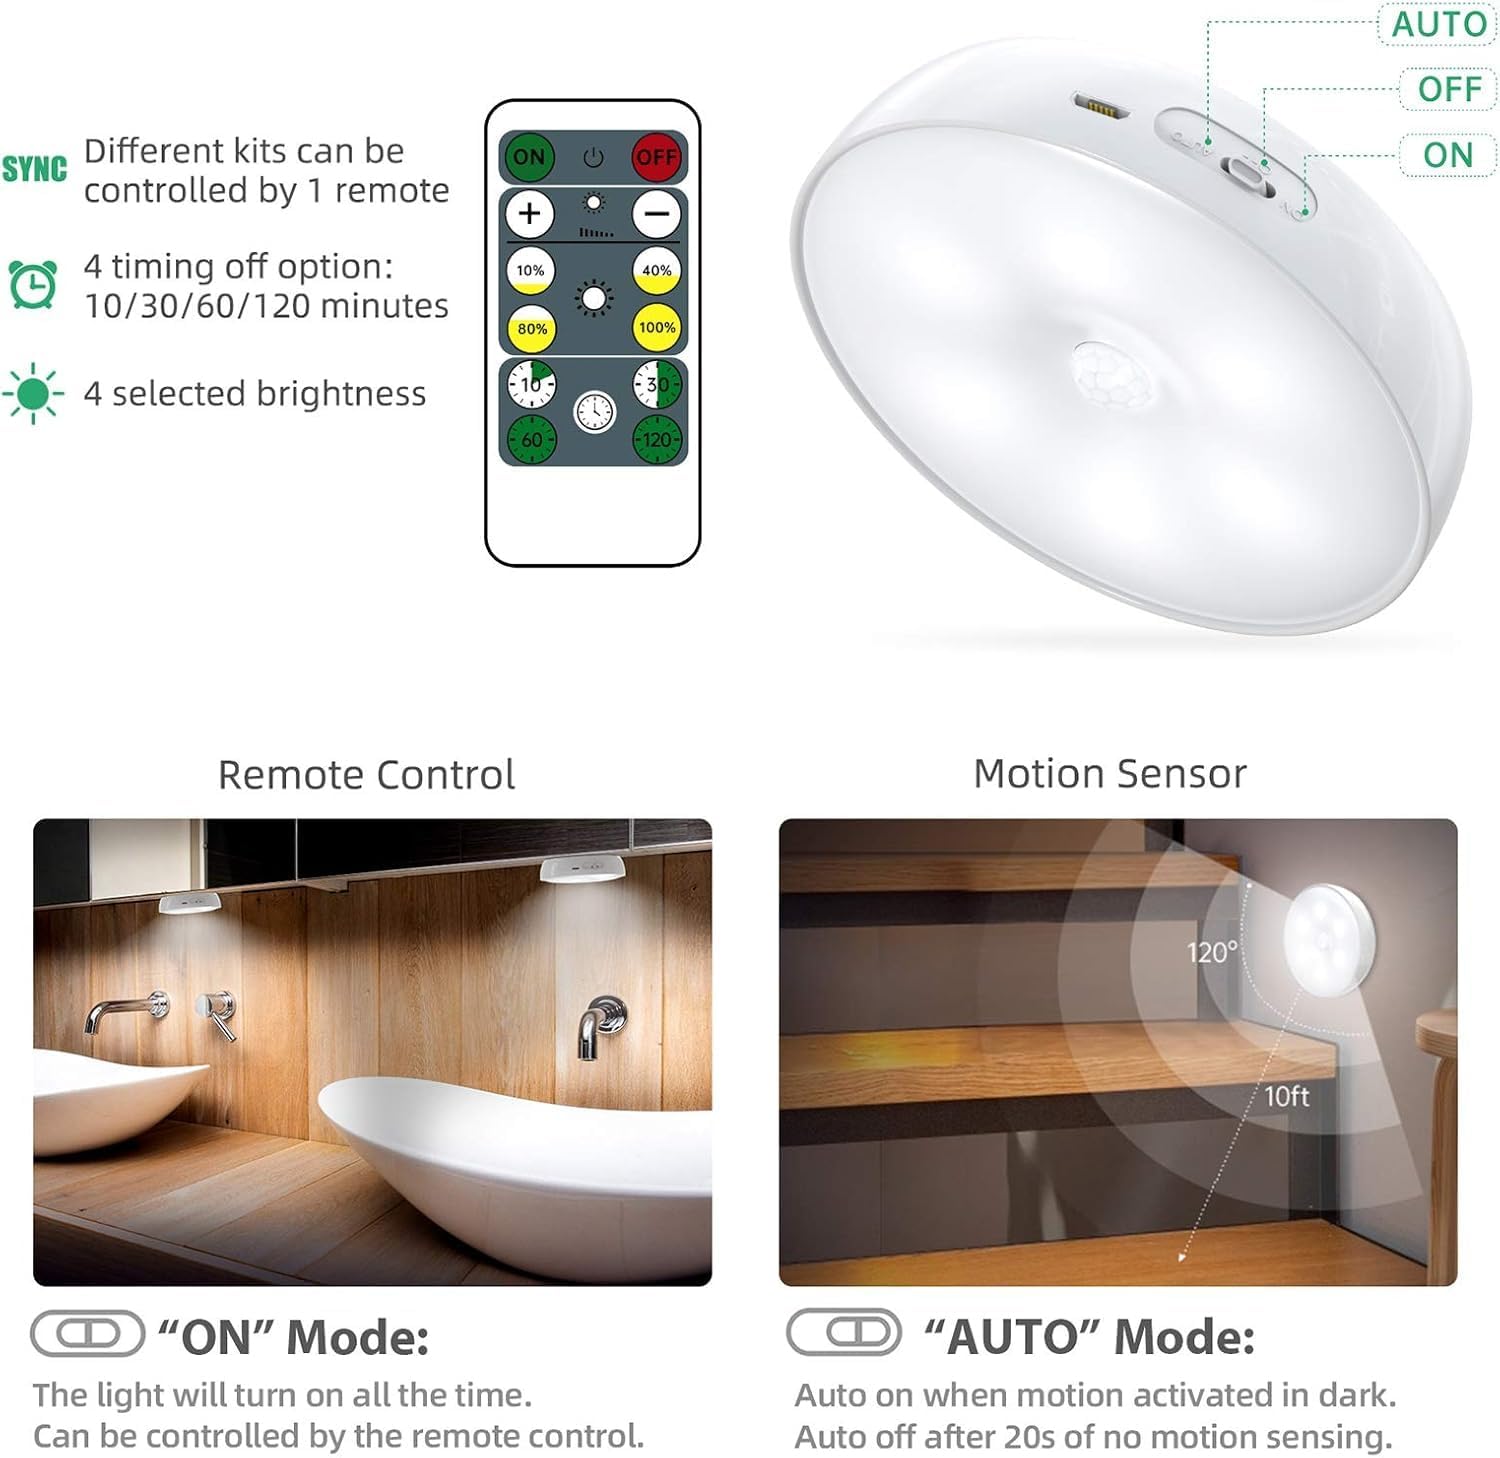
Image: A puck light connected via USB for charging, with a red light indicating the charging status.
Maintenance
- Clean the light surface with a soft, dry cloth. Do not use abrasive cleaners or solvents.
- Ensure the charging port is free of dust and debris.
- Store in a cool, dry place when not in use for extended periods.
Troubleshooting
| Problem | Possible Cause | Solution |
|---|---|---|
| Light does not turn on. | Low battery. Incorrect mode selected. | Charge the light. Ensure the switch is in 'ON' or 'AUTO' position. |
| Motion sensor not working. | Insufficient darkness. Obstruction. | Ensure ambient light is low enough for AUTO mode. Check for obstructions blocking the sensor. |
| Remote control not responding. | Remote battery low. Obstruction. | Replace remote battery (CR2032). Ensure clear line of sight to the light. |
| Light falls off surface. | Improper adhesive application. | Clean surface thoroughly before applying adhesive. Use a new adhesive metal sheet if necessary. |
Specifications
| Feature | Detail |
|---|---|
| Model Name | X200 |
| Light Source Type | LED |
| Brightness | 120 Lumens |
| Color Temperature | 6500 Kelvin (Cool White) |
| Battery Capacity | 1000mAh Lithium Polymer |
| Charging Time | Approx. 2 hours |
| Motion Sensor Range | 10 feet / 120 degrees |
| Auto-off Delay (Motion Mode) | 20 seconds |
| Dimensions | 3.34"D x 3.34"W x 0.87"H |
| Material | Acrylonitrile Butadiene Styrene, Metal |
| Mounting Type | Adhesive and Built-in magnet |
| Indoor/Outdoor Usage | Indoor |
Warranty and Support
For warranty information or technical support, please refer to the product packaging or contact Lightbiz customer service directly. Contact details can typically be found on the product box or the official Lightbiz website.