
1. Introduction
The AIOMEST AN-846A Digital Anemometer is a professional instrument designed for precise measurement of air velocity, air temperature, and airflow volume (CFM/CMM). Equipped with a highly sensitive vane sensor and an extendable probe, it is suitable for a wide range of applications including HVAC system analysis, industrial ventilation checks, outdoor activities, and environmental monitoring. This manual provides detailed instructions for the proper use and maintenance of your device.

Figure 1: AIOMEST AN-846A Digital Anemometer with its detachable vane sensor, displaying wind speed, temperature, and CFM readings.
2. Product Overview and Key Features
The AN-846A anemometer consists of a main unit with an LCD display and control buttons, and a detachable vane sensor connected via a coiled cable. It offers multiple measurement modes and data storage capabilities.
2.1 Key Components and Functions

Figure 2: Key components and functions of the AN-846A Anemometer.
- Backlight LCD: Displays measurement data and settings.
- Max/Min Mode: Toggles between maximum and minimum value display.
- Wind Speed/Air Volume: Button to switch between wind speed and air volume (CFM/CMM) measurement.
- Hold: Freezes the current reading on the display.
- Units Switchable: Changes measurement units (e.g., m/s, ft/min, °C, °F).
- °C/°F Switchable: Toggles temperature units between Celsius and Fahrenheit.
- Record Measurement: Initiates data recording.
- Input Sampling Cross-Sectional Area: Used for setting the area for CFM/CMM calculations.
- Power ON/OFF: Turns the device on or off.
- Default Record: Resets recorded data.
- Backlight ON/OFF: Activates or deactivates the display backlight.
- Confirm Input Area: Confirms the entered cross-sectional area.
- Average Airflow Measurement: Displays the average airflow.
- Read Record Data: Accesses stored measurement data.
2.2 Additional Features
- Extendable and Replaceable Wind Sensor: The vane sensor is connected via a 79-inch (2m) extendable coiled cable, allowing for measurements in hard-to-reach areas. The wand is adjustable and features a tripod mounting hole for continuous, hands-free operation.
- Built-in Data Recorder: Stores up to 600 groups of measurements, including Current, Max, (2/3)Max, Min, and Average values for wind speed and airflow.
- Backlight Function: Ensures clear display readability in low-light conditions.
- USB Connection Port: For data transfer or power (specific functionality may vary, refer to detailed instructions).

Figure 3: Features such as the tripod mountable wand, sensor port, and extendable wand.
3. Setup
3.1 Unpacking and Initial Inspection
Upon receiving your AIOMEST AN-846A, carefully unpack all components and inspect for any damage. The packing list typically includes:
- 1 x AN-846A CFM Anemometer
- 1 x Vane Sensor
- 1 x 9V (6F22) Battery
- 1 x Small Screwdriver
- 1 x Storage Box
- 1 x User Manual (this document)

Figure 4: Contents of the AN-846A package.
3.2 Battery Installation
- Locate the battery compartment on the back of the main unit.
- Use the provided screwdriver to open the battery compartment cover.
- Insert the 9V (6F22) battery, ensuring correct polarity (+/-).
- Replace the battery compartment cover and secure it with the screw.

Figure 5: Battery installation process for the AN-846A.
3.3 Connecting the Vane Sensor
Connect the coiled cable of the vane sensor to the dedicated port on the main unit. Ensure the connection is secure.
4. Operating Instructions
4.1 Power On/Off
Press the POWER ON/OFF button (9) to turn the device on. Press and hold the same button to turn it off.
4.2 Basic Measurement
Once powered on, the device will display real-time wind speed and temperature. Ensure the vane sensor is positioned correctly in the airflow for accurate readings.

Figure 6: Display showing wind velocity, temperature, and wind flow.
4.3 Switching Measurement Units
- Press the UNIT button (5) to cycle through wind speed units: m/s, ft/min, Knots, Km/h, Mph.
- Press the °C/°F button (6) to switch between Celsius and Fahrenheit for temperature display.
4.4 Wind Speed and Air Volume (CFM/CMM) Measurement
- Press the VEL/FLOW button (3) to switch between wind speed and airflow (CFM/CMM) measurement modes.
- For CFM/CMM: Before measuring airflow, you must input the cross-sectional area of the duct or vent.
- Press the SAMPLE AREA button (8).
- Use the arrow keys (if available, or refer to specific button combinations in the full manual) to input the area value.
- Press the ENTER button (12) to confirm the input.
4.5 Measurement Modes (MAX/MIN/AVG)
Press the MAX/MIN button (2) to cycle through different display modes:
- Current: Real-time measurement.
- MAX: Displays the maximum recorded value.
- MIN: Displays the minimum recorded value.
- (2/3)MAX: Displays 2/3 of the maximum value (specific to certain airflow calculations).
- AVG: Displays the average value.

Figure 7: Various measurement modes available on the AN-846A.
4.6 Data Hold and Record
- Data Hold: Press the HOLD button (4) to freeze the current reading on the display. Press again to release.
- Data Record: Press the REC button (7) to start recording data. The device can store up to 600 groups of measurements.
- Read Recorded Data: Press the READ button (14) to review stored data. Use the navigation buttons (if applicable) to scroll through records.

Figure 8: Data Hold and Record functions.
4.7 Backlight Operation
Press the LIGHT button (11) to turn the display backlight on or off, improving visibility in dark environments.

Figure 9: Silicone buttons and backlit LCD display for enhanced readability.
5. Maintenance
5.1 Cleaning
- Wipe the device with a soft, dry cloth. Do not use abrasive cleaners or solvents.
- Keep the vane sensor free from dust and debris to ensure accurate readings.
5.2 Battery Replacement
When the low battery indicator appears on the display, replace the 9V battery as described in the Setup section (3.2 Battery Installation).
5.3 Storage
When not in use for extended periods, remove the battery to prevent leakage. Store the anemometer in its protective carrying case in a cool, dry place, away from direct sunlight and extreme temperatures.
6. Troubleshooting
- Device does not power on:
- Check if the battery is installed correctly with the right polarity.
- Replace the battery with a new 9V battery. - Inaccurate readings:
- Ensure the vane sensor is clean and rotates freely.
- Verify that the sensor cable is securely connected.
- Make sure the measurement environment is stable and free from obstructions.
- For CFM/CMM, confirm the correct cross-sectional area has been input. - Display is dim or flickering:
- The battery may be low; replace it.
- Ensure the backlight is activated if operating in low light. - Data recording issues:
- Check if the memory is full. If so, clear old data if necessary (refer to the full manual for specific instructions on clearing data).
7. Specifications
| Parameter | Value |
|---|---|
| Brand | AIOMEST |
| Model Number | AN-846A |
| Material | Acrylonitrile Butadiene Styrene (ABS) |
| Air Velocity Range | 0.001 ~ 100 Mph (0.001 ~ 45.0 m/s) |
| Air Velocity Accuracy | ±3% + 0.1 rdg (m/s) |
| Temperature Range | 32 ~ 113°F (0 ~ 45°C) |
| CMM Range | 0 ~ 999900 m³/min |
| CFM Range | 0 ~ 999900 ft³/min |
| Data Storage | Up to 600 groups |
| Power Source | 1 x 9V (6F22) Battery |
| Item Dimensions (L x W x H) | 21.3 x 6.9 x 28.3 cm |
| Item Weight | 1.98 pounds |
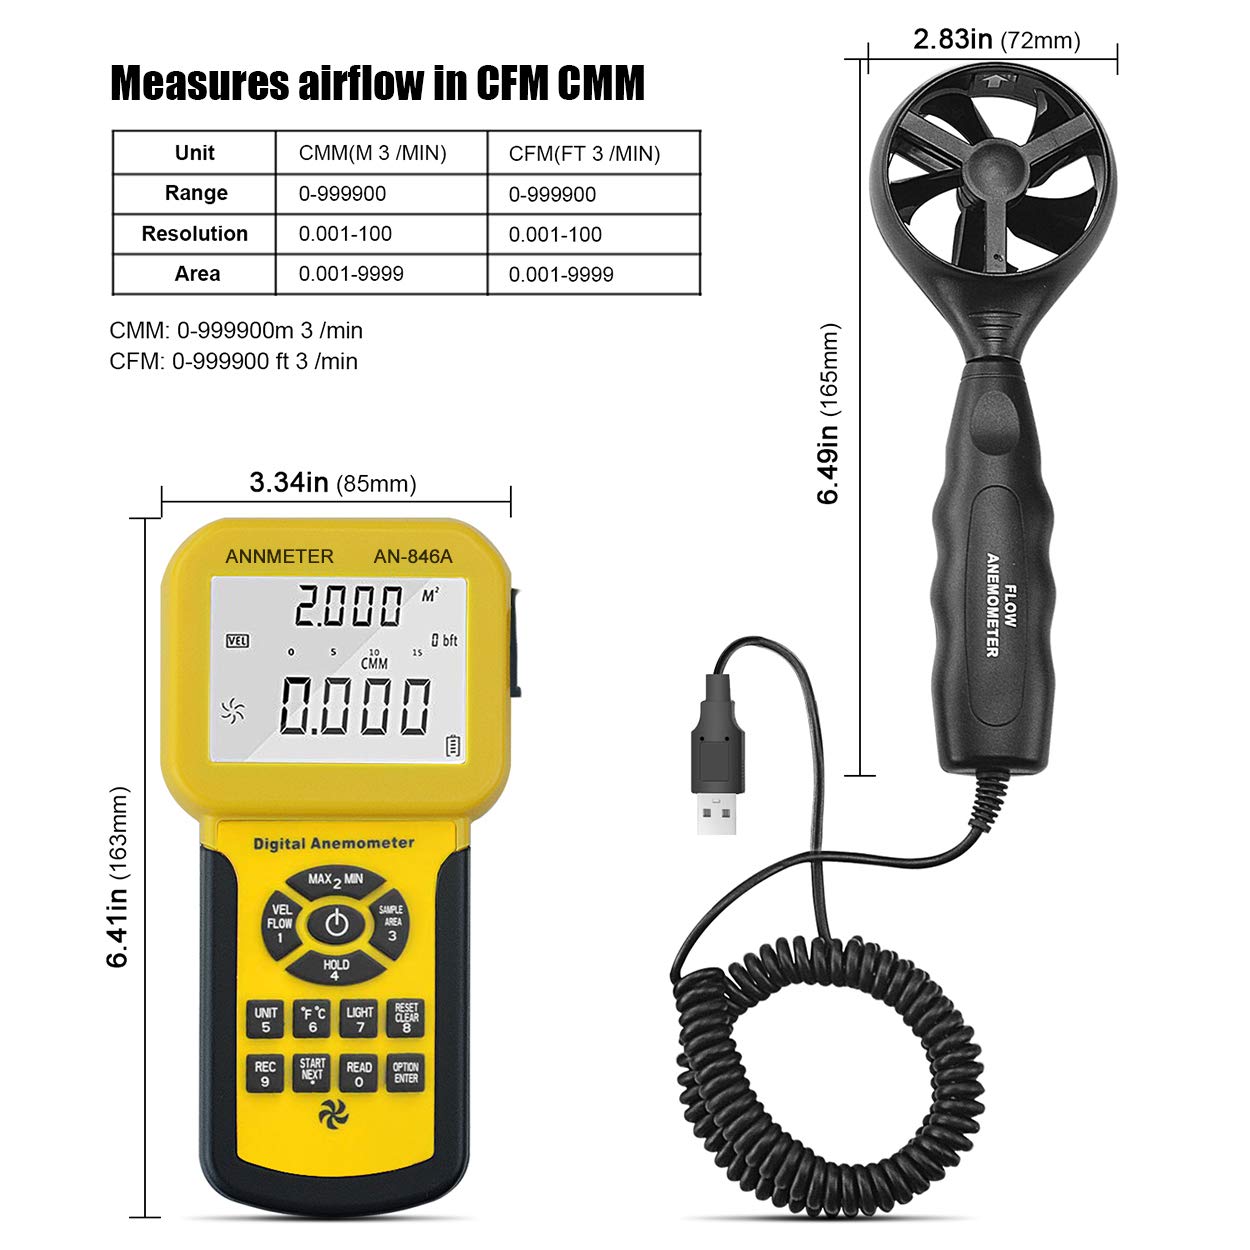
Figure 10: Dimensions and CFM/CMM specifications.

Figure 11: Accuracy specifications for wind velocity measurements.
8. Warranty and Support
The AIOMEST AN-846A Digital Anemometer comes with a 12-month product warranty and lifetime technical support. For any issues or inquiries, please contact AIOMEST customer service. Refer to the product packaging or the official AIOMEST website for contact details.


