
1. Introduction and Overview
The ABAC MONTECARLO B20 BASELINE is an oil-lubricated piston air compressor designed for both professional and hobbyist applications. This robust and stable unit is suitable for various tasks including inflation, blowing, cleaning, air brushing, stapling, simple painting, and nailing. It features a 50-liter tank, a 2 HP motor, and delivers a maximum pressure of 8 bar with an air intake capacity of 190 liters per minute. Its mobile design, equipped with wheels and a transport handle, ensures easy portability. The oil-injected configuration simplifies maintenance and reduces operational costs.
2. Safety Information
Always prioritize safety when operating the air compressor. Failure to follow these instructions may result in serious injury or damage to the equipment.
- Read the Manual: Always read and understand the complete user manual before operating the compressor.
- Ventilation: Operate the compressor in a well-ventilated area to prevent the buildup of fumes and ensure proper cooling.
- Personal Protective Equipment (PPE): Wear appropriate eye protection (safety glasses) and hearing protection (earplugs or earmuffs) during operation.
- Electrical Safety: Ensure the compressor is connected to a properly grounded 230V power outlet. Do not use damaged power cords or operate in wet conditions.
- Compressed Air: Never direct compressed air at people, animals, or any part of your body. Compressed air can cause serious injury.
- Moving Parts: Keep hands, hair, and clothing away from moving parts of the compressor.
- Tank Drainage: Regularly drain condensation from the air tank to prevent corrosion and ensure safe operation.
- Pressure Relief: Do not tamper with the safety valve or pressure switch settings.
3. Product Components
Familiarize yourself with the main components of your ABAC MONTECARLO B20 BASELINE air compressor.

Figure 1: Overview of the ABAC MONTECARLO B20 BASELINE air compressor. Key components include the yellow 50-liter tank, black motor/pump assembly, pressure gauges, and transport wheels.
- Motor/Pump Assembly: Generates compressed air.
- Air Tank (50 Liters): Stores compressed air.
- Pressure Regulator: Adjusts the output air pressure.
- Pressure Gauges: Display tank pressure and regulated output pressure.
- Safety Valve: Releases excess pressure if it exceeds safe limits.
- Drain Valve: Located at the bottom of the tank, used to drain condensation.
- Wheels and Handle: For easy transport of the unit.
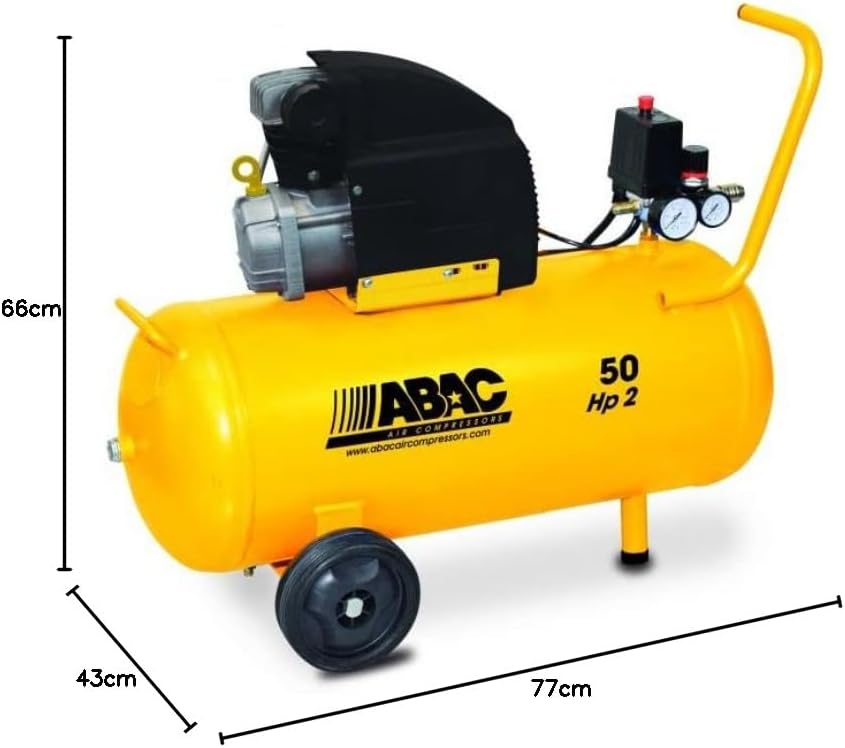
Figure 2: Dimensions of the ABAC MONTECARLO B20 BASELINE air compressor, measuring 77 cm in length, 43 cm in width, and 66 cm in height.
4. Setup
Follow these steps to prepare your compressor for first use:
- Unpacking: Carefully remove the compressor and all accessories from the packaging. Inspect for any shipping damage.
- Wheel Assembly: Attach the wheels to the designated points on the compressor base using the provided hardware.
- Handle Assembly: Secure the transport handle to the compressor body.
- Oil Level Check: Before first use, verify the oil level in the pump. The oil level should be between the minimum and maximum marks on the dipstick or sight glass. Add appropriate compressor oil if necessary.
- Placement: Position the compressor on a stable, level surface. Ensure there is adequate space around the unit for ventilation and cooling. Avoid operating in dusty or humid environments.
- Electrical Connection: Connect the compressor's power cord to a grounded 230V electrical outlet. Ensure the circuit can handle the compressor's power requirements (2 HP).
5. Operating Instructions
5.1 First Use / Break-in Procedure
- Ensure the tank drain valve (located at the bottom of the tank) is fully closed.
- Open the air outlet valve or quick coupler fully to allow air to escape freely.
- Plug in the compressor and turn on the power switch.
- Allow the compressor to run for approximately 15-20 minutes with the outlet valve open. This helps to properly seat the piston rings.
- After the break-in period, close the air outlet valve. The compressor will build pressure and automatically shut off when it reaches its maximum pressure.
5.2 Daily Operation
- Connect the desired air tool or hose to the quick coupler.
- Adjust the output pressure to the required setting for your tool using the pressure regulator knob. The regulated pressure will be shown on one of the gauges.
- Turn on the compressor using the power switch. The compressor will start automatically when the tank pressure drops below a preset minimum and will stop when the maximum pressure is reached.
- Monitor the pressure gauges during operation.
5.3 Shutting Down
- Turn off the power switch on the compressor.
- Unplug the compressor from the electrical outlet.
- Release any remaining air pressure from the tank by opening the drain valve or by briefly operating an air tool until the gauges read zero.
- Drain condensation from the air tank by opening the drain valve. Close the valve after draining.
6. Maintenance
Regular maintenance ensures the longevity and efficient operation of your compressor.
6.1 Regular Checks
- Daily/Before Each Use:
- Check the oil level in the pump.
- Drain condensation from the air tank.
- Weekly/After 20 Hours of Operation:
- Clean the air filter.
- Monthly/After 100 Hours of Operation:
- Check all fasteners (bolts, screws) for tightness.
- Inspect air hoses and connections for wear or leaks.
- Annually/After 300 Hours of Operation:
- Change the compressor oil.
- Replace the air filter element.
6.2 Oil Change
To change the oil, ensure the compressor is off and unplugged. Drain the old oil completely and refill with the recommended compressor oil to the correct level.
6.3 Air Filter Cleaning/Replacement
Remove the air filter cover and element. Clean the element with compressed air or replace it if heavily soiled or damaged. Reassemble securely.
6.4 Tank Drainage
With the compressor off and depressurized, open the drain valve at the bottom of the tank to release accumulated condensation. Close the valve tightly after draining.
7. Troubleshooting
Refer to the table below for common issues and their solutions.
| Issue | Possible Cause | Solution |
|---|---|---|
| Compressor does not start | No power supply Thermal overload activated | Check power cord, outlet, and switch Allow motor to cool down |
| Compressor runs continuously | Air leak in system Pressure switch malfunction | Check connections, hoses, and valves for leaks Contact service center |
| Low air pressure output | Air leak Clogged air filter Worn piston rings | Check connections and hoses Clean or replace air filter Contact service center |
| Excessive noise during operation | Loose components Worn bearings | Tighten all bolts and screws Contact service center |
| Oil in discharge air | Overfilled oil Worn piston rings | Drain excess oil to correct level Contact service center |
8. Technical Specifications
Detailed specifications for the ABAC MONTECARLO B20 BASELINE air compressor.
| Feature | Value |
|---|---|
| Brand | ABAC |
| Model Name | MONTECARLO B20 BASELINE (1129981009) |
| Power Source | Corded Electric |
| Voltage | 230 Volt |
| Max Power | 2 HP (Horsepower) |
| Tank Capacity | 50 Liters |
| Max Pressure | 8 Bar |
| Air Flow Capacity | 190 Liters per minute |
| Noise Level | 95 Decibels |
| Weight | 32 Kilograms |
| Dimensions (L x W x H) | 77 cm x 43 cm x 66 cm |
| Lubrication | Oil-lubricated |
| Components Included | Air Compressor, Instruction Manual |
9. Warranty and Support
This ABAC product is covered by a manufacturer's warranty. For detailed warranty terms and conditions, please refer to the official documentation provided with your purchase. For further assistance, technical support, or spare parts, please contact ABAC customer service or an authorized service center.
A comprehensive user manual is available in PDF format for download: Download User Manual (PDF).


