
TOOLIOM TL-200M
TOOLIOM 200M Multi-Process Welder User Manual
Model: TL-200M
1. Introduction
The TOOLIOM 200M is a versatile multi-process welding machine designed for various welding applications. It supports Flux MIG, Gas MIG, Lift TIG, and Stick welding, offering a comprehensive solution for both light and heavy-duty tasks. Featuring dual voltage input (110V/220V) and synergic control, this welder is engineered for ease of use and reliable performance.

Figure 1.1: TOOLIOM 200M Multi-Process Welder and Included Accessories.
2. Safety Information
Always prioritize safety when operating welding equipment. Read and understand all safety warnings and instructions before use. Failure to do so may result in serious injury or death.
2.1 General Safety Precautions
- Wear appropriate personal protective equipment (PPE), including a welding helmet with proper shade, flame-resistant clothing, welding gloves, and safety shoes.
- Ensure adequate ventilation in the work area to avoid inhaling welding fumes.
- Protect bystanders from arc rays and hot metal.
- Do not weld near flammable materials.
- Always disconnect power before performing any maintenance or adjustments.
2.2 Built-in Safety Features
The TOOLIOM 200M is equipped with several safety mechanisms:
- Overheating Protection: Automatic shutdown if the internal temperature exceeds safe limits.
- Overload Protection: Automatic shutdown system to prevent damage from excessive current draw.
- Water Rating: IP21 protection standard, offering protection against vertically falling water drops and solid objects larger than 12.5mm.
- Electrostatic Coating: Unique coating designed to prevent shock transfer.

Figure 2.1: Overview of the Welder's Safety Features.
3. Product Features
- Synergic Control: Built-in precise welding parameters automatically adjust voltage, amperage, and feeding speed based on selected welding data, simplifying operation for new users.
- Multi-functionality (4-in-1): Supports Stick (MMA), Lift TIG (torch not included), Flux MIG, and Gas MIG welding processes.
- Powerful Output: Up to 200A output current, capable of welding mild steel up to 5/32 inch (4.0mm) plate.
- Dual Voltage Input: Automatically adapts to 110V (120V) or 220V (230V) power sources, suitable for various work environments.
- Wire Compatibility: Accommodates 2 and 10-pound rolls of wire. Ready to feed 0.030" (0.8mm) solid core wire and 0.035" (0.9mm) flux core wire. Can also handle E7018 basic electrodes for Stick welding.

Figure 3.1: The TL-200M supports four welding processes.

Figure 3.2: Dual Voltage Capability for Versatile Use.
4. Package Contents
Upon unpacking, ensure all the following components are present:
- TOOLIOM 200M MIG Welder Unit
- MIG Gun
- Adapter Cord (for 110V/220V conversion)
- Shielding Gas Hose
- Ground Clamp
- Electrode Holder
- Drive Roll (pre-installed or included separately)

Figure 4.1: Included Accessories with the TL-200M Welder.
5. Setup
5.1 Power Connection
The TL-200M features automatic dual voltage detection. Connect the welder to either a 110V (120V) or 220V (230V) power outlet using the appropriate plug and adapter cord if necessary. Ensure the power source can provide sufficient amperage for your welding tasks.
5.2 Welding Wire Installation (MIG/Flux Core)
The welder supports D100 (2lb) and D200 (10lb) wire spools.
- Open the side panel of the welder.
- Place the wire spool onto the spindle, ensuring it rotates freely.
- Feed the wire through the guide tube and into the drive roll mechanism.
- Secure the wire with the tension arm, adjusting tension as needed (refer to wire manufacturer's recommendations).
- Close the side panel.

Figure 5.1: Installing Welding Wire Spools (D100 and D200).
5.3 Connecting Accessories
- MIG Gun: Connect the MIG gun to the Euro connector on the front panel. Ensure it is securely tightened.
- Ground Clamp: Connect the ground clamp cable to the negative (-) terminal on the front panel. Attach the clamp to the workpiece, ensuring good electrical contact.
- Electrode Holder (for Stick Welding): Connect the electrode holder cable to the positive (+) terminal on the front panel.
- Shielding Gas Hose (for Gas MIG/Lift TIG): Connect one end of the gas hose to the gas inlet on the welder and the other end to your gas regulator (not included).

Figure 5.2: Connection Setup for Different Welding Modes.
5.4 Control Panel Overview
Familiarize yourself with the control panel for optimal operation.
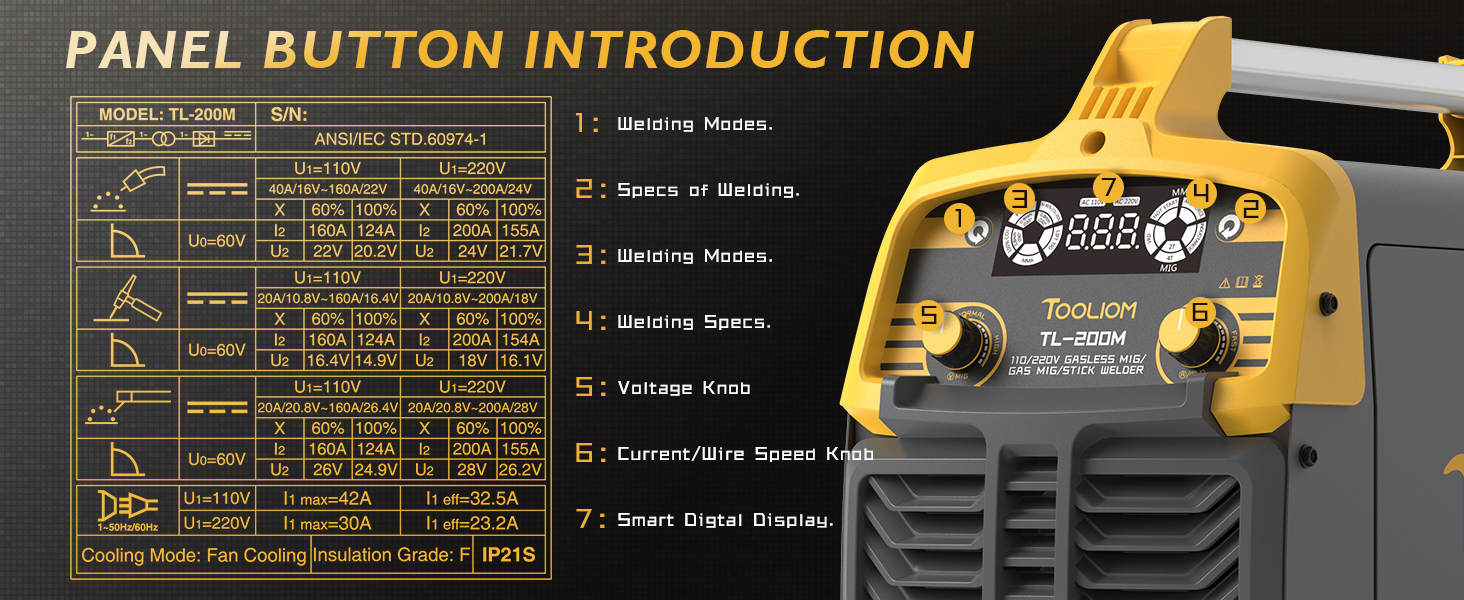
Figure 5.3: TL-200M Control Panel Introduction.
- 1: Welding Modes: Select the desired welding process (MIG, Flux MIG, Stick, Lift TIG).
- 2: Specs of Welding: Displays current welding parameters.
- 3: Welding Modes (Indicators): Visual indicators for selected mode.
- 4: Welding Specs (Indicators): Visual indicators for parameters.
- 5: Voltage Knob: Adjusts welding voltage.
- 6: Current/Wire Speed Knob: Adjusts welding current (for Stick/TIG) or wire feed speed (for MIG).
- 7: Smart Digital Display: Shows real-time welding parameters.
6. Operating Instructions
Before operating, ensure all connections are secure and safety precautions are followed.
6.1 General Operation
- Turn on the welder using the main power switch.
- Select the desired welding mode using the mode selection button.
- Adjust the voltage and current/wire speed knobs according to the material thickness and welding process. The synergic control will assist in setting optimal parameters.
- Perform a test weld on scrap material to fine-tune settings before welding your actual workpiece.
6.2 Welding Modes Specifics
Refer to the welding parameter table for recommended settings for different materials and wire/electrode sizes.

Figure 6.1: Welding Parameter Reference Table.
6.2.1 MIG Welding (Gas MIG / Flux MIG)
- Ensure the correct wire type (.030" solid for Gas MIG, .035" flux for Flux MIG) and drive roll are installed.
- For Gas MIG, ensure the shielding gas cylinder is open and the flow rate is set appropriately (e.g., 80% Argon + 20% CO2 for steel).
- Adjust voltage and wire feed speed using the synergic control or manually.
6.2.2 Stick Welding (MMA)
- Connect the electrode holder to the positive (+) terminal and the ground clamp to the negative (-) terminal.
- Insert the appropriate electrode into the holder.
- Adjust the current (amperage) based on the electrode type and material thickness.
6.2.3 Lift TIG Welding
- A TIG torch (not included) is required. Connect it to the appropriate terminal.
- Ensure 99.9% Argon shielding gas is connected and flowing.
- Adjust the current (amperage) for TIG welding.
- Initiate the arc by gently touching the tungsten electrode to the workpiece and lifting slightly.
7. Maintenance
Regular maintenance ensures the longevity and optimal performance of your welder.
- Cleaning: Periodically clean the welder's exterior with a dry cloth. Use compressed air to blow out dust and debris from the cooling vents.
- Wire Feed Mechanism: Inspect the drive rolls and wire guides for wear or debris. Clean as necessary to ensure smooth wire feeding.
- MIG Gun/Torch: Regularly check the contact tip, nozzle, and diffuser for spatter buildup and wear. Replace consumables as needed.
- Cables and Connections: Inspect all cables for cuts, fraying, or damage. Ensure all connections are tight and free of corrosion.

Figure 7.1: MIG Gun Components for Maintenance.
8. Troubleshooting
If you encounter issues, refer to the following common problems and solutions:
| Problem | Possible Cause | Solution |
|---|---|---|
| No power | Power cord disconnected; Circuit breaker tripped; Welder switch off | Check power connections; Reset breaker; Turn welder switch on |
| No arc | Poor ground connection; Incorrect settings; Consumables worn | Ensure good ground contact; Adjust voltage/current; Replace contact tip/electrode |
| Wire feed issues | Incorrect drive roll tension; Kinked wire; Clogged liner; Worn contact tip | Adjust tension; Straighten wire; Clean/replace liner; Replace contact tip |
| Overheat indicator on | Exceeded duty cycle; Blocked vents | Allow welder to cool down; Clear vents |
If the problem persists after attempting these solutions, please contact TOOLIOM customer support.
9. Specifications
| Feature | Detail |
|---|---|
| Model Number | TL-200M |
| Input Voltage | 110V (120V) / 220V (230V) Dual Voltage (Automatic Fitting) |
| Output Current | Up to 200A |
| Welding Processes | Flux MIG, Gas MIG, Lift TIG, Stick (MMA) |
| Max Plate Thickness | 5/32 inch (4.0mm) mild steel |
| Wire Spool Capacity | 2 lbs (D100) and 10 lbs (D200) |
| Compatible Wire Sizes | 0.030" (0.8mm) solid core, 0.035" (0.9mm) flux core |
| Electrode Compatibility | E7018 basic electrode |
| Cooling Mode | Fan Cooling |
| Insulation Grade | F |
| Protection Standard | IP21S |
| Item Weight | 14.6 kg (32.19 lbs) |
| Parcel Dimensions | 53 x 35.5 x 35 cm (20.87 x 13.98 x 13.78 inches) |

Figure 9.1: TL-200M Welder Size and Weight.
10. Warranty and Support
For warranty information and technical support, please refer to the official TOOLIOM website or contact their customer service directly. Keep your purchase receipt as proof of purchase for any warranty claims.
TOOLIOM Official Store: Visit the TOOLIOM Store on Amazon
Related documentsTL-200M

Ask a question about this manual
Ask about setup, troubleshooting, compatibility, parts, safety, or missing instructions. Manuals+ will review the question and use this page’s manual context to help answer it.