
Introduction
This manual provides comprehensive instructions for the installation, operation, and maintenance of your Lepro LE 50ft RGB 5050 LED Strip Lights. Please read this manual thoroughly before installation and use to ensure proper function and safety. Keep this manual for future reference.
Safety Instructions
- Ensure the power supply is disconnected before installation or maintenance.
- This product is designed for indoor use only. Avoid exposure to water or high humidity.
- Do not connect the LED strip to the power supply while it is still coiled on the reel. Unroll the strip completely before powering on to prevent overheating.
- Use only the provided 12V ETL-listed power adapter. Using an incompatible power supply may damage the product and void the warranty.
- Do not bend the LED strip at sharp angles (less than 90 degrees) to avoid damaging the circuit board or LEDs.
- Keep out of reach of children.
- If any damage is observed on the strip or power adapter, discontinue use immediately and contact customer support.
Package Contents

Image: The complete package contents including two rolls of LED strip lights, a remote control, a power adapter, and fixing clips with screws.
Please verify that all items listed below are included in your package:
- 2 x 24.6ft (total 50ft) RGB 5050 LED Strip Lights
- 1 x IR Remote Controller (44-key)
- 1 x 12V ETL-listed Power Adapter
- 1 x Control Box
- Fixing Clips and Screws
- User Manual (this document)
Specifications
| Model Number | 410105-RGB-US |
| Light Color | RGB (Red, Green, Blue) |
| Light Source Type | 5050 LED |
| Total Length | 50 Feet (2 x 24.6ft rolls) |
| LEDs per Meter | 30 LEDs |
| Power Source | Corded Electric, 12V Adapter |
| Wattage | 36 Watts |
| Controller Type | IR Remote Control (44-key) |
| Indoor/Outdoor Usage | Indoor Only |
| Material | Plastic |
| Product Dimensions | 5.31 x 3.15 x 5.35 inches (package) |
| Item Weight | 14.72 ounces |
Setup & Installation
Follow these steps for proper installation of your LED strip lights:
- Prepare the Surface:
Before attaching the LED strip, ensure the installation surface is clean, dry, and smooth. Wipe the surface with a clean cloth to remove dust or debris. This ensures optimal adhesion of the 3M adhesive backing.

Image: A hand wiping a wooden surface with a cloth, illustrating the first step of surface preparation.
- Connect the Components:
Connect the 4-pin connector from the LED strip to the control box. Ensure the arrow mark on the strip's connector aligns with the arrow mark on the control box. Then, connect the DC wire from the power adapter to the control box. Finally, plug the power adapter into a standard electrical outlet.
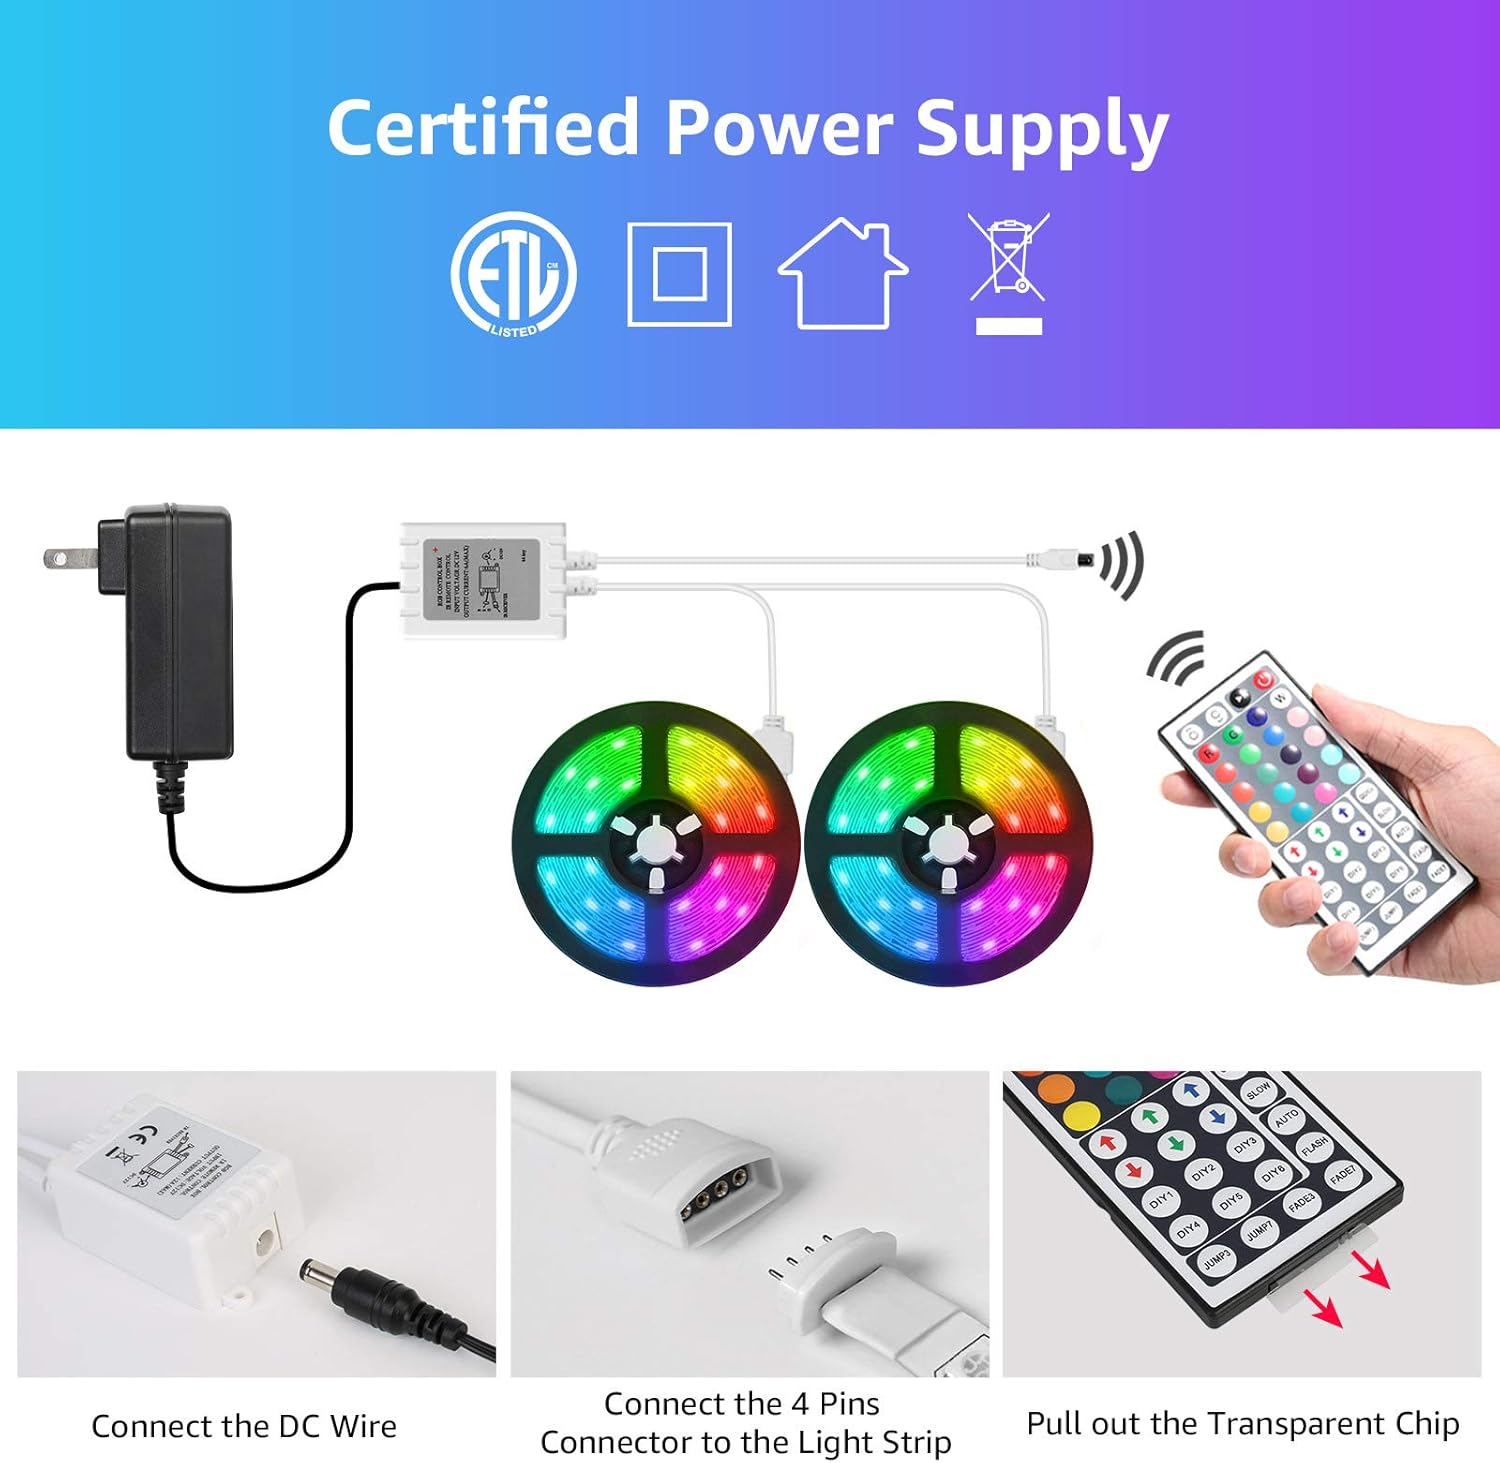
Image: A visual guide demonstrating how to connect the DC wire to the control box and the 4-pin connector to the LED strip, emphasizing arrow alignment.
Important: Ensure the "arrow" mark on the LED strip connector and the "12V" mark on the control box are on the same side for correct polarity.

Image: Detail of the RGB light strip, highlighting the 10mm 4-pin connector and the strong 3M self-adhesive backing for installation.
- Attach the LED Strip:
Peel off the protective backing from the 3M adhesive on the back of the LED strip. Carefully press the strip onto the prepared surface, applying firm and even pressure along its entire length. For added security, use the included fixing clips and screws at regular intervals, especially around corners or areas with less adhesion.
Image: A hand demonstrating how to peel and attach the LED strip to a surface, showing the adhesive backing.
- Remote Control Preparation:
Before using the remote control, pull out the transparent plastic chip from the battery compartment. This activates the battery.
Image: A close-up showing a hand pulling the transparent plastic chip from the remote control, indicating battery activation.
Installation Demonstration Video
Video: A demonstration of the Lepro LED Strip Lights in various indoor settings, showcasing color changes and potential applications. This video provides visual examples of how the lights can be installed and used to enhance different environments.
Operation
Your LED strip lights are controlled by the included 44-key IR remote control. Point the remote directly at the IR receiver on the control box for optimal response.
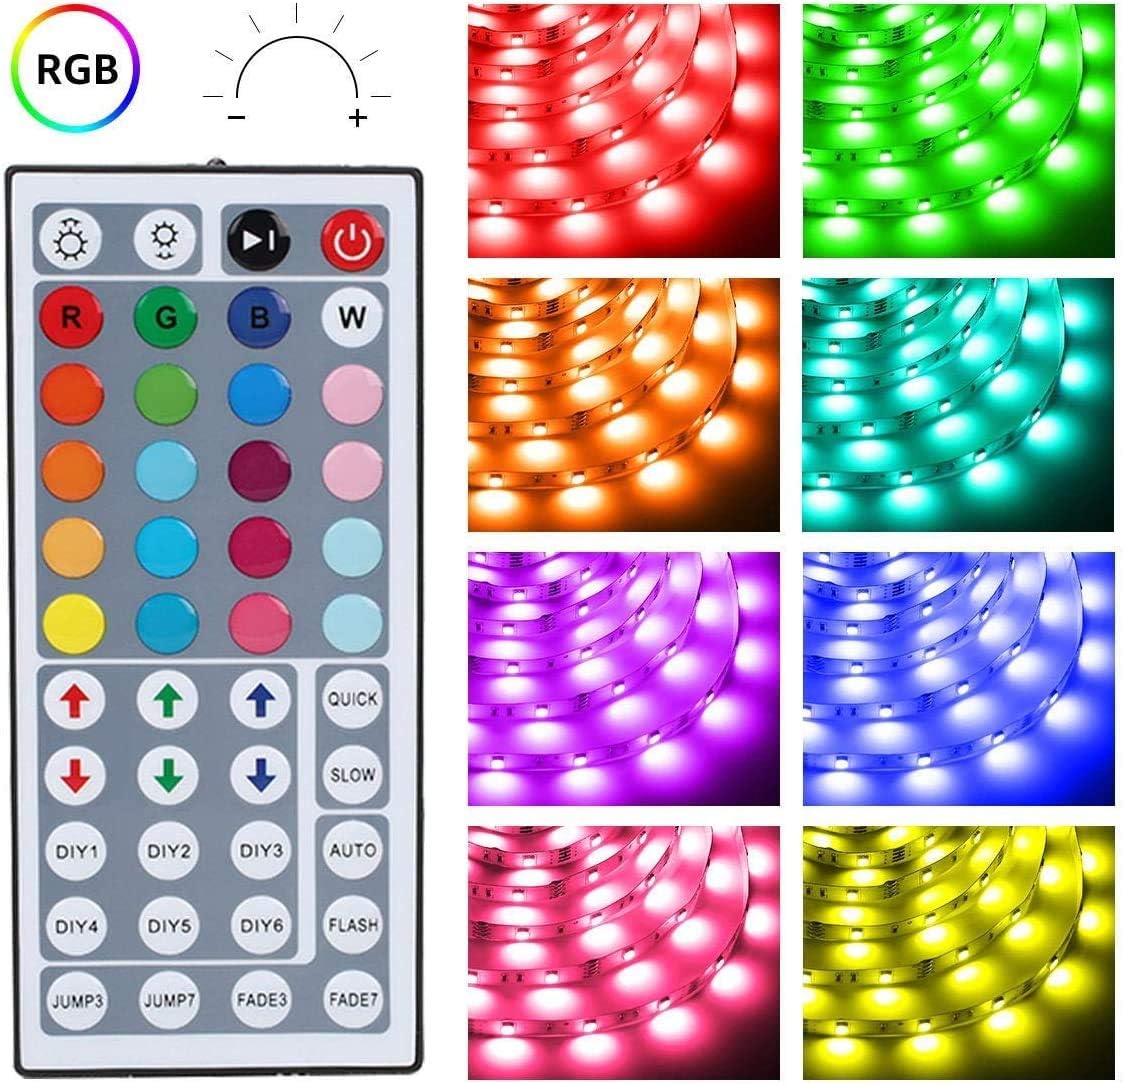
Image: A detailed view of the 44-key remote control, showing buttons for power, brightness adjustment, RGB color selection, 6 DIY color buttons, and various dynamic modes like Jump, Fade, Quick, Slow, and Auto.
- Power On/Off: Press the red power button to turn the lights on or off.
- Brightness Adjustment: Use the up and down arrow buttons (above the R, G, B, W buttons) to increase or decrease brightness.
- Color Selection: Press any of the 20 color buttons to select a static color.
- DIY Colors:
- Press one of the DIY1-DIY6 buttons.
- Use the RGB up/down arrows to adjust the intensity of Red, Green, and Blue to create your desired custom color.
- Press the same DIY button again to save the custom color.
- Dynamic Modes:
- JUMP3 / JUMP7: Cycles through 3 or 7 colors with a jump effect.
- FADE3 / FADE7: Fades between 3 or 7 colors.
- QUICK / SLOW: Adjusts the speed of dynamic modes.
- AUTO: Cycles through all available dynamic modes.
- FLASH: Flashes through colors.
Maintenance
- Cleaning: Ensure the power is off and unplugged before cleaning. Gently wipe the LED strip with a dry, soft cloth. Do not use liquid cleaners or abrasive materials.
- Storage: If storing the lights for an extended period, ensure they are clean and dry. Store in a cool, dry place away from direct sunlight.
- Adhesion: If the adhesive begins to lose its stickiness, you can reinforce the strip with additional fixing clips or a suitable adhesive tape (not included).
Troubleshooting
| Problem | Possible Cause | Solution |
|---|---|---|
| Lights do not turn on. |
|
|
| Remote control not responding. |
|
|
| Colors are incorrect or inconsistent. |
|
|
| LED strip is falling off the surface. |
|
|
Warranty & Support
Lepro products are designed for quality and reliability. For warranty information, technical support, or any questions regarding your LED strip lights, please contact Lepro customer service through the retailer where the product was purchased or visit the official Lepro website.
Please have your model number (410105-RGB-US) and purchase details ready when contacting support.