1. Product Overview
The Sami Sami-LD1117P is a vertical wireless weather station designed to provide accurate indoor and outdoor temperature and humidity readings. It features a large touch screen display with LED backlighting, offering clear visibility of various meteorological data including lunar phase, current time, and date. This device also includes a barometer for weather forecasting, helping you plan your day effectively. Its multi-language support and low power consumption make it a versatile and convenient addition to any home or office.

Figure 1: Sami Sami-LD1117P Wireless Weather Station and Remote Sensor.
2. Package Contents
Please check the package contents carefully upon unboxing to ensure all components are present:
- Main Weather Station Unit
- Remote Sensor
- User Manual (this document)
Note: 2 AAA batteries for the main unit and 2 AAA batteries for the remote sensor are required but not included in the package.
3. Key Features
- Indoor/Outdoor Temperature and Humidity Display: Accurately monitors environmental conditions both inside and outside your home.
- Barometer and Weather Forecast: Provides updated weather forecasts based on barometric pressure trends.
- Large LCD Touch Screen with LED Backlight: Offers a wide view and easy interaction with the display.
- Lunar Phase Display: Shows the current phase of the moon.
- Calendar and Multi-language Support: Displays date and supports multiple languages for user convenience.
- Digital Alarm Clock: Includes an integrated alarm function.
- Wireless Connectivity: Remote sensor connects wirelessly to the main unit.
- Low Power Consumption: Designed for energy efficiency.
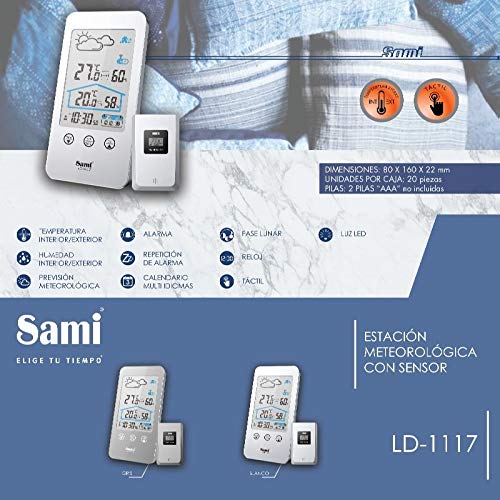
Figure 2: Visual representation of key features and dimensions of the Sami Sami-LD1117P.
4. Setup Guide
4.1. Battery Installation
- Main Unit: Open the battery compartment cover on the back of the main weather station unit. Insert 2 AAA batteries, ensuring correct polarity (+/-). Close the cover.
- Remote Sensor: Open the battery compartment cover on the back of the remote sensor. Insert 2 AAA batteries, ensuring correct polarity (+/-). Close the cover.
Important: Always use new batteries of the same type. Do not mix old and new batteries.
4.2. Initial Synchronization
Once batteries are installed in both units, the main unit will automatically search for the remote sensor. Place the remote sensor within range (typically up to 30 meters in open air) of the main unit. The outdoor temperature and humidity readings should appear on the main unit's display within a few minutes. If not, refer to the Troubleshooting section.
5. Operating Instructions
5.1. Display Overview
The large LCD display shows the following information:
- Indoor Temperature and Humidity
- Outdoor Temperature and Humidity (from remote sensor)
- Weather Forecast Icons (Sunny, Partly Cloudy, Cloudy, Rainy, Snowy)
- Time and Date
- Lunar Phase
- Alarm Indicator
5.2. Touch Screen Controls
The unit features touch-sensitive buttons on the front panel:
- MEM: Press to view MAX/MIN temperature and humidity records. Press again to cycle through records.
- C/F SET: Press to switch between Celsius (°C) and Fahrenheit (°F). Press and hold to enter time/date/alarm setting mode.
- CH: Press to cycle through remote sensor channels (if multiple sensors are used).
- Light Icon (Top Right): Touch to activate the LED backlight for 10 seconds.
5.3. Setting Time and Date
- Press and hold the C/F SET button until the hour digit starts flashing.
- Use the MEM or CH buttons (or corresponding touch areas) to adjust the value.
- Press C/F SET again to confirm and move to the next setting (minute, year, month, day, 12/24 hour format, language).
- Repeat steps 2 and 3 until all settings are configured.
- Press C/F SET one last time to exit setting mode.
5.4. Setting the Alarm
- In time setting mode (see 5.3), continue pressing C/F SET until the alarm hour flashes.
- Adjust the alarm hour using the MEM or CH buttons.
- Press C/F SET to move to alarm minute. Adjust as needed.
- Press C/F SET to activate/deactivate the alarm. An alarm icon will appear on the display when active.
- To snooze, press any button when the alarm sounds. The alarm will sound again after 5 minutes.
- To stop the alarm, press and hold any button (except snooze) or let it ring for 2 minutes.
6. Maintenance
- Cleaning: Wipe the unit and sensor with a soft, damp cloth. Do not use abrasive cleaners or solvents.
- Battery Replacement: Replace batteries in both units when the low battery indicator appears on the display. Always replace all batteries at the same time.
- Placement: For accurate outdoor readings, place the remote sensor in a shaded, dry location, away from direct sunlight and precipitation. Ensure it is within the wireless range of the main unit.
- Storage: If storing the unit for an extended period, remove all batteries to prevent leakage.
7. Troubleshooting
| Problem | Possible Cause | Solution |
|---|---|---|
| No display on main unit. | Batteries are dead or incorrectly inserted. | Check battery polarity and replace with new batteries. |
| Outdoor temperature/humidity not displayed or inaccurate. | Remote sensor out of range, low battery, or interference. | Move sensor closer to main unit. Replace sensor batteries. Avoid placing near large metal objects or electronics. Re-synchronize units. |
| Weather forecast icon does not match actual weather. | Forecast is based on barometric pressure trends, not real-time conditions. | This is normal. The forecast is a prediction based on pressure changes over time. |
| Screen backlight not working. | Batteries are low or feature is not activated. | Replace batteries. Touch the light icon on the display to activate. |
8. Specifications
| Feature | Detail |
|---|---|
| Model Number | LD1117P |
| Brand | Sami |
| Power Source | Battery (2x AAA for main unit, 2x AAA for remote sensor - not included) |
| Connectivity Technology | Wireless |
| Temperature Accuracy | ±1 °C |
| Display Type | LCD |
| Sensor Technology | Wireless |
| Dimensions (Main Unit) | Approx. 80 x 160 x 22 mm |
9. Warranty and Support
This product is covered by a standard manufacturer's warranty. For specific warranty terms and conditions, please refer to the warranty card included with your purchase or contact the retailer. If you encounter any issues not covered in this manual or require further assistance, please contact Sami customer support through their official website or the point of purchase.
For more information, you may visit the Sami Brand Store.


