1. Introduction
Thank you for purchasing the OHMEX OHM-MWO-2089 Microwave Oven. This manual provides essential information for the safe and efficient operation, maintenance, and troubleshooting of your appliance. Please read these instructions carefully before use and retain them for future reference.
2. Important Safety Instructions
To reduce the risk of fire, electric shock, injury to persons, or exposure to excessive microwave energy when using your appliance, follow basic precautions, including the following:
- Read all instructions before using the appliance.
- Do not attempt to operate this oven with the door open as this can result in harmful exposure to microwave energy.
- Do not place any object between the oven front face and the door or allow soil or cleaner residue to accumulate on sealing surfaces.
- Do not operate the oven if it is damaged. It is particularly important that the oven door closes properly and that there is no damage to the: (1) door (bent), (2) hinges and latches (broken or loosened), (3) door seals and sealing surfaces.
- The oven should not be adjusted or repaired by anyone except properly qualified service personnel.
- Ensure the appliance is properly grounded.
- Do not heat liquids or other foods in sealed containers as they are liable to explode.
- Only use utensils suitable for microwave ovens.
- Do not use corrosive chemicals or vapors in this appliance.
- This appliance is intended for household use only.
3. Product Overview
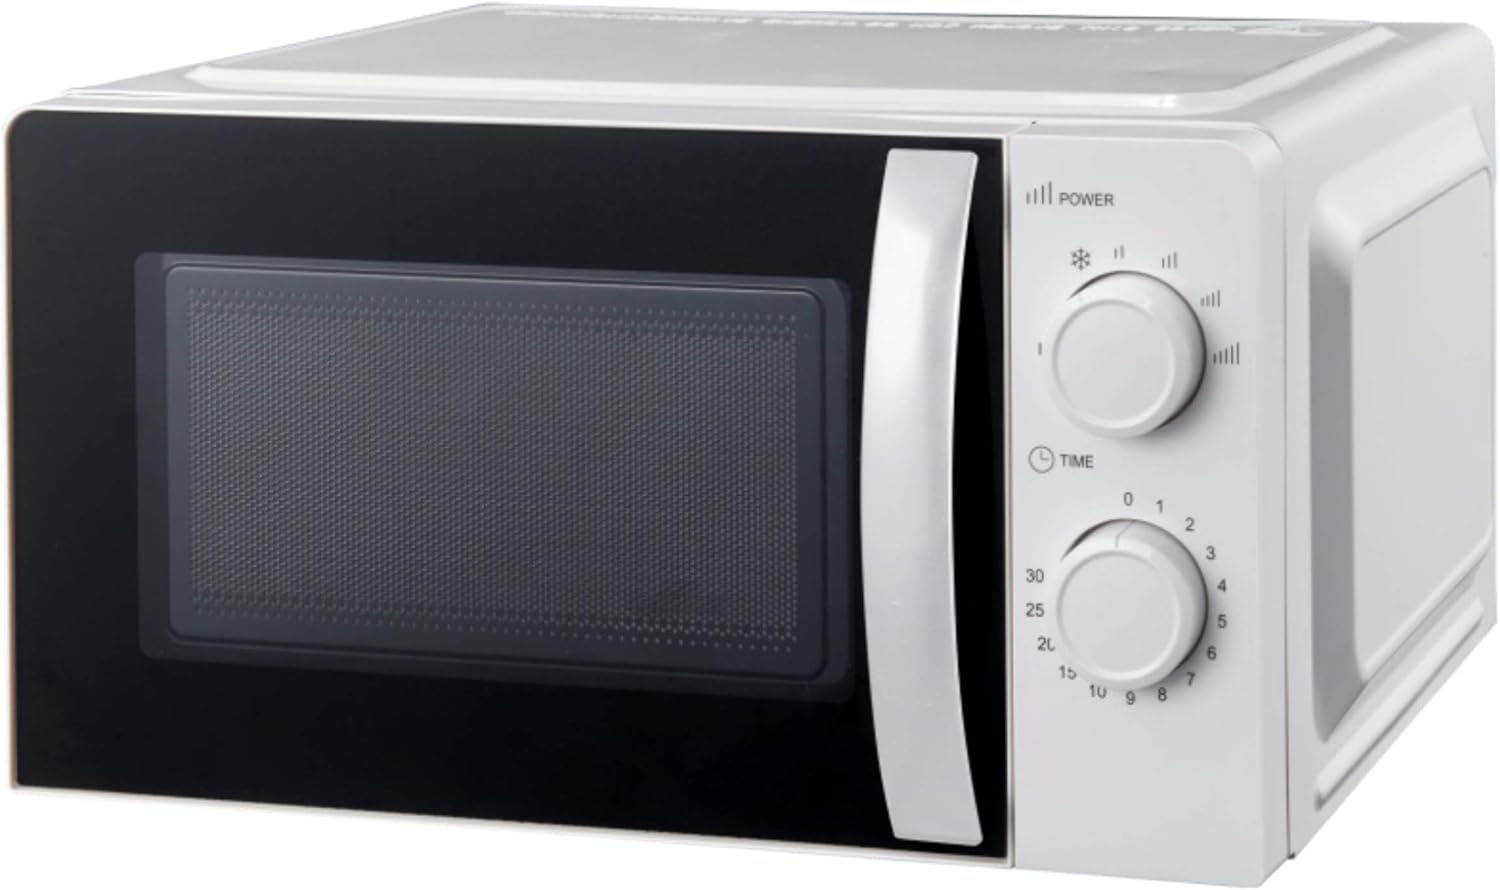
Figure 1: Front view of the OHMEX OHM-MWO-2089 Microwave Oven.
This image displays the front of the OHMEX OHM-MWO-2089 microwave oven. It features a sleek black door with a silver handle on the right side. To the right of the door is the mechanical control panel, which includes two rotary knobs. The top knob controls the power settings, indicated by symbols and lines, including a defrost function. The bottom knob is for setting the cooking time, with markings from 0 to 30 minutes. The overall casing is white.
Components:
- Door: Features a viewing window and a handle for opening.
- Control Panel: Two rotary knobs for power and time settings.
- Turntable: Glass tray inside the oven for even cooking.
- Oven Cavity: Interior space where food is placed.
4. Setup
- Unpacking: Carefully remove the microwave oven and all packing materials. Check for any damage. Do not operate if damaged.
- Placement: Place the oven on a flat, stable surface strong enough to hold its weight. Ensure adequate ventilation by leaving at least 10 cm (4 inches) of space at the back, 20 cm (8 inches) at the top, and 5 cm (2 inches) on the sides. Do not block any ventilation openings.
- Power Connection: Plug the power cord into a grounded electrical outlet. Ensure the voltage matches the rating label on the oven.
- Turntable Installation: Place the roller ring in the center of the oven floor. Place the glass turntable on top of the roller ring, ensuring it sits securely.
5. Operating Instructions
5.1 Control Panel Overview
- Power Knob (Top): Selects the desired power level or defrost function.
- Defrost (Snowflake symbol): For thawing frozen foods.
- Low to High Power (Lines): Increases microwave power from minimum to maximum (700W). There are 6 power levels available.
- Timer Knob (Bottom): Sets the cooking time, up to a maximum of 30 minutes.
5.2 Basic Microwave Operation
- Place the food in a microwave-safe container on the glass turntable.
- Close the oven door securely.
- Turn the Power Knob to select the desired power level. For general heating, a medium-high to high setting is often used.
- Turn the Timer Knob to set the desired cooking time. The oven will start automatically once the timer is set.
- When the set time expires, the oven will automatically stop and a bell will sound.
- Carefully remove the food from the oven. Use oven mitts as the container and food may be hot.
5.3 Defrosting Function
The defrost function is designed to thaw frozen foods efficiently.
- Place the frozen food in a microwave-safe container on the turntable.
- Close the oven door securely.
- Turn the Power Knob to the Defrost (Snowflake) symbol.
- Turn the Timer Knob to set the desired defrosting time. Defrosting time varies based on the type and weight of the food. Refer to food packaging for recommended defrosting times.
- During defrosting, it is recommended to turn or separate the food periodically for more even thawing.
- When the set time expires, the oven will automatically stop.
- Remove the defrosted food. Some parts may still be cold; allow standing time for even temperature distribution.
6. Maintenance and Cleaning
Regular cleaning helps maintain the performance and longevity of your microwave oven.
- Before Cleaning: Always unplug the oven from the power outlet.
- Oven Interior: Wipe the interior cavity after each use with a damp cloth and mild detergent. For stubborn stains, boil a cup of water with a few slices of lemon inside the oven for a few minutes to loosen residue, then wipe clean.
- Door Seals: Clean the door seals and adjacent parts carefully with a damp cloth to ensure proper sealing.
- Turntable and Roller Ring: The glass turntable and roller ring can be removed and washed in warm soapy water or in a dishwasher. Ensure they are completely dry before placing them back in the oven.
- Exterior: Wipe the exterior surface with a soft, damp cloth. Do not use abrasive cleaners or harsh chemicals.
- Control Panel: Wipe the control panel with a soft, damp cloth. Avoid excessive moisture.
7. Troubleshooting
If you encounter issues with your microwave oven, refer to the following table for common problems and solutions.
| Problem | Possible Cause | Solution |
|---|---|---|
| Oven does not start | Power cord not plugged in; Door not closed properly; Timer not set. | Ensure power cord is securely plugged in; Close the door firmly; Set the timer knob. |
| Food not heating | Power level too low; Cooking time too short; Incorrect utensil used. | Increase power level; Extend cooking time; Use microwave-safe cookware. |
| Turntable not rotating | Turntable not properly seated; Obstruction under turntable. | Ensure turntable and roller ring are correctly positioned; Remove any obstructions. |
| Sparks inside oven | Metal or foil in oven; Utensils with metallic trim. | Remove all metal objects; Use only microwave-safe utensils. |
If the problem persists after trying these solutions, please contact qualified service personnel.
8. Specifications
| Feature | Specification |
|---|---|
| Brand | Ohmex |
| Model Number | OHM-MWO-2089 |
| Color | Black |
| Capacity | 20 Liters |
| Power Output | 700 W |
| Power Levels | 6 |
| Control Type | Mechanical |
| Special Feature | Defrost Function |
| Package Dimensions | 46.5 x 39 x 27 cm |
| Item Weight | 10.72 Kilograms |
9. Warranty and Support
For information regarding warranty coverage, service, or technical support, please refer to the warranty card included with your product or contact your retailer. Keep your purchase receipt as proof of purchase for any warranty claims.


