
Huepar LS415
Huepar LS415 Green Laser Level User Manual
Model: LS415 | Brand: Huepar
1. Introduction
Thank you for choosing the Huepar LS415 Green Laser Level. This device is designed for precise leveling and alignment tasks in various applications, including construction, renovation, and DIY projects. It features a horizontal full line, four vertical lines, and five plumb dots for comprehensive coverage. Please read this manual thoroughly before operating the device to ensure safe and efficient use.
2. Safety Information
This product emits a Class 2 laser beam. Observe the following safety precautions:
- Do not stare directly into the laser beam.
- Avoid directing the laser beam at other people or reflective surfaces.
- Do not operate the device in explosive environments.
- Keep the device out of reach of children.
- Use only specified batteries and chargers.
3. Package Contents
The Huepar LS415 Green Laser Level package includes the following items:
- Huepar LS415 Green Laser Level Unit
- Storage Case
- 360° Micro-Adjustable Tripod Connection Adapter
- Two Rechargeable Lithium Batteries
- Power Adapter (Type-C compatible)
- Height Adjustable Base
- Simple Receiver Board

4. Product Overview
Familiarize yourself with the main components of your Huepar LS415 laser level:
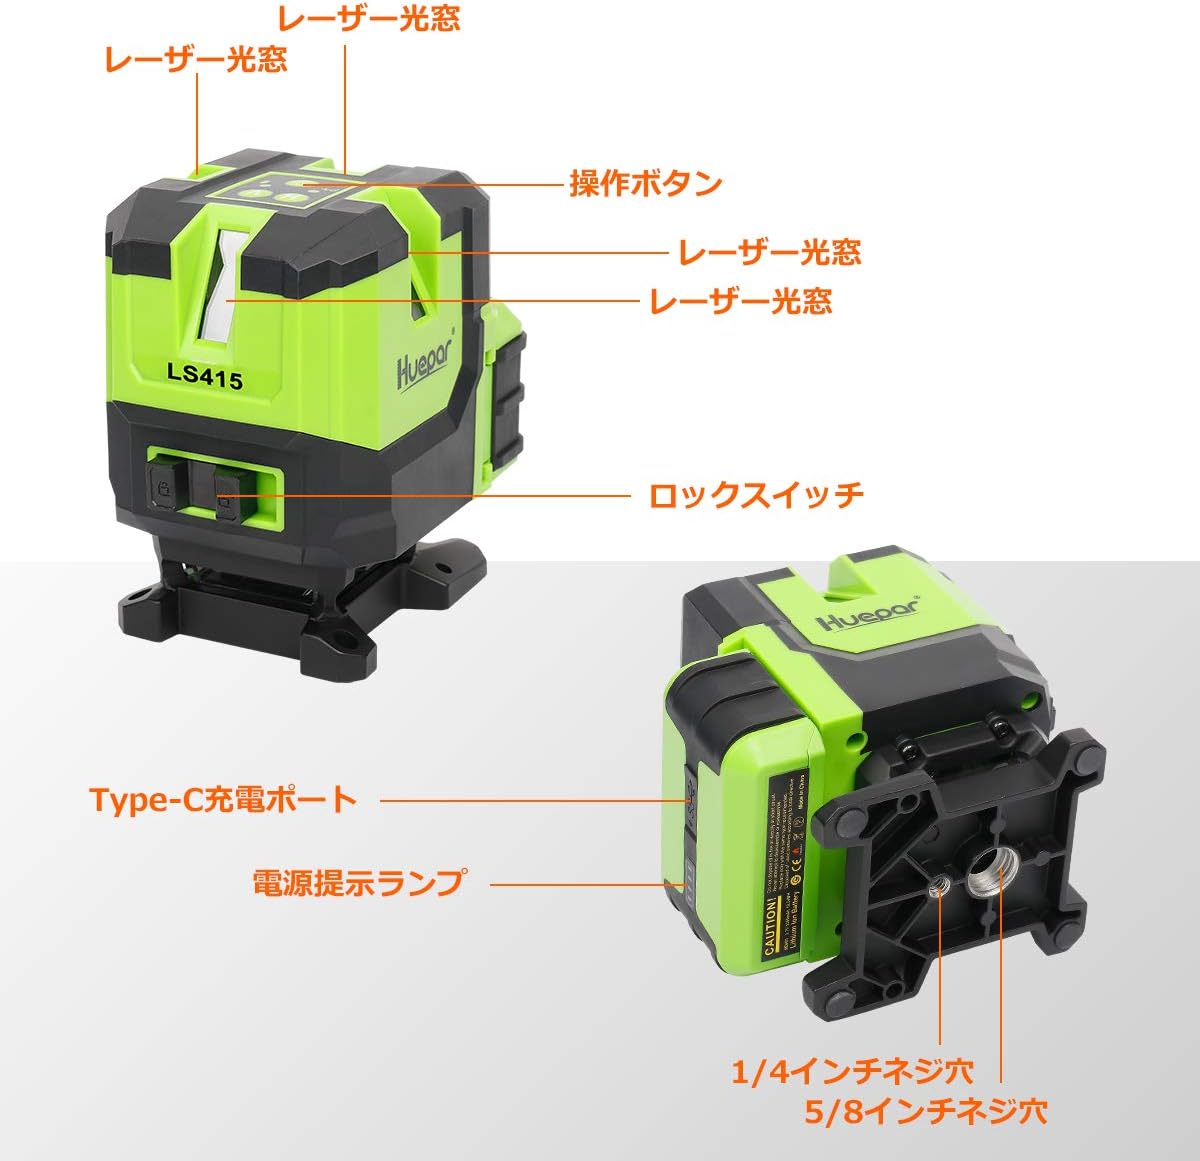
- Laser Windows: Emitters for horizontal, vertical, and dot lasers.
- Operation Buttons: Control laser lines (H for horizontal, V for vertical) and pulse mode.
- Lock Switch: Engages/disengages the pendulum for self-leveling or manual mode.
- Type-C Charging Port: For charging the lithium batteries.
- Power Indicator Lamp: Displays battery status.
- Mounting Threads: 1/4-inch and 5/8-inch screw holes for tripod or bracket attachment.
5. Setup
5.1 Battery Installation and Charging
The LS415 uses two dedicated rechargeable lithium batteries. For short-term use, insert a charged battery. For extended operation, connect the power adapter directly. The device features a Type-C charging port, allowing for emergency use with a mobile battery.
5.2 Mounting Options
The device can be mounted using its integrated 1/4-inch and 5/8-inch screw holes. The included 360° micro-adjustable tripod connection adapter allows for precise alignment on uneven surfaces, with 1cm adjustment feet and a bubble level.

An included height-adjustable base can be used to raise the laser level from the floor, useful for tiling applications where the horizontal line needs to be close to the ground (minimum 20mm).

6. Operating Modes
6.1 Self-Leveling Mode
To activate self-leveling mode, unlock the pendulum by sliding the lock switch to the 'UNLOCKED' position. The device will automatically level itself within ±3 degrees. If the tilt exceeds this range, the laser lines will flash rapidly to indicate an out-of-level condition.

6.2 Manual Mode (Tilt Function)
To use the device for projecting lines at any angle, slide the lock switch to the 'LOCKED' position. This disables the self-leveling function and allows the laser lines to be fixed at a desired angle. This is useful for tasks like staircase installation or pipe fitting.
6.3 Line Switching
Use the 'H' button to switch horizontal lines and the 'V' button to switch vertical lines. The LS415 features one horizontal full line, four vertical lines, and five plumb dots. You can activate only the necessary lines to conserve battery power.

6.4 Pulse Mode (Outdoor Use)
For outdoor use or in bright conditions where laser visibility is reduced, activate Pulse Mode. This mode extends the working range up to 50 meters when used with a Huepar Line Laser Receiver (sold separately). Press the pulse mode button on the control panel to activate it.

7. Applications
The Huepar LS415 is versatile for various tasks:
- Room Partitioning: The four vertical lines allow for efficient layout of room dividers.
- Anchor/Duct Positioning: The cross lines formed by the ceiling and ground dots are ideal for precise positioning.
- Tiling: The 360° horizontal line simplifies tile alignment without needing to rotate the unit.
- Staircase/Pipe Installation: Manual mode allows for projecting lines at custom angles.

8. Specifications
| Feature | Specification |
|---|---|
| Brand | Huepar |
| Model | LS415 |
| Laser Color | Green |
| Laser Configuration | 1 Horizontal Full Line, 4 Vertical Lines, 5 Plumb Dots |
| Power Source | Battery (Lithium) |
| Battery Included | Yes (2 units) |
| Operation Mode | Automatic / Manual |
| Accuracy | ±3 mm at 10 meters |
| Working Range | Up to 20 meters (50 meters with receiver) |
| Package Dimensions | 28.7 x 25.7 x 11.4 cm |
| Item Weight | 2.37 kg |
9. Maintenance
To ensure the longevity and accuracy of your Huepar LS415 laser level:
- Clean the laser windows and housing with a soft, dry cloth. Do not use abrasive cleaners or solvents.
- Store the device in its protective case when not in use.
- Remove batteries if the device will not be used for an extended period.
- Avoid exposing the device to extreme temperatures or direct sunlight for prolonged periods.
- Do not attempt to disassemble or repair the device yourself. Contact authorized service personnel.
10. Troubleshooting
If you encounter issues with your Huepar LS415, refer to the following common problems and solutions:
- Laser lines flashing rapidly: The device is out of its self-leveling range. Place it on a more level surface.
- No laser lines: Check if the device is powered on and the batteries are charged. Ensure the pendulum is unlocked for self-leveling mode.
- Dim laser lines: Ensure the device is in pulse mode when using a receiver or in bright conditions. Clean the laser windows.
- Inaccurate lines: Verify the device is on a stable surface and within its self-leveling range. If issues persist, the device may require calibration by authorized service.
11. Warranty and Support
Huepar products are manufactured to high-quality standards. For warranty information, technical support, or service inquiries, please refer to the warranty card included with your product or visit the official Huepar website. Keep your purchase receipt as proof of purchase.
Related documentsLS415


Ask a question about this manual
Ask about setup, troubleshooting, compatibility, parts, safety, or missing instructions. Manuals+ will review the question and use this page’s manual context to help answer it.