
WHOLESUN WS 3000
WHOLESUN Electric Pressure Washer WS 3000 Instruction Manual
Model: WS 3000
1. Introduction
This manual provides essential information for the safe and efficient operation, maintenance, and troubleshooting of your WHOLESUN Electric Pressure Washer Model WS 3000. Please read these instructions thoroughly before initial use and retain for future reference.
2. Important Safety Information
Always observe basic safety precautions to reduce the risk of fire, electric shock, and personal injury. This pressure washer is equipped with a Total Stop System (TSS) and a Ground Fault Circuit Interrupter (GFCI) for enhanced safety.
- Ensure the power cord is connected to a grounded outlet.
- Do not operate the unit if the power cord or plug is damaged.
- Keep children and pets away from the operating area.
- Wear appropriate personal protective equipment, including eye protection.
- Never point the spray gun at people, animals, or electrical devices.
- Always disconnect the power supply before performing any maintenance.
3. Product Components
The WHOLESUN Electric Pressure Washer WS 3000 includes the following components:
- Pressure Washer Unit with Hose Reel
- Gun Handle
- Gun Lance
- 33ft High-Pressure Hose
- Detergent Bottle
- Garden Adapter
- 4 Quick-Connect Nozzles (0°, 15°, 25°, 40°)
- O-ring
- Cleaning Pin
- Brush

Figure 1: Overview of WHOLESUN Electric Pressure Washer components.
4. Setup Instructions
Follow these steps to assemble and prepare your pressure washer for use:
- Connect Water Supply: Attach your garden hose to the pressure washer's water inlet. Ensure a secure connection to prevent leaks.
- Connect High-Pressure Hose: Connect the 33ft high-pressure hose to the pressure washer's outlet and to the gun handle. The hose features secure metal connections.
- Attach Lance and Nozzle: Insert the gun lance into the gun handle. Select the desired quick-connect nozzle (0°, 15°, 25°, or 40°) and firmly attach it to the end of the lance.
- Power Connection: Plug the 17ft power cord with the inline GFCI into a grounded 110V-120V/60Hz electrical outlet.
- Purge Air: Before turning on the unit, squeeze the trigger on the spray gun to allow water to flow through the system and purge any trapped air. This helps protect the pump.
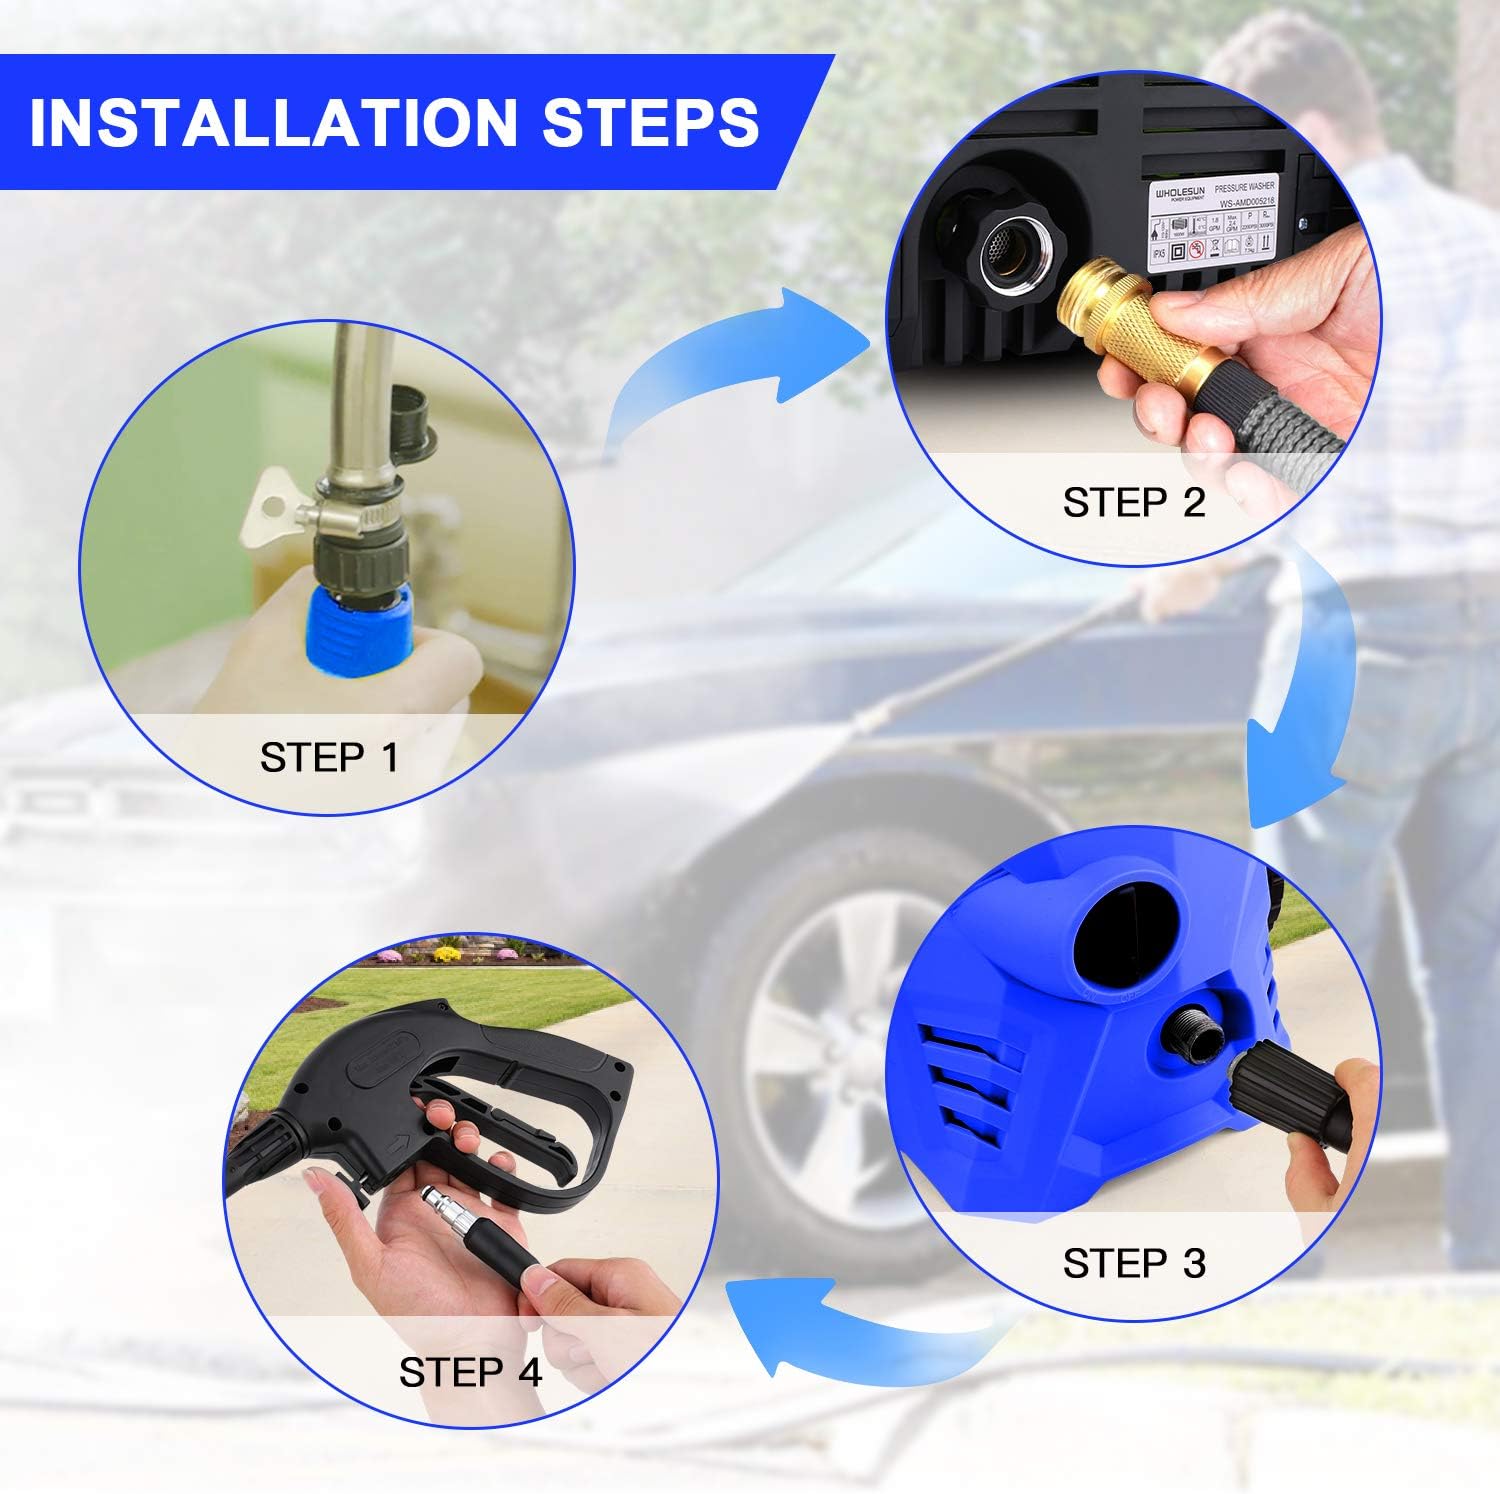
Figure 2: Visual guide for connecting the pressure washer components.
Video 1: Demonstration of the pressure washer setup and operation.
5. Operating Instructions
5.1 Starting the Pressure Washer
- Ensure all connections are secure and water is flowing through the system.
- Turn the power switch to the "ON" position. The Total Stop System (TSS) will activate the pump only when the trigger is squeezed.
- Squeeze the trigger on the spray gun to begin spraying.
5.2 Nozzle Selection and Application
The pressure washer comes with four quick-connect nozzles, each designed for specific cleaning tasks:
- 0° (Red) Nozzle: Provides a concentrated, high-pressure stream for spot cleaning and tough stains on durable surfaces. Use with caution.
- 15° (Yellow) Nozzle: Offers a narrow, powerful spray for intense cleaning of concrete, brick, and decking.
- 25° (Green) Nozzle: Delivers a medium-width spray suitable for general cleaning of painted surfaces, fences, and lawnmowers.
- 40° (White) Nozzle: Produces a wide, gentle spray ideal for delicate surfaces like windows, vehicles, and boats.

Figure 3: Nozzle types and their corresponding spray patterns.
5.3 Detergent Application
For thorough cleaning, use the included detergent bottle:
- Fill the detergent bottle with an appropriate pressure washer-safe cleaning solution.
- Attach the detergent bottle to the spray gun.
- Apply foam to the desired surface. The foam helps loosen dirt and grime.
- Allow the detergent to sit for a few minutes (refer to detergent instructions), then rinse thoroughly with a suitable nozzle.
Video 2: Demonstration of the pressure washer in use for cleaning.
6. Maintenance
Regular maintenance ensures optimal performance and extends the life of your pressure washer:
- Nozzle Cleaning: Use the provided cleaning pin to clear any blockages in the nozzle tips.
- Hose Management: Utilize the integrated hose reel to keep the high-pressure hose organized and prevent kinks or damage.
- Cord Storage: Wrap the power cord neatly around the designated storage area on the unit.
- Winterization: In cold climates, drain all water from the pump and hoses to prevent freezing and damage.

Figure 4: Hose reel and wheel design for convenient storage and mobility.
7. Troubleshooting
If you encounter issues, refer to the following common troubleshooting tips:
- No Power: Check the GFCI plug for a tripped circuit. Ensure the power cord is fully plugged into a working outlet.
- Low Pressure: Verify that the water supply is fully open and the garden hose is not kinked. Clean any clogged nozzles.
- Water Leaks: Inspect all connections for tightness. Replace any worn O-rings.
- Motor Runs but No Water: Ensure all air is purged from the system by squeezing the trigger with the unit off until a steady stream of water flows.
8. Specifications
| Feature | Specification |
|---|---|
| Brand | WHOLESUN |
| Model Number | WS 3000 |
| Power Source | AC Electric |
| Wattage | 1600W |
| Maximum Pressure | 3000 PSI |
| Maximum Flow Rate | 2.4 Gallons Per Minute (GPM) |
| Hose Length | 33 Feet |
| Power Cord Length | 17 Feet |
| Item Weight | 18.85 Pounds |
| Product Dimensions | 11"L x 10"W x 26"H |
| Rated Temperature | 0~40°C |
| Degree of Protection | IPX5 |
9. Warranty and Support
Your WHOLESUN Electric Pressure Washer comes with a 2-Year warranty and 30 days risk-free return and replacement policy. For any concerns, technical support, or to replace a defective unit, please contact our customer service:
Email: Wnanai@outlook.com
Related documentsWS 3000


Ask a question about this manual
Ask about setup, troubleshooting, compatibility, parts, safety, or missing instructions. Manuals+ will review the question and use this page’s manual context to help answer it.