1. Introduction
Thank you for choosing the NexiGo 15.6-inch Portable QLED Monitor. This manual provides detailed instructions to help you set up, operate, and maintain your new monitor. Please read this manual thoroughly before use to ensure optimal performance and longevity of your device.
2. Product Overview
2.1 Key Features
- Full HD 1080P QLED Screen: Delivers stunning 1920 x 1080 resolution with a 178° full viewing angle and Eye Care technology.
- Wide Compatibility: Connects via USB Type-C or Mini HDMI to various devices including laptops, PCs, Macs, PS4, Xbox, and Switch.
- Smart Cover & Screen Protector: Includes a durable PU leather smart cover that doubles as a stand, and a screen protector for added safety.
- Slim, Lightweight & Portable: Features a 0.3-inch profile and weighs 1.48 pounds, ideal for mobile setups.
- Advanced Connectivity: Equipped with 2 x USB Type-C Full Function ports (data transfer, power source), 1 x Mini HDMI port, and built-in speakers.
2.2 Package Contents
- NexiGo 15.6-inch Portable QLED Monitor
- Smart Cover
- Screen Protector
- USB Type-C to Type-C Cable
- Mini HDMI to HDMI Cable
- USB Type-A to Type-C Power Cable
- Power Adapter
- User Manual
2.3 Monitor Layout

Figure 2.3.1: Front view of the NexiGo 15.6-inch Portable QLED Monitor with its smart cover acting as a stand, displaying a scenic landscape.
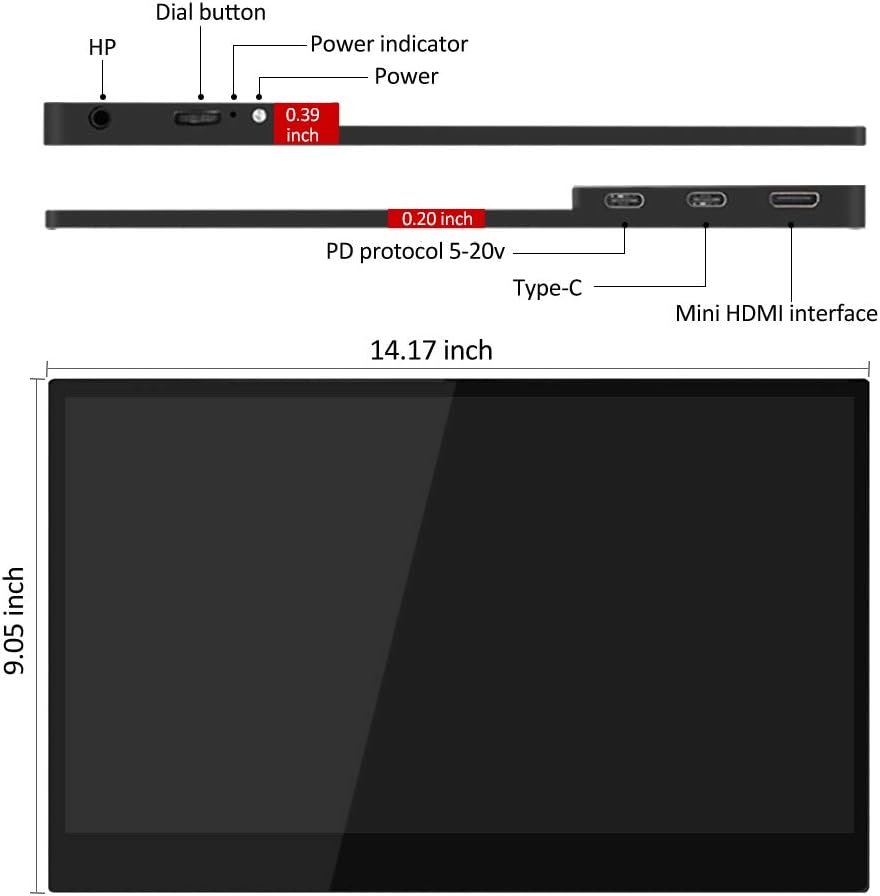
Figure 2.3.2: Diagram illustrating the side and top views of the monitor, highlighting the dial button, power indicator, power port, two Type-C ports, and Mini HDMI interface, along with its dimensions (14.17 inches width, 9.05 inches height, 0.19-0.39 inches thickness).
- Dial Button: Used for navigating the On-Screen Display (OSD) menu and adjusting settings.
- Power Indicator: Illuminates when the monitor is powered on.
- Power Port: Connects to the power adapter for external power.
- Type-C Ports (x2): Full-function ports for power, video, and data transfer.
- Mini HDMI Interface: Connects to devices via Mini HDMI for video input.
- HP (Headphone Jack): 3.5mm audio output for headphones.
3. Setup Instructions
3.1 Using the Smart Cover as a Stand
The included smart cover can be folded into various positions to serve as a stand for your monitor. Position the monitor securely to ensure stability.
3.2 Connecting to Devices
The NexiGo portable monitor offers flexible connectivity options. Ensure your device supports video output via the chosen port.

Figure 3.2.1: Examples of the monitor's wide application, including duplicate monitor setup, connection to a Raspberry Pi, phone screen mirroring, and extended desktop use.
- USB Type-C Connection (Single Cable Solution):
If your device (laptop, smartphone, etc.) has a full-function USB Type-C port (supporting DisplayPort Alternate Mode and power delivery), you can connect the monitor using a single USB Type-C to Type-C cable. This cable will provide both power and video signal.
- Connect one end of the USB Type-C to Type-C cable to your device's full-function USB Type-C port.
- Connect the other end to either of the Type-C ports on the NexiGo monitor.
- The monitor should automatically power on and display your device's screen.
- Mini HDMI Connection (Video) + USB Type-C (Power):
If your device uses HDMI for video output or does not have a full-function USB Type-C port, you will need two cables:
- Connect one end of the Mini HDMI to HDMI cable to your device's HDMI port.
- Connect the Mini HDMI end to the Mini HDMI port on the NexiGo monitor.
- Connect the USB Type-A to Type-C power cable to a power source (e.g., the included power adapter, a USB wall charger, or a laptop's USB-A port).
- Connect the Type-C end of the power cable to one of the Type-C ports on the NexiGo monitor for power.
- The monitor will power on and display the video signal from your device.
- Gaming Console Connection (e.g., PS4, Xbox, Switch):
For gaming consoles, use the Mini HDMI connection for video and a USB Type-C power connection as described above. For Nintendo Switch, ensure the console is powered by its original adapter or a compatible power bank to provide sufficient power to the monitor.

Figure 3.2.2: The NexiGo portable monitor displaying a game from a Nintendo Switch console, demonstrating its use as a gaming display.
4. Operating Instructions
4.1 On-Screen Display (OSD) Menu
The OSD menu allows you to adjust various display settings. Use the dial button located on the side of the monitor to navigate and select options.
- Press the Dial Button: To open the OSD menu.
- Roll the Dial Button Up/Down: To navigate through menu options.
- Press the Dial Button Again: To select an option or confirm a setting.
- Roll the Dial Button Left/Right: To adjust values within a selected option.
- Long Press the Dial Button: To exit the OSD menu.
4.2 Common OSD Settings
- Brightness/Contrast: Adjust the display's luminance and contrast levels.
- Color Settings: Modify color temperature, hue, and saturation.
- Input Source: Manually select between Type-C and Mini HDMI inputs if auto-detection fails.
- Aspect Ratio: Choose between 16:9, 4:3, or other available aspect ratios.
- Volume: Adjust the volume of the built-in speakers or connected headphones.
- HDR Mode: Enable or disable High Dynamic Range (HDR) if supported by your device and content.
- Eye Care Mode: Activate low blue light filter for reduced eye strain during prolonged use.
4.3 Display Modes (Windows/macOS)
Once connected, your operating system will detect the monitor. You can configure how your computer uses the external display:
- Duplicate Mode (Mirror): The monitor displays the same content as your primary screen.
- Extend Mode: The monitor acts as an extension of your desktop, allowing you to drag windows between screens.
- Second Screen Only: Only the portable monitor displays content, with your primary screen turned off.
Refer to your operating system's display settings for detailed configuration options.
5. Maintenance
5.1 Cleaning the Monitor
- Always power off and unplug the monitor before cleaning.
- Use a soft, lint-free cloth slightly dampened with water or a non-abrasive screen cleaner.
- Do not spray cleaner directly onto the screen. Apply it to the cloth first.
- Avoid using alcohol, ammonia, or abrasive cleaners, as they can damage the screen surface.
5.2 Screen Protector Care
The included screen protector helps guard against scratches. If applying a new one, ensure the screen is clean and dust-free for best adhesion. Replace if it becomes excessively scratched or damaged.
5.3 Storage and Portability

Figure 5.3.1: A person demonstrating the portability of the NexiGo monitor by easily sliding it into a messenger bag.
- When transporting the monitor, always use the smart cover to protect the screen.
- Store the monitor in a cool, dry place away from direct sunlight and extreme temperatures.
- Avoid placing heavy objects on the monitor.
6. Troubleshooting
If you encounter issues with your NexiGo portable monitor, please refer to the following common problems and solutions:
| Problem | Possible Cause | Solution |
|---|---|---|
| "No Signal" message or blank screen |
|
|
| Monitor flickers or disconnects intermittently |
|
|
| No audio from speakers/headphones |
|
|
| Image quality issues (blurry, distorted colors) |
|
|
7. Specifications
| Feature | Detail |
|---|---|
| Model Number | PMFHD15-HS01 |
| Screen Size | 15.6 Inches |
| Panel Type | QLED |
| Resolution | 1920 x 1080 (FHD 1080p) |
| Aspect Ratio | 16:9 |
| Image Brightness | 400 cd/m² |
| Screen Surface | Glossy |
| Connectivity | 2 x USB Type-C (Full Function), 1 x Mini HDMI, 1 x 3.5mm Headphone Jack |
| Product Dimensions | 13.9 x 8.5 x 0.19 inches |
| Item Weight | 1.48 pounds |
| Manufacturer | NexiGo |
8. Warranty and Support
NexiGo is committed to providing high-quality products and excellent customer service. Your NexiGo portable monitor comes with a standard manufacturer's warranty. Please refer to the warranty card included in your package for specific terms and conditions.
For technical support, troubleshooting assistance, or warranty claims, please contact NexiGo Customer Support:
- Website: www.nexigo.com/support
- Email: support@nexigo.com
- Please have your model number (PMFHD15-HS01) and purchase information ready when contacting support.


