Introduction
Thank you for choosing the Trevi RC 85D8 DAB Digital Alarm Clock Radio. This compact device offers DAB/DAB+ and FM RDS radio reception, a large LED display, dual alarms, snooze, sleep functions, and a unique time projection feature. This manual provides detailed instructions to help you set up and operate your new alarm clock radio effectively.
Package Contents
- Trevi RC 85D8 DAB Digital Alarm Clock Radio
- Power Adapter
- User Manual (this document)
Safety Information
Please read all safety instructions before using the device. Keep this manual for future reference.
- Do not expose the device to rain or moisture.
- Do not disassemble the device. Refer all servicing to qualified personnel.
- Use only the provided power adapter.
- Ensure proper ventilation around the device.
- Dispose of batteries responsibly.
Product Overview
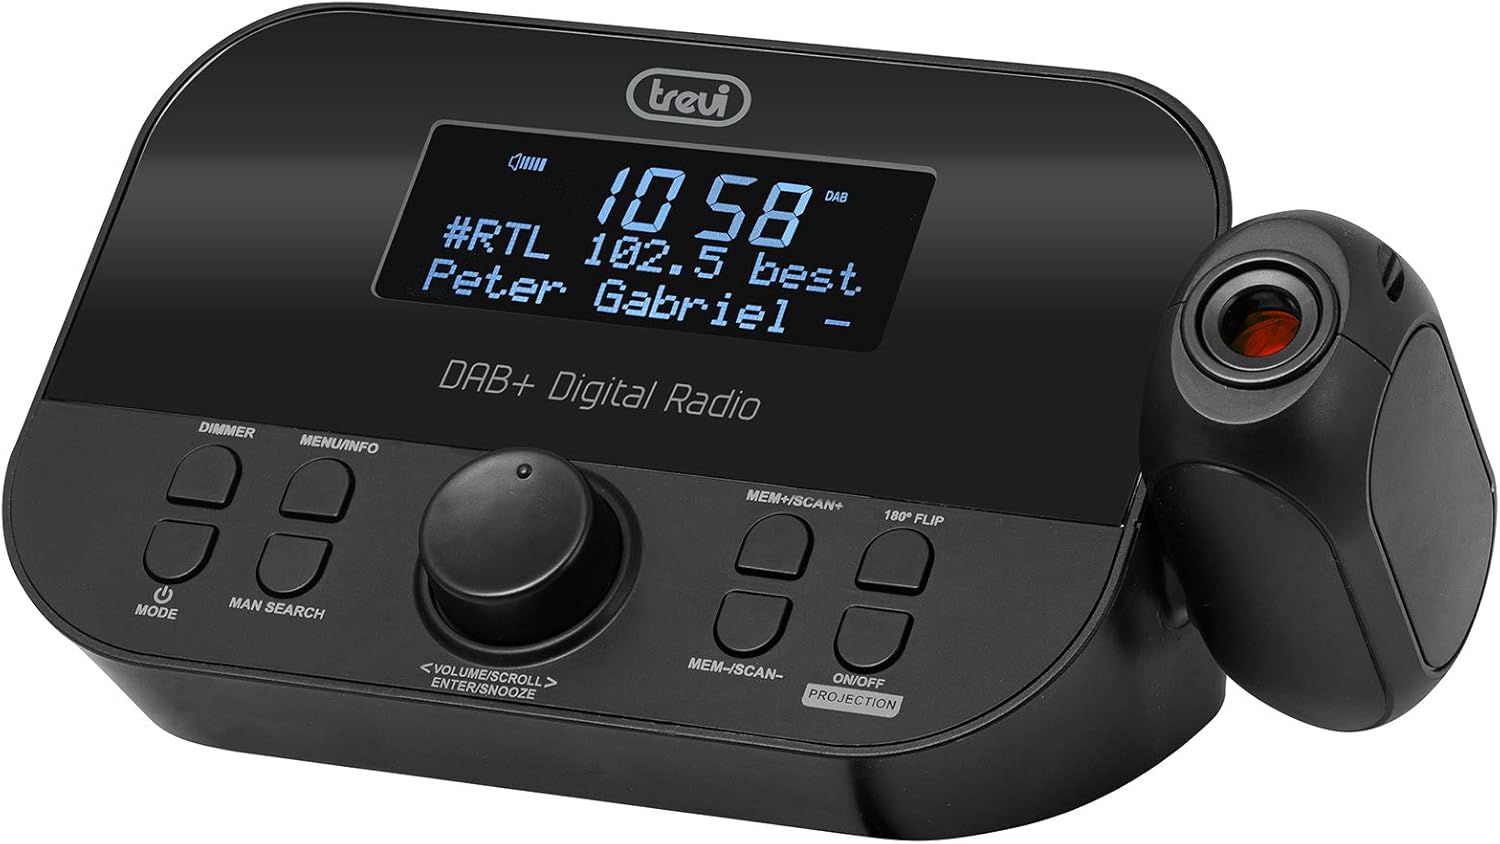
Front view of the Trevi RC 85D8 DAB Digital Alarm Clock Radio, showing the LED display, control buttons, and the time projector.
Controls and Display:
- LED Display: Shows time, radio station, song title/artist, volume, and other information.
- DIMMER Button: Adjusts display brightness.
- MENU/INFO Button: Accesses menu options and displays radio information.
- MODE Button: Switches between DAB, FM, and other modes.
- MAN SEARCH Button: Initiates manual station search.
- VOLUME/SCROLL/ENTER/SNOOZE Knob: Multi-function knob for volume control, menu navigation, selection, and snooze activation.
- MEM+/SCAN+ Button: Stores/recalls presets, scans forward.
- MEM-/SCAN- Button: Stores/recalls presets, scans backward.
- 180° FLIP Button: Rotates projected time display.
- ON/OFF PROJECTION Button: Turns the time projection on or off.
- Projection Lens: Projects time onto a surface.
Setup
1. Power Connection
- Connect the provided power adapter to the DC IN port on the back of the alarm clock radio.
- Plug the adapter into a standard wall outlet.
- The device will power on and the display will illuminate.
2. Battery Backup Installation (Optional)
The device has a battery compartment for anti-failure backup (2 AAA batteries, not included). This ensures time and alarm settings are retained during a power outage.
- Open the battery compartment cover on the bottom of the unit.
- Insert 2 AAA batteries, observing the correct polarity (+/-).
- Close the battery compartment cover securely.
3. Antenna Setup
Extend the telescopic antenna fully for optimal DAB/DAB+ and FM radio reception. Adjust its position for the best signal.

Side view of the Trevi RC 85D8 DAB Digital Alarm Clock Radio, showing the extended telescopic antenna for improved reception.
4. Initial Time and Date Setting
Upon first power-on, the device will attempt to synchronize time and date automatically via DAB or FM RDS signal. If automatic synchronization fails or you wish to set it manually:
- Press the MENU/INFO button to enter the menu.
- Rotate the VOLUME/SCROLL knob to navigate to "Time/Date" or "Settings".
- Press the ENTER (push the knob) to select.
- Follow the on-screen prompts to set the time, date, and 12/24-hour format using the VOLUME/SCROLL knob and ENTER button.
Operating Instructions
1. Power On/Off
- To turn on, press the MODE button.
- To turn off, press and hold the MODE button.
2. Radio Mode Selection (DAB/DAB+ / FM RDS)
- Press the MODE button repeatedly to cycle between DAB/DAB+ and FM radio modes.
3. Tuning and Scanning
DAB/DAB+ Radio:
- In DAB mode, press MEM+/SCAN+ or MEM-/SCAN- to automatically scan for available stations.
- Alternatively, press MAN SEARCH to manually tune. Rotate the VOLUME/SCROLL knob to select a station, then press ENTER.
FM RDS Radio:
- In FM mode, press MEM+/SCAN+ or MEM-/SCAN- to automatically scan for the next available station.
- Press MAN SEARCH to manually tune. Rotate the VOLUME/SCROLL knob to adjust the frequency, then press ENTER.
4. Storing and Recalling Presets
- Tune to your desired station.
- Press and hold MEM+/SCAN+ or MEM-/SCAN- until the display shows "Preset Store".
- Rotate the VOLUME/SCROLL knob to select a preset number (e.g., P01, P02).
- Press ENTER to confirm and save the station.
- To recall a preset, briefly press MEM+/SCAN+ or MEM-/SCAN- to cycle through stored stations.
5. Volume Control
- Rotate the VOLUME/SCROLL knob to adjust the listening volume.
6. Setting Alarms (Dual Alarms)
The Trevi RC 85D8 supports two independent alarms (Alarm 1 and Alarm 2).
- Press the MENU/INFO button to enter the menu.
- Rotate the VOLUME/SCROLL knob to navigate to "Alarm 1 Setup" or "Alarm 2 Setup".
- Press ENTER to select.
- Follow the on-screen prompts to set:
- Alarm Time: Set the desired wake-up time.
- Alarm Source: Choose between "Buzzer" or "Radio" (DAB or FM).
- Alarm Volume: Set the desired alarm volume.
- Alarm Frequency: Select "Daily", "Weekdays", "Weekends", or "Once".
- Alarm Status: Turn the alarm "On" or "Off".
- Press ENTER to confirm each setting.
7. Snooze Function
- When an alarm sounds, press the VOLUME/SCROLL/ENTER/SNOOZE knob to activate snooze. The alarm will pause for a set period (usually 9 minutes) and sound again.
- To cancel snooze and turn off the alarm, press the MODE button.
8. Sleep Timer Function
The sleep timer allows the radio to play for a set duration before automatically turning off.
- Press the MENU/INFO button to enter the menu.
- Rotate the VOLUME/SCROLL knob to navigate to "Sleep Timer".
- Press ENTER to select.
- Rotate the VOLUME/SCROLL knob to choose the desired sleep duration (e.g., 15, 30, 60, 90 minutes, or Off).
- Press ENTER to confirm.
9. Time Projection Feature
The Trevi RC 85D8 DAB Digital Alarm Clock Radio projecting the time onto a surface, demonstrating the adjustable projection lens.
- Turn Projection On/Off: Press the ON/OFF PROJECTION button.
- Adjust Projection Angle: Manually adjust the projection lens on the side of the unit to direct the time display onto your ceiling or wall.
- Rotate Projected Time: If the projected time is upside down or sideways, press the 180° FLIP button to rotate it for correct viewing.
- Adjust Focus: Rotate the ring around the projection lens to sharpen the projected image.
10. Display Dimmer
- Press the DIMMER button repeatedly to cycle through different brightness levels for the main LED display (e.g., High, Medium, Low, Off).
Maintenance
- Cleaning: Use a soft, dry cloth to clean the surface of the device. Do not use abrasive cleaners or solvents.
- Antenna Care: Handle the telescopic antenna gently to avoid damage.
- Battery Replacement: If using battery backup, replace AAA batteries annually or when the low battery indicator appears.
Troubleshooting
| Problem | Possible Cause | Solution |
|---|---|---|
| No power/Display off | Power adapter not connected; Power outlet faulty; DIMMER set to Off. | Ensure power adapter is securely connected and outlet is functional. Press DIMMER button to adjust display brightness. |
| Poor radio reception (DAB/FM) | Antenna not extended; Weak signal area; Interference from other electronics. | Fully extend and adjust the telescopic antenna. Try repositioning the unit. Move away from other electronic devices. Perform a full scan for DAB stations. |
| Alarm does not sound | Alarm not activated; Alarm volume too low; Incorrect alarm time/frequency. | Check alarm settings (Alarm 1/2 Setup) to ensure it is "On", time is correct, frequency is set, and volume is audible. |
| Projected time is blurry or unclear | Focus not adjusted; Projection distance too far/close. | Rotate the ring around the projection lens to adjust focus. Ensure the projection surface is within an optimal distance. |
| Projected time is upside down/sideways | Projection orientation incorrect. | Press the 180° FLIP button to rotate the projected image. |
| Display is too bright at night | Dimmer setting too high. | Press the DIMMER button repeatedly to select a lower brightness level or turn the display off. |
Specifications
| Feature | Detail |
|---|---|
| Brand | Trevi |
| Model Number | RC 85D8 (0RC85D800) |
| Color | Black |
| Tuning Technology | DAB, FM RDS |
| Radio Bands Supported | DAB/DAB+, FM |
| Special Features | Alarm, Snooze, Sleep Timer, Time Projection, Dual Alarms |
| Connectivity Technology | 3.5 mm Jack (for headphones) |
| Power Source | AC Power Adapter (included), Battery backup (2x AAA, not included) |
| Product Dimensions | 23L x 13W x 14H centimeters (approx.) |
| Display | LED Display with Dimmer |
Warranty and Support
For warranty information and technical support, please refer to the documentation provided with your purchase or visit the official Trevi website. Keep your proof of purchase for warranty claims.
Manufacturer: Trevi SpA
Country of Origin: China


