
1. Safety Warnings
WARNING: This device utilizes a Class IIIa green laser with a maximum output of ≤ 5mW and a wavelength of 532 nm. Direct exposure to the laser beam may cause eye damage. Always follow these safety precautions:
- Do not stare directly into the laser beam.
- Do not aim the laser at aircraft or other reflective surfaces.
- Ensure the device is turned off when not in use or during maintenance.
- Keep out of reach of children.
2. Product Overview & What's in the Box
The Feyachi GL6 Tactical Green Laser Sight is constructed from aerospace-grade aluminum with a hard anodized finish, designed for durability and high impact resistance. It features a highly visible green laser and is fully adjustable for windage and elevation.
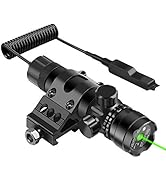
Image: Feyachi GL6 Tactical Green Laser Sight mounted on a rifle, showcasing its compact design.
Package Contents:
- Feyachi GL6 Green Laser Sight Unit
- 45 Degree Picatinny Rail Mount
- Pressure Switch with coiled cable
- Allen Wrench for adjustments
- User Manual

Image: All components included in the Feyachi GL6 package, laid out on a surface.

Image: An exploded view of the Feyachi GL6 laser sight, showing its internal and external components including the aluminum alloy body, adjustment buttons, and tail button switch.
3. Setup
3.1 Mounting the Laser Sight
The GL6 is designed to be mounted on a 20mm Picatinny or Weaver rail using the included 45-degree rail mount. Ensure the mount is securely fastened to prevent movement during use.

Image: Close-up of the Feyachi GL6 laser sight mount, highlighting its 1-inch diameter ring and 20mm rail compatibility.
3.2 Attaching the Pressure Switch
The pressure switch provides tactical control for activating the laser. Connect the pressure switch to the rear of the laser sight. Secure the pressure switch to your rail system using the appropriate mount (e.g., MP23 Picatinny Pressure Switch Mount or MP22 Mlok Pressure Switch Mount, if applicable and purchased separately).

Image: The Feyachi GL6 pressure switch, showing its coiled cable and momentary-on/constant-on buttons.
Video: This video demonstrates the installation of a Feyachi pressure switch mount plate, which can be applied to similar pressure switch setups for the GL6.
4. Operating Instructions
4.1 Powering On/Off
- Main Button: Press the main button on the rear of the unit to cycle through modes (Laser On, Light On, Laser + Light On, Off).
- Pressure Switch: Use the pressure switch for momentary or constant activation of the laser and/or light, depending on the selected mode.
Video: This video provides a demonstration on how to operate the light and laser functions of the device.
4.2 Adjusting Windage and Elevation
The GL6 laser sight is fully adjustable for windage and elevation to ensure accurate targeting. Use the provided Allen wrench to make precise adjustments.
- Windage Adjustment: The screw on the side of the unit adjusts the horizontal position (left/right) of the laser dot.
- Elevation Adjustment: The screw on the top/bottom of the unit adjusts the vertical position (up/down) of the laser dot.
To zero the laser, aim at a target at a known distance. Adjust the windage and elevation screws until the laser dot aligns with your point of impact.
Video: This video illustrates the process of adjusting the laser and light for optimal performance and accuracy.
5. Maintenance
5.1 Cleaning
Regularly clean the lens and exterior of the laser sight with a soft, dry cloth. Avoid using abrasive materials or harsh chemicals that could damage the finish or optics.
5.2 Charging
The GL6 laser sight is USB-C rechargeable. Connect the provided USB-C cable to the charging port on the unit and to a suitable USB power source. An indicator light will show charging status.
6. Troubleshooting
- Laser/Light Not Turning On: Ensure the battery is charged and properly installed. Check for any obstructions or loose connections.
- Inaccurate Laser: Re-zero the laser sight following the windage and elevation adjustment instructions. Ensure the mount is securely tightened to the rail.
- Intermittent Operation: Check battery charge and connections. Ensure the pressure switch cable is fully inserted and not damaged.
7. Specifications
| Feature | Specification |
|---|---|
| Laser Type | Class IIIa Green Laser |
| Max Output | ≤ 5mW |
| Wavelength | 532 nm |
| Daytime Visibility | 100 to 300 ft |
| Nighttime Visibility | Up to 1000 ft |
| Mount Type | 45 Degree Picatinny Rail Mount (20mm) |
| Material | Aerospace Grade Aluminum |
| Dimensions | 11.94 x 4.06 x 4.06 cm |
| Weight | 127.57 g (4.5 Ounces) |
| Model Number | Feyachi3041_VC |
8. Warranty and Support
For warranty information or technical support, please refer to the product packaging or contact Feyachi customer service directly. Keep your purchase receipt for any warranty claims.