
BOYA BY-M800
BOYA BY-M800 Studio Condenser Microphone User Manual
Model: BY-M800 | Brand: BOYA
1. Introduction
The BOYA BY-M800 is a large cardioid diaphragm condenser microphone designed for high-quality audio capture in studio environments. It features a smooth, flat, wide-range frequency response, making it ideal for vocal and general instrument recording. This manual provides detailed instructions for setting up, operating, and maintaining your BY-M800 microphone.
Key Features:
- Large gold-sputtered diaphragm for accurate sound reproduction.
- Cardioid polar pattern effectively rejects off-axis sound.
- Switchable -10dB pad for handling high SPL sources.
- Two-position low-cut filter switch to reduce unwanted low-frequency noise.
- Sturdy all-metal construction for durability.
- Requires standard 24V or 48V phantom power via XLR connector.
- Includes shockmount, pop filter, and 3m (10ft) XLR cable.
2. Package Contents
Please check the package carefully to ensure all items are present and in good condition.
- BOYA BY-M800 Condenser Microphone
- Shockmount
- Pop Filter
- 3m (10ft) XLR Cable
- User Manual (this document)
- Warranty Card
3. Product Overview
Familiarize yourself with the components of your BY-M800 microphone.

Figure 3.1: The BOYA BY-M800 condenser microphone assembled with its included shockmount and pop filter, ready for studio use.
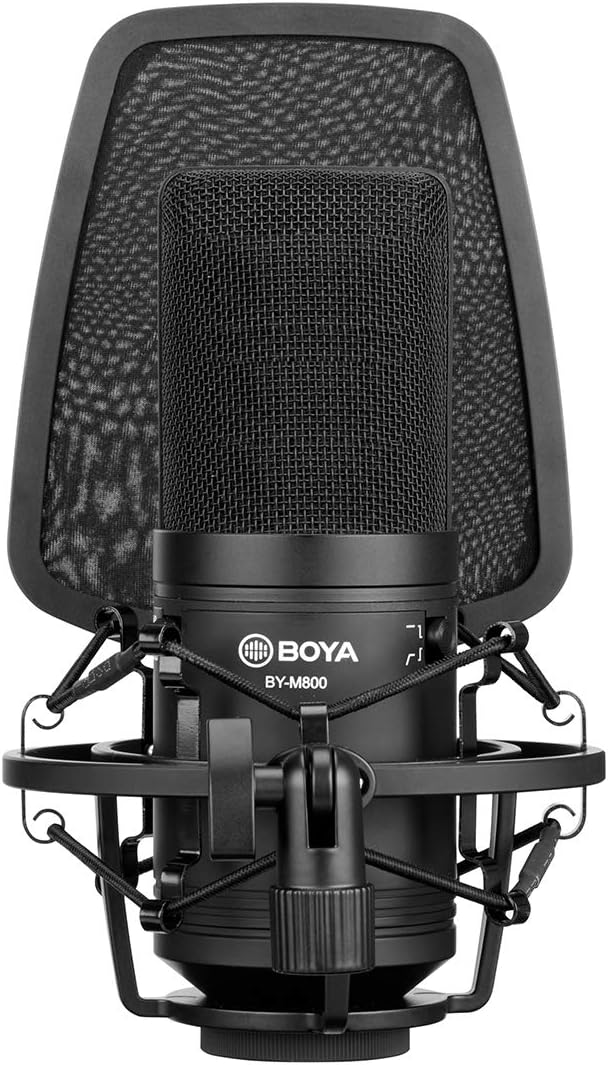
Figure 3.2: A detailed view of the BOYA BY-M800 microphone body, highlighting the model number "BY-M800" and the switches for -10dB pad and low-cut filter.
Components:
- Microphone Capsule: Large gold-sputtered diaphragm.
- -10dB Pad Switch: Reduces input sensitivity by 10dB for loud sound sources.
- Low-Cut Filter Switch: Engages a low-frequency roll-off to reduce rumble and unwanted bass.
- XLR Connector: Standard 3-pin XLR output for connecting to audio interfaces or mixers.
- Shockmount: Isolates the microphone from vibrations and handling noise.
- Pop Filter: Reduces plosive sounds (P, B) and protects the microphone capsule.
4. Setup
Follow these steps to set up your BOYA BY-M800 microphone for recording.
- Attach the Shockmount: Secure the BY-M800 microphone into the included shockmount. Ensure it is firmly seated to prevent accidental dislodging.
- Mount to a Stand: Attach the shockmount to a microphone stand using the standard 3/8" or 5/8" thread adapter. Tighten securely.
- Position the Pop Filter: Attach the pop filter to the microphone stand and position it approximately 1-2 inches in front of the microphone capsule. This helps to reduce plosive sounds and protect the diaphragm.

Figure 4.1: The BY-M800 microphone mounted on a stand with the pop filter correctly positioned, demonstrating a typical setup for vocal recording.
- Connect the XLR Cable: Connect one end of the supplied 3m (10ft) XLR cable to the XLR output on the bottom of the microphone. Connect the other end to an audio interface, mixer, or preamplifier that provides 24V or 48V phantom power.

Figure 4.2: Illustration of the BY-M800 microphone connected via its XLR cable, emphasizing the requirement for 24V or 48V phantom power from the connected device.
- Activate Phantom Power: Ensure phantom power is enabled on your audio interface or mixer. The BY-M800 requires phantom power to operate.
- Adjust Switches (if needed):
- If recording very loud sound sources (e.g., drums, loud vocals), engage the -10dB pad switch to prevent distortion.
- If experiencing low-frequency rumble or unwanted bass noise (e.g., air conditioning, traffic), engage the low-cut filter switch.
5. Operating the Microphone
Once set up, the BY-M800 is ready for use. Here are some tips for optimal performance.
Microphone Placement:
- Vocals: For vocal recording, position the microphone 6-12 inches from the vocalist, directly facing the sound source. Always use the pop filter.
- Instruments: Placement will vary depending on the instrument. Experiment with distance and angle to capture the desired tone. The cardioid pattern is most sensitive directly in front of the microphone.

Figure 5.1: A person speaking into the BY-M800 microphone, illustrating the ideal distance and angle for capturing clear vocal recordings.
Monitoring and Gain Staging:
- Monitor your audio through headphones connected to your audio interface to hear the microphone's output.
- Adjust the gain (input level) on your audio interface or mixer so that the signal is strong but does not clip or distort. Aim for peak levels around -6dB to -3dB on your recording software's meters.
6. Maintenance
Proper care will extend the life and performance of your BY-M800 microphone.
- Cleaning: Use a soft, dry cloth to wipe down the microphone body. Do not use liquid cleaners or solvents, as they can damage the microphone.
- Storage: When not in use, store the microphone in a dry, dust-free environment, preferably in its original packaging or a protective case.
- Handling: Avoid dropping the microphone or subjecting it to strong impacts, as this can damage the delicate internal components.
- Moisture: Keep the microphone away from moisture and extreme temperatures.
7. Troubleshooting
If you encounter issues with your BY-M800 microphone, refer to the following common problems and solutions.
| Problem | Possible Cause | Solution |
|---|---|---|
| No sound output |
|
|
| Distorted audio |
|
|
| Excessive background noise/hum |
|
|
8. Specifications
Detailed technical specifications for the BOYA BY-M800 microphone.
| Feature | Specification |
|---|---|
| Acoustic Principle | Condenser |
| Polar Pattern | Cardioid |
| Diaphragm Size | Large Gold-sputtered Diaphragm |
| Frequency Response | 20 Hz - 20 kHz |
| Sensitivity | -33dB ±3dB (0dB=1V/Pa @ 1KHz) |
| Output Impedance | 200 Ohm |
| Signal-to-Noise Ratio | 80 dB |
| Power Requirement | 24V or 48V Phantom Power |
| Output Connector | 3-pin XLR |
| Material | Metal |
| Dimensions | Approx. 10.59 x 8.19 x 6.06 inches (Package) |
| Weight | Approx. 2.49 pounds |
9. Warranty and Support
BOYA provides a one-year warranty for the BY-M800 microphone from the date of purchase. This warranty covers manufacturing defects and workmanship under normal use.
Warranty Exclusions:
- Damage caused by misuse, abuse, accident, or neglect.
- Damage caused by unauthorized repair or modification.
- Normal wear and tear.
- Damage from external causes such as power surges or natural disasters.
Customer Support:
For technical support, warranty claims, or further assistance, please contact BOYA customer service through their official website or the retailer where you purchased the product. Please have your proof of purchase and product model number (BY-M800) ready when contacting support.
You can find more information and contact details on the official BOYA website: www.boya-mic.com
Related documentsBY-M800


Ask a question about this manual
Ask about setup, troubleshooting, compatibility, parts, safety, or missing instructions. Manuals+ will review the question and use this page’s manual context to help answer it.