
Introduction
This manual provides comprehensive instructions for the setup, operation, and maintenance of your TENG AT-306 Wireless Dual Handheld Microphone system. This system is designed for clear audio transmission and is suitable for various applications including KTV, bar, and stage performances. Please read this manual thoroughly before using the product to ensure optimal performance and longevity.

Image: The complete TENG AT-306 Wireless Dual Handheld Microphone system, including the receiver, two handheld microphones, and an audio output cable.
Package Contents
Please verify that all items listed below are included in your package:
- 1 x Wireless Receiver
- 2 x Handheld Microphones
- 1 x Audio Output Line (6.35mm to 6.35mm cable)

Image: The included audio output cable, used to connect the receiver to an audio input device.
Key Features
The TENG AT-306 Wireless Microphone System offers the following features:
- High definition audio with excellent signal-to-noise ratio.
- Wide frequency response range and low distortion for clear sound.
- Wireless receiver for enhanced mobility and ease of use.
- Ergonomic design of microphones for comfortable handling.
- Suitable for various professional and recreational audio applications.
Setup Guide
- Unpack Components: Carefully remove all items from the packaging and place them on a stable, flat surface.
- Position the Receiver: Place the wireless receiver in a central location, away from large metal objects or other electronic devices that may cause interference. Extend the antennas vertically for optimal signal reception.

Image: Rear view of the receiver showing antenna ports, audio output, and power input. Ensure antennas are fully extended.
- Connect Power: Connect the receiver's power cable to a standard AC 110V 60Hz power outlet. Do not power on the receiver yet.
- Connect Audio Output: Use the provided audio output line to connect the receiver's "AUDIO OUTPUT" port to the audio input (e.g., microphone input, AUX input) of your amplifier, mixer, or karaoke machine.
- Install Microphone Batteries: Unscrew the bottom cap of each handheld microphone. Insert one 1.5V battery (not included) into each microphone, ensuring correct polarity (+/-). Replace the cap securely.
Operating Instructions
- Power On Receiver: Flip the power switch on the front of the receiver to the "ON" position. The power indicator light should illuminate.

Image: Front panel of the receiver showing the power switch on the left and channel A and B indicators.
- Power On Microphones: Locate the power switch on each microphone. Slide the switch to the "ON" position. The microphone's indicator light should turn on.
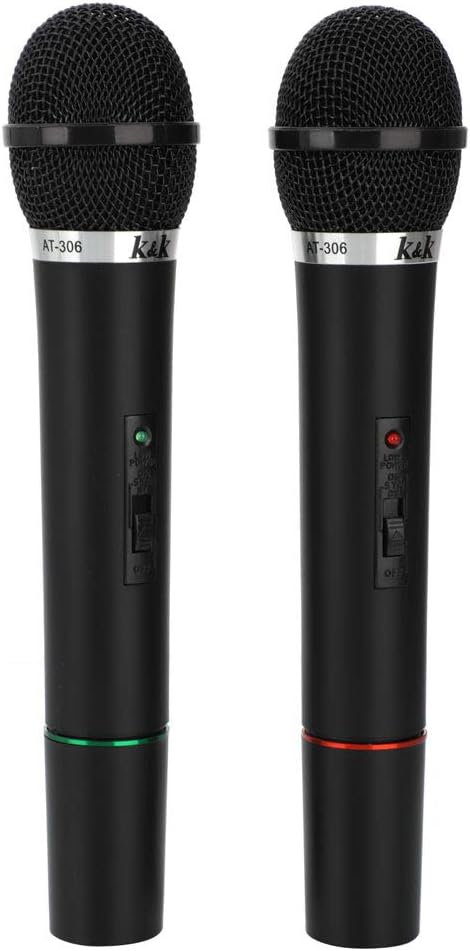
Image: Detail of the handheld microphones, highlighting the power switch and indicator light.
- Verify Connection: Once the microphones are powered on, the corresponding channel indicator (A or B) on the receiver should light up, indicating a successful wireless connection.

Image: The two handheld microphones, ready for use. Each microphone corresponds to a channel on the receiver.
- Adjust Volume: Adjust the volume on your connected amplifier, mixer, or karaoke machine to the desired level. The microphone system itself does not have volume controls on the microphones or receiver.
- Begin Use: You can now begin using the microphones for your intended purpose. Speak directly into the microphone grille for optimal sound pickup.
- Power Off: After use, first turn off the microphones by sliding their power switches to "OFF". Then, turn off the receiver by flipping its power switch to "OFF". Disconnect the power cable from the outlet if the system will not be used for an extended period.
Maintenance
- Cleaning: Use a soft, dry cloth to clean the surfaces of the receiver and microphones. Do not use liquid cleaners or abrasive materials.
- Battery Replacement: Replace microphone batteries when the indicator light on the microphone dims or audio quality degrades. Always use fresh batteries of the specified type (1.5V).
- Storage: When not in use, store the system in a cool, dry place, away from direct sunlight and extreme temperatures.
Troubleshooting
| Problem | Possible Cause | Solution |
|---|---|---|
| No sound from microphones. |
|
|
| Poor sound quality / Static. |
|
|
| Receiver power indicator off. |
|
|
Technical Specifications
| Parameter | Value |
|---|---|
| Frequency | FM121.7-128.7MHz |
| Frequency Response | 100 ~ 10000Hz (±3db) |
| Dynamic Range | 80db |
| Signal-to-noise Ratio | > 80db |
| Working Temperature | 32°F ~ 113°F (0°C ~ 45°C) |
| Scope of Work | About 90ft (27m) without Interference |
| Frequency Output Power | 8MW (Max 50MW) |
| Microphone Battery | 1 Volt (Per MIC) |
| Audio Output Power | > 25MV |
| Output Impedance | 600Ω (Unbalanced) |
| Receive Sensitivity | 30dBuV |
| Operating Voltage (Receiver) | AC 110V 60Hz |
| Dimensions (Receiver) | (14.57 x 2.95 x 2.36)" / (37 x 7.5 x 6)cm (L x W x H) |
| Weight (System) | 30.34oz / 860g |
| Color | Black |
| Microphone Form Factor | Handheld |
| Connectivity Technology | UHF |
| Connector Type | 3.5 mm TRS, Wireless |
| Polar Pattern | Unidirectional |
Warranty and Support
Specific warranty information for the TENG AT-306 Wireless Dual Handheld Microphone system is not provided in this manual. For warranty details, technical support, or service inquiries, please refer to the product packaging or contact the retailer or manufacturer directly.
Please retain your purchase receipt as proof of purchase for any warranty claims.