1. Important Safety Instructions
Please read all instructions carefully before using the appliance. Retain this manual for future reference.
- This appliance is for household use only. Do not use outdoors or on wet surfaces.
- Do not allow children to operate the vacuum cleaner. Close supervision is necessary when used near children.
- Do not pick up flammable or combustible liquids, such as gasoline, or use in areas where they may be present.
- Do not pick up anything that is burning or smoking, such as cigarettes, matches, or hot ashes.
- Do not use without the dust cup and filter in place.
- Turn off the appliance before connecting or disconnecting the battery charger.
- Use only the charger supplied by the manufacturer to recharge the appliance.
- If the power cord is damaged, it must be replaced by the manufacturer, its service agent, or similarly qualified persons to avoid a hazard.
- Store the appliance indoors in a cool, dry place.
2. Product Overview
The Ohmex OHM-VVC-1322 is a lightweight and versatile cordless vacuum cleaner designed for efficient home cleaning. It features a powerful motor, a long tube for extended reach, and a removable dustbin for easy maintenance.
Key Components
- Main Unit (Motor, Dustbin, Handle)
- Long Extension Tube
- Floor Brush Head
- Battery Charger
- Cartridge Filter

Figure 2.1: The Ohmex OHM-VVC-1322 Cordless Vacuum Cleaner assembled in its full stick configuration, ready for floor cleaning.
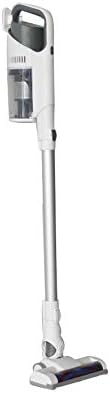
Figure 2.2: Side view of the vacuum cleaner in stick mode, highlighting the main unit, extension tube, and floor brush.

Figure 2.3: The vacuum cleaner configured for handheld use, ideal for smaller areas or upholstery.
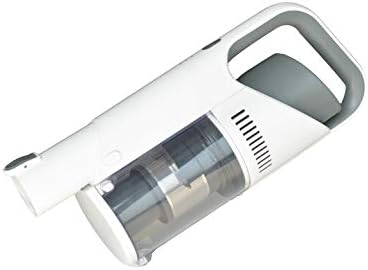
Figure 2.4: Detailed view of the handheld unit, showing the dustbin and handle design.
3. Setup
3.1 Assembly
- Unpack all components from the packaging.
- Attach the long extension tube to the main unit until it clicks securely into place.
- Connect the floor brush head to the other end of the extension tube, ensuring a firm connection. For handheld use, attach desired accessories directly to the main unit.
3.2 Initial Charging
Before first use, fully charge the vacuum cleaner's battery.
- Connect the charger to the charging port on the main unit.
- Plug the charger into a suitable power outlet.
- The charging indicator light will illuminate. Allow the unit to charge until the indicator shows a full charge (refer to the specific indicator behavior in your product's quick start guide if available).
4. Operating Instructions
4.1 Powering On/Off
- To turn on the vacuum cleaner, press the power button located on the main unit.
- To turn off, press the power button again.
4.2 Cleaning Operation
- Ensure the dustbin is empty and the filter is clean before starting.
- For floor cleaning, use the assembled stick vacuum. Guide the floor brush over the surface to be cleaned. The powerful 15 kPa suction effectively picks up dust and debris.
- For cleaning upholstery, car interiors, or hard-to-reach areas, detach the extension tube and use the main unit with appropriate accessories (not included, but generally available for handheld vacuums).
- The lightweight design and cordless operation provide flexibility and ease of movement during cleaning.
5. Maintenance
Regular maintenance ensures optimal performance and extends the lifespan of your vacuum cleaner.
5.1 Emptying the Dustbin
- When the dustbin is full (capacity 0.5 liters), or after each use, it should be emptied.
- Locate the dustbin release button/latch on the main unit.
- Press the button to detach the dustbin.
- Hold the dustbin over a waste bin and open its bottom flap to release the collected debris.
- Close the flap and reattach the dustbin to the main unit, ensuring it clicks into place.

Figure 5.1: Illustration of the dustbin being opened for emptying, showing the filter compartment.
5.2 Cleaning the Filter
The vacuum cleaner uses a cartridge filter. Clean the filter regularly to maintain suction power.
- After emptying the dustbin, carefully remove the cartridge filter.
- Tap the filter gently over a waste bin to remove loose dust.
- If necessary, rinse the filter under cold running water. Ensure it is completely dry before reinserting it into the vacuum cleaner. Do not use the vacuum cleaner with a wet filter.
- Reinsert the dry filter into the dustbin and reattach the dustbin to the main unit.
5.3 General Cleaning
- Wipe the exterior of the vacuum cleaner with a soft, damp cloth. Do not use abrasive cleaners or solvents.
- Periodically check the floor brush head for tangled hair or debris and remove them to ensure smooth operation.
6. Troubleshooting
If you encounter issues with your Ohmex OHM-VVC-1322, refer to the following common problems and solutions:
| Problem | Possible Cause | Solution |
|---|---|---|
| Vacuum cleaner does not turn on. | Battery is discharged. | Charge the battery fully. |
| Power button malfunction. | Contact customer support. | |
| Low suction power. | Dustbin is full. | Empty the dustbin. |
| Filter is clogged. | Clean or replace the filter. | |
| Obstruction in the nozzle or tube. | Check and clear any blockages. | |
| Unusual noise during operation. | Obstruction in the brush roll or motor. | Turn off and inspect the brush roll and air pathways for debris. |
| Loose component. | Ensure all parts are securely assembled. |
7. Specifications
| Feature | Detail |
|---|---|
| Brand | Ohmex |
| Model Number | OHM-VVC-1322 |
| Color | White |
| Package Dimensions | 60.5 x 28 x 21 cm |
| Item Weight | 3.12 Kilogram |
| Dustbin Capacity | 0.5 Liters |
| Power/Wattage | 130 watts |
| Voltage | 22.2 Volts |
| Noise Level | 72 Decibels |
| Special Features | Lightweight, Cordless |
| Manufacturer | Ohmex |
| First Available Date | June 6, 2020 |
| Filter Type | Cartridge |
| Surface Recommendation | Carpet |
| Power Source | Battery Powered |
8. Warranty and Support
For warranty information, technical support, or service inquiries, please refer to the warranty card included with your product or contact Ohmex customer service.
- Keep your purchase receipt as proof of purchase.
- Do not attempt to repair the appliance yourself. Unauthorized repairs may void the warranty.


