1. Introduction and Overview
This manual provides detailed instructions for the installation, operation, and maintenance of your GIGABYTE B550 AORUS PRO AC motherboard. Designed for 3rd Gen AMD Ryzen Processors, this motherboard offers advanced features for gaming and content creation, including PCIe 4.0 support, robust power delivery, and efficient thermal management.
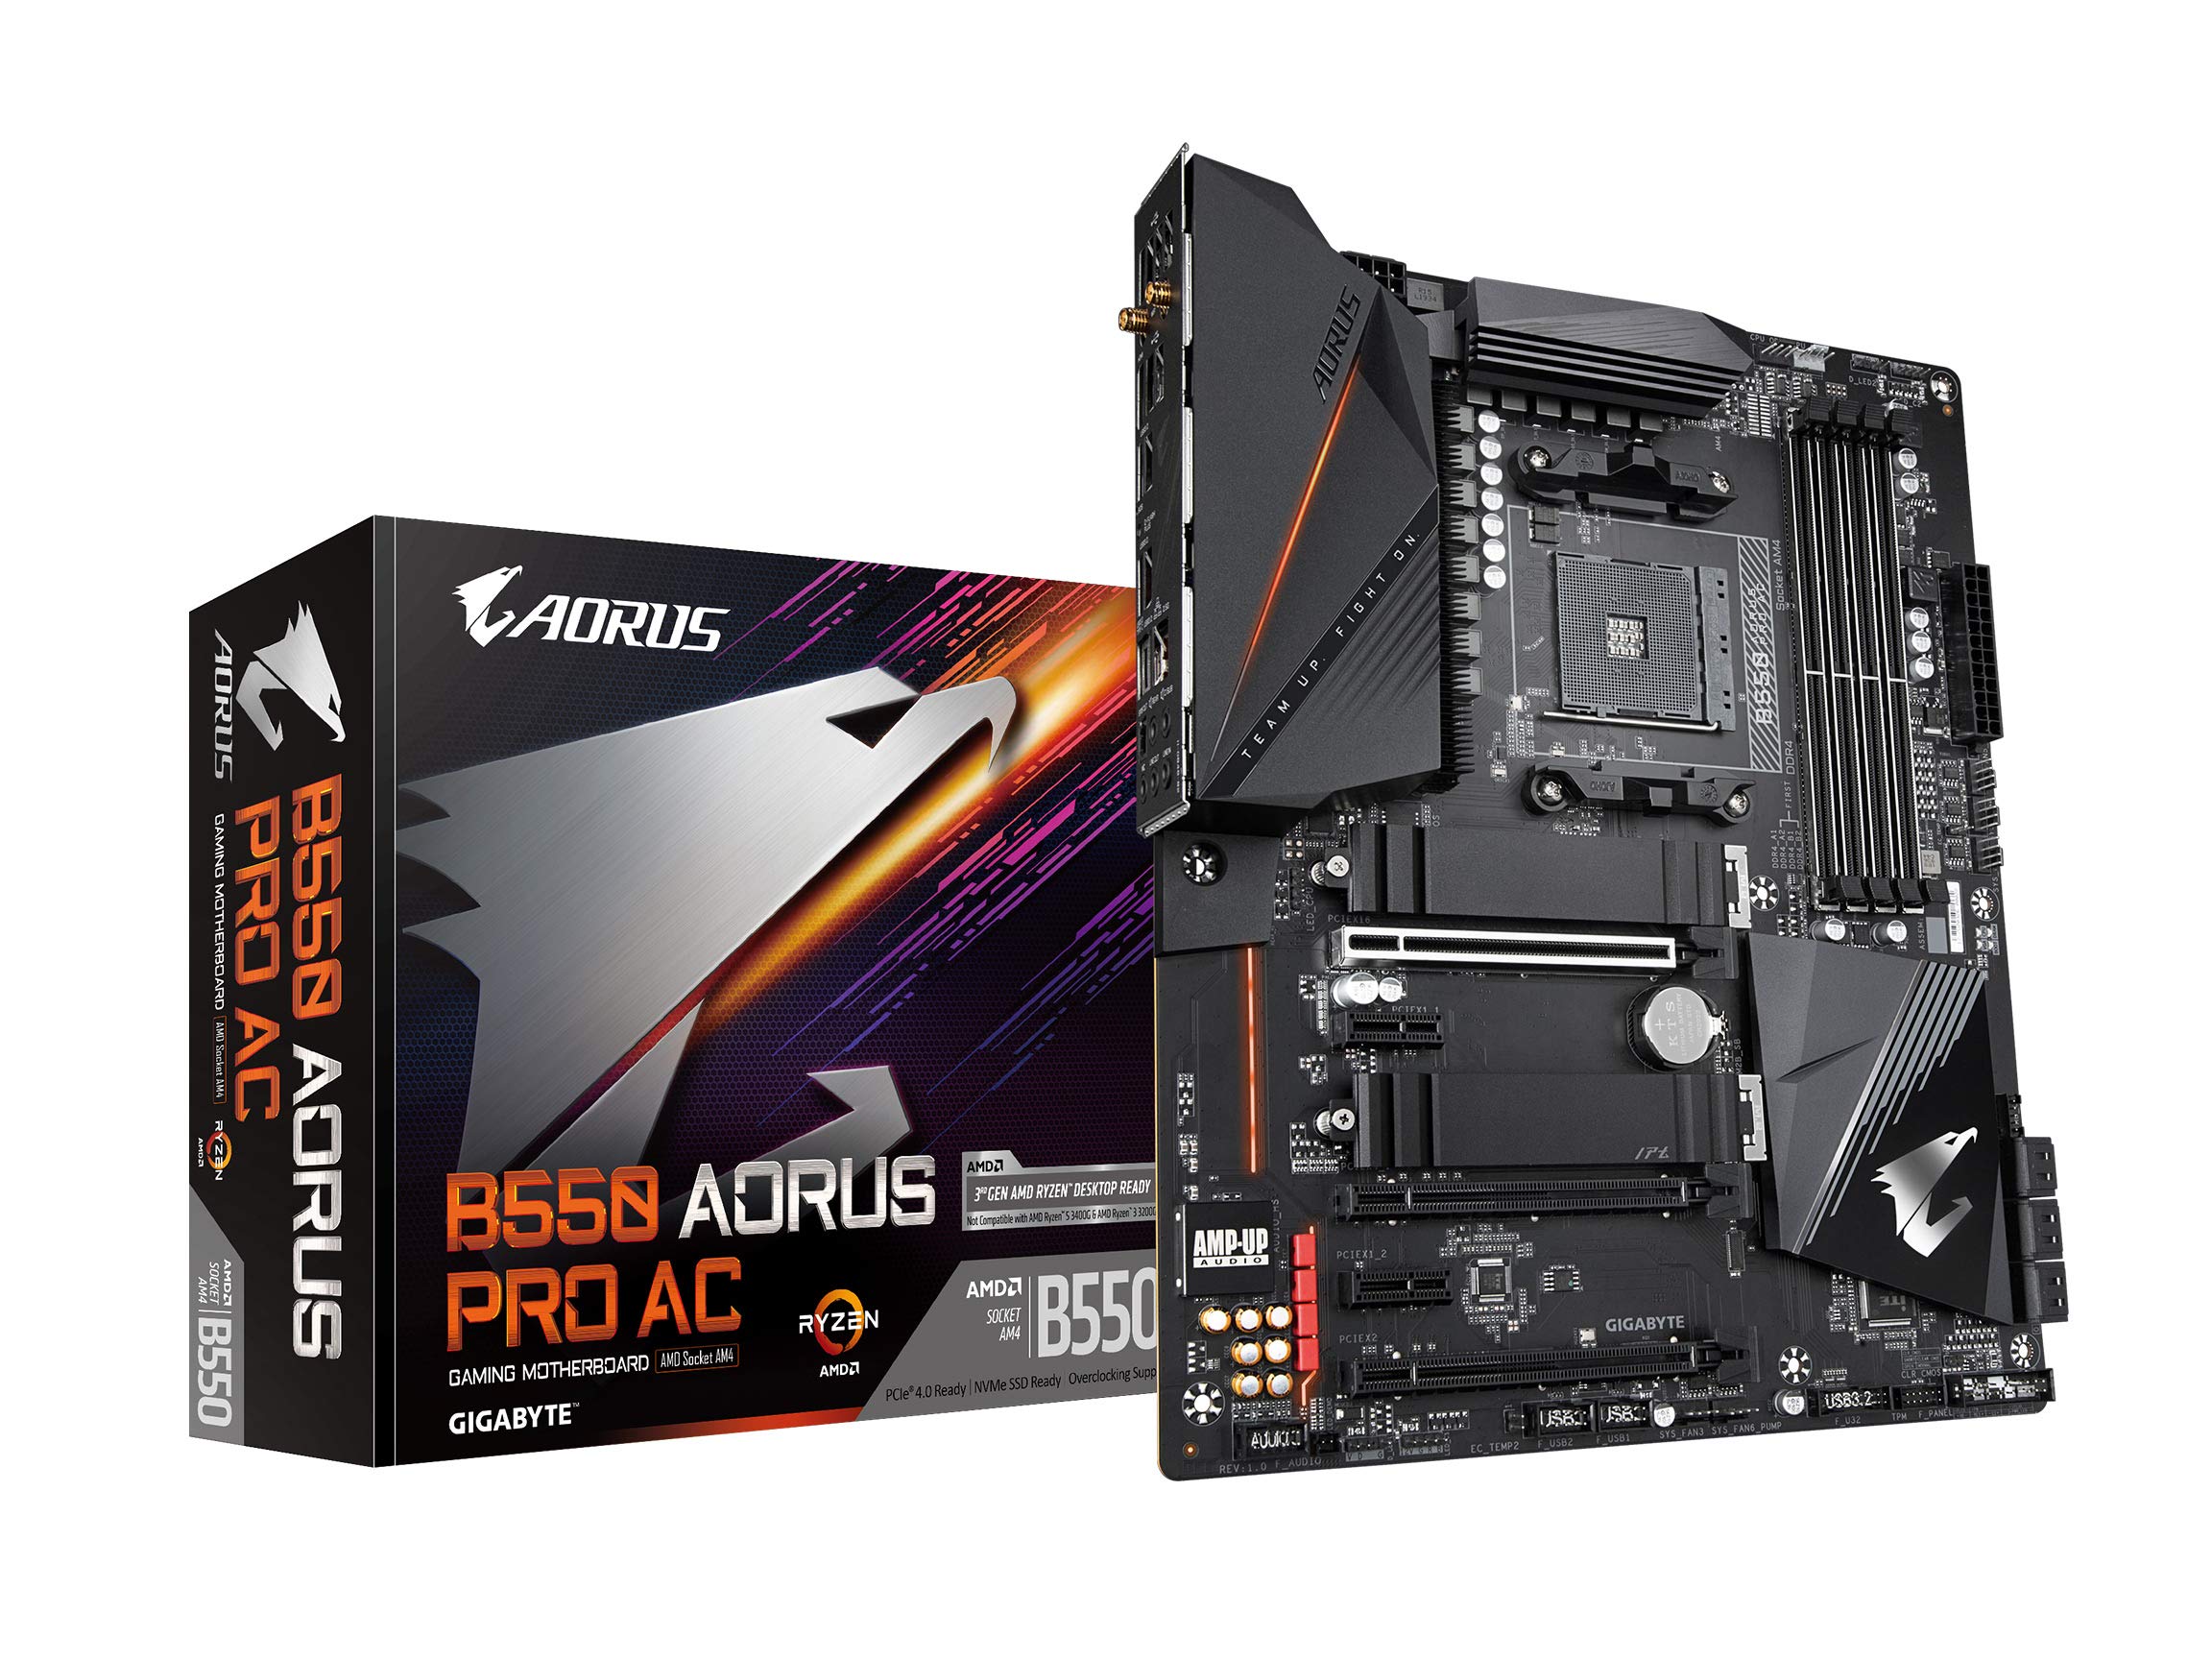
Figure 1: Top-down view of the GIGABYTE B550 AORUS PRO AC Motherboard.
Key Features:
- Supports 3rd Gen AMD Ryzen Processors
- Dual Channel Non-ECC Unbuffered DDR4, 4 DIMMs
- True 12+2 Phases Digital VRM Solution with 50A DrMOS
- Advanced Thermal Design with Fins-Array Heatsink and Direct Touch Heatpipe
- Ultra Durable PCIe 4.0 Ready x16 Slot
- Dual Ultra-Fast NVMe PCIe 4.0/3.0 x4 M.2 with Thermal Guards
- Onboard Intel Dual Band 802.11ac & BT 4.2 Wireless with AORUS Antenna
- Blazing Fast 2.5GbE LAN with Bandwidth Management
- USB 3.2 Gen2 Type-C & HDMI Support
- RGB FUSION 2.0 with Multi-Zone Addressable LED Light Show Design
- Q-Flash Plus Update BIOS without Installing the CPU, Memory and GPU
2. Setup and Installation
2.1 CPU Installation
Carefully align your AMD Ryzen CPU with the AM4 socket on the motherboard. Ensure the triangular markers on the CPU and socket match before gently lowering the CPU into place. Secure the CPU with the retention lever.

Figure 2: Close-up view of the AM4 CPU socket on the motherboard.
2.2 Memory (RAM) Installation
The motherboard supports Dual Channel Non-ECC Unbuffered DDR4 memory across 4 DIMM slots. Open the clips on both ends of the DIMM slot, align the memory module with the slot key, and press down firmly until the clips snap into place.
2.3 Storage Installation (M.2 and SATA)
The B550 AORUS PRO AC features dual M.2 slots with PCIe 4.0/3.0 x4 support, equipped with Thermal Guards for optimal performance. Install your M.2 SSD into the designated slot and secure it with the provided screw. For SATA drives, connect the SATA data and power cables to the respective ports on the motherboard and drive.
2.4 Power Connections
Connect the 24-pin ATX main power connector and the 8-pin EPS 12V CPU power connector from your power supply to the motherboard. Ensure all connections are secure.
2.5 Front Panel Connections
Connect the front panel headers (power button, reset button, HDD LED, power LED, USB ports, audio jacks) to their corresponding pins on the motherboard. Refer to the labeled diagram for precise pin assignments.

Figure 3: Labeled diagram highlighting key features and connectors on the motherboard.
3. Operating Instructions
3.1 BIOS/UEFI Overview
The UEFI BIOS provides a user-friendly interface for configuring system settings, including boot order, fan curves, and overclocking parameters. Access the BIOS by pressing the 'Del' key during system startup. The Q-Flash Plus feature allows you to update the BIOS without installing a CPU, memory, or graphics card, which is particularly useful for supporting newer CPU generations.
3.2 Driver Installation
After installing your operating system, install the necessary drivers for the motherboard components. It is recommended to download the latest drivers from the GIGABYTE official website. For Windows 11, some users have reported better stability using default Windows drivers initially, then selectively updating from the manufacturer's site if needed.
3.3 RGB FUSION 2.0
Customize the integrated RGB lighting and connected RGB/Addressable LED strips using the GIGABYTE RGB FUSION 2.0 software. This allows for multi-zone lighting effects and synchronization with other compatible components.
4. Maintenance
4.1 Thermal Design
The motherboard features an advanced thermal design, including a Fins-Array Heatsink and Direct Touch Heatpipe, to ensure optimal cooling for the VRM components. Regularly clean dust from your PC case and components to maintain efficient heat dissipation. The Fins-Array technology increases the heat dissipation area by 300% compared to traditional heatsinks of the same size.
4.2 BIOS Updates
Periodically check the GIGABYTE website for BIOS updates. BIOS updates can improve system stability, add support for new hardware, and fix known issues. Utilize the Q-Flash Plus feature for safe and convenient BIOS updates.
5. Troubleshooting
5.1 CPU Compatibility and BIOS Update
If you are using an AMD Ryzen 5000 series processor, you may need to update the BIOS to a newer version (e.g., F13 or later) before the system will boot correctly. The Q-Flash Plus feature can be used for this purpose without a CPU installed.
5.2 Red VGA Light / No Display
A red VGA light often indicates an issue with the graphics card or its connection. Ensure the graphics card is properly seated in the PCIe slot and that all power cables are connected. If using a Ryzen 5000 series CPU, a BIOS update may resolve this.
5.3 USB Port Disconnections / PCIe 4.0 Issues
Some users have reported intermittent USB disconnections or network interface issues when a PCIe 4.0 device (like a GPU) is under heavy load. This can sometimes be resolved by updating the BIOS or, as a temporary measure, by setting the PCIe slot to operate in PCIe 3.0 mode in the BIOS.
5.4 RGB Lighting Conflicts
If experiencing issues with RGB lighting synchronization (e.g., with Corsair iCUE), ensure all RGB software is up-to-date. Sometimes, conflicts between different RGB control applications can occur. Try uninstalling conflicting software or updating firmware for affected devices.
6. Specifications
| Feature | Specification |
|---|---|
| Brand | GIGABYTE |
| Series | B550 |
| Item Model Number | B550 |
| CPU Socket | Socket AM4 |
| Compatible Processors | AMD 3rd Generation Ryzen |
| RAM Memory Technology | DDR4 |
| Memory Speed | 2133 MHz (Supports up to 5100MHz XMP) |
| Chipset Type | AMD B550 |
| Wireless Type | 802.11ac (Intel Dual Band 802.11ac & BT 4.2) |
| LAN | 2.5 Gigabit Ethernet |
| Product Dimensions | 13.18 x 10.62 x 3.14 inches |
| Item Weight | 4.41 pounds |
7. Connectivity
The GIGABYTE B550 AORUS PRO AC motherboard offers a comprehensive array of connectivity options to support various peripherals and networking needs.

Figure 4: Rear I/O panel showcasing various ports.
Rear I/O Ports:
- Multiple USB 3.2 Gen2 Type-A and Type-C ports
- USB 3.2 Gen1 ports
- HDMI port
- Intel Dual Band 802.11ac WiFi antenna connectors
- 2.5 Gigabit Ethernet LAN port
- Audio jacks (Line In, Line Out, Mic, C/Sub, Rear)
- SPDIF Out
- Q-Flash Plus button
The integrated 2.5GbE LAN ensures a high-speed, stable network connection for online gaming and data transfer. The Intel Dual Band 802.11ac WiFi provides reliable wireless connectivity.
8. Official Product Video Overview
Video 1: An official overview of the GIGABYTE B550 AORUS PRO AC Motherboard, detailing its design, features, power delivery, thermal solutions, and connectivity options. This video provides a visual guide to the motherboard's capabilities and highlights its suitability for various PC builds.
9. Warranty and Support
GIGABYTE products are covered by a manufacturer's warranty. For detailed warranty information, including terms, conditions, and duration, please refer to the warranty card included with your product or visit the official GIGABYTE website. For technical support, driver downloads, and further assistance, please visit the GIGABYTE support page or contact their customer service.


