
Adviace 4 Burner Kit SS
Adviace Grill Replacement Parts Instruction Manual
For Nexgrill 720-0830H, 720-0888, 720-0888N, and Compatible Models
1. Introduction
Thank you for choosing Adviace Grill Replacement Parts. This kit is designed to restore your gas barbecue grill to optimal performance, providing a fresh set of burner tubes, heat shield tent plates, and grill igniters. This manual provides detailed instructions for installation, maintenance, and troubleshooting to ensure a long-lasting and efficient grilling experience.
2. Product Components
This kit includes the following high-quality stainless steel components:
- 4 x Grill Burner Tubes: Each measuring 14 7/8 inches in length with a 1-inch diameter. Constructed from durable stainless steel for high hardness, rust resistance, and corrosion resistance.
- 4 x Heat Shield Tent Plates: Each measuring 14 9/16 inches in length and 4 3/16 inches in width. Designed to protect burners and distribute heat evenly.
- 4 x Grill Igniters: Complete with 33.5-inch long braided cables for reliable ignition.

Image 2.1: Complete Adviace Grill Replacement Parts Kit.

Image 2.2: Detailed view of a burner tube, highlighting its 14 7/8" length and 1" diameter, made from high hardness, rust-resistant, and corrosion-resistant stainless steel.

Image 2.3: Detailed view of a heat shield tent plate, showing its 14 9/16" length and 4 3/16" width, with a comparison of old, rusted plates versus new, clean ones.
3. Compatibility
This grill parts kit is designed to fit a variety of gas barbecue grills. Please verify your grill model number for compatibility:
- Nexgrill: 720-0830H, 720-0864, 720-0864M, 720-0882S, 720-0888, 720-0888A, 720-0888N, 720-0894F, 720-0896CA, 720-0958A, 720-0864R, 720-0925S, 720-0898, 730-0898, 720-0783E, 720-0830A, 720-0830D
- Members Mark: 720-0882D, 720-0830F, 720-0830G
- Backyard Grill: 720-0888M
- BBQ Pro: 122.47207610, 122.57901710, 720-0894R
- BHG Grill: 720-0783W, 720-0783H
- Kenmore: 122.20148510, 122.33492410, 720-0830A
- Kitchen Aid: 720-0830A

Image 3.1: Visual representation of compatible grill models.
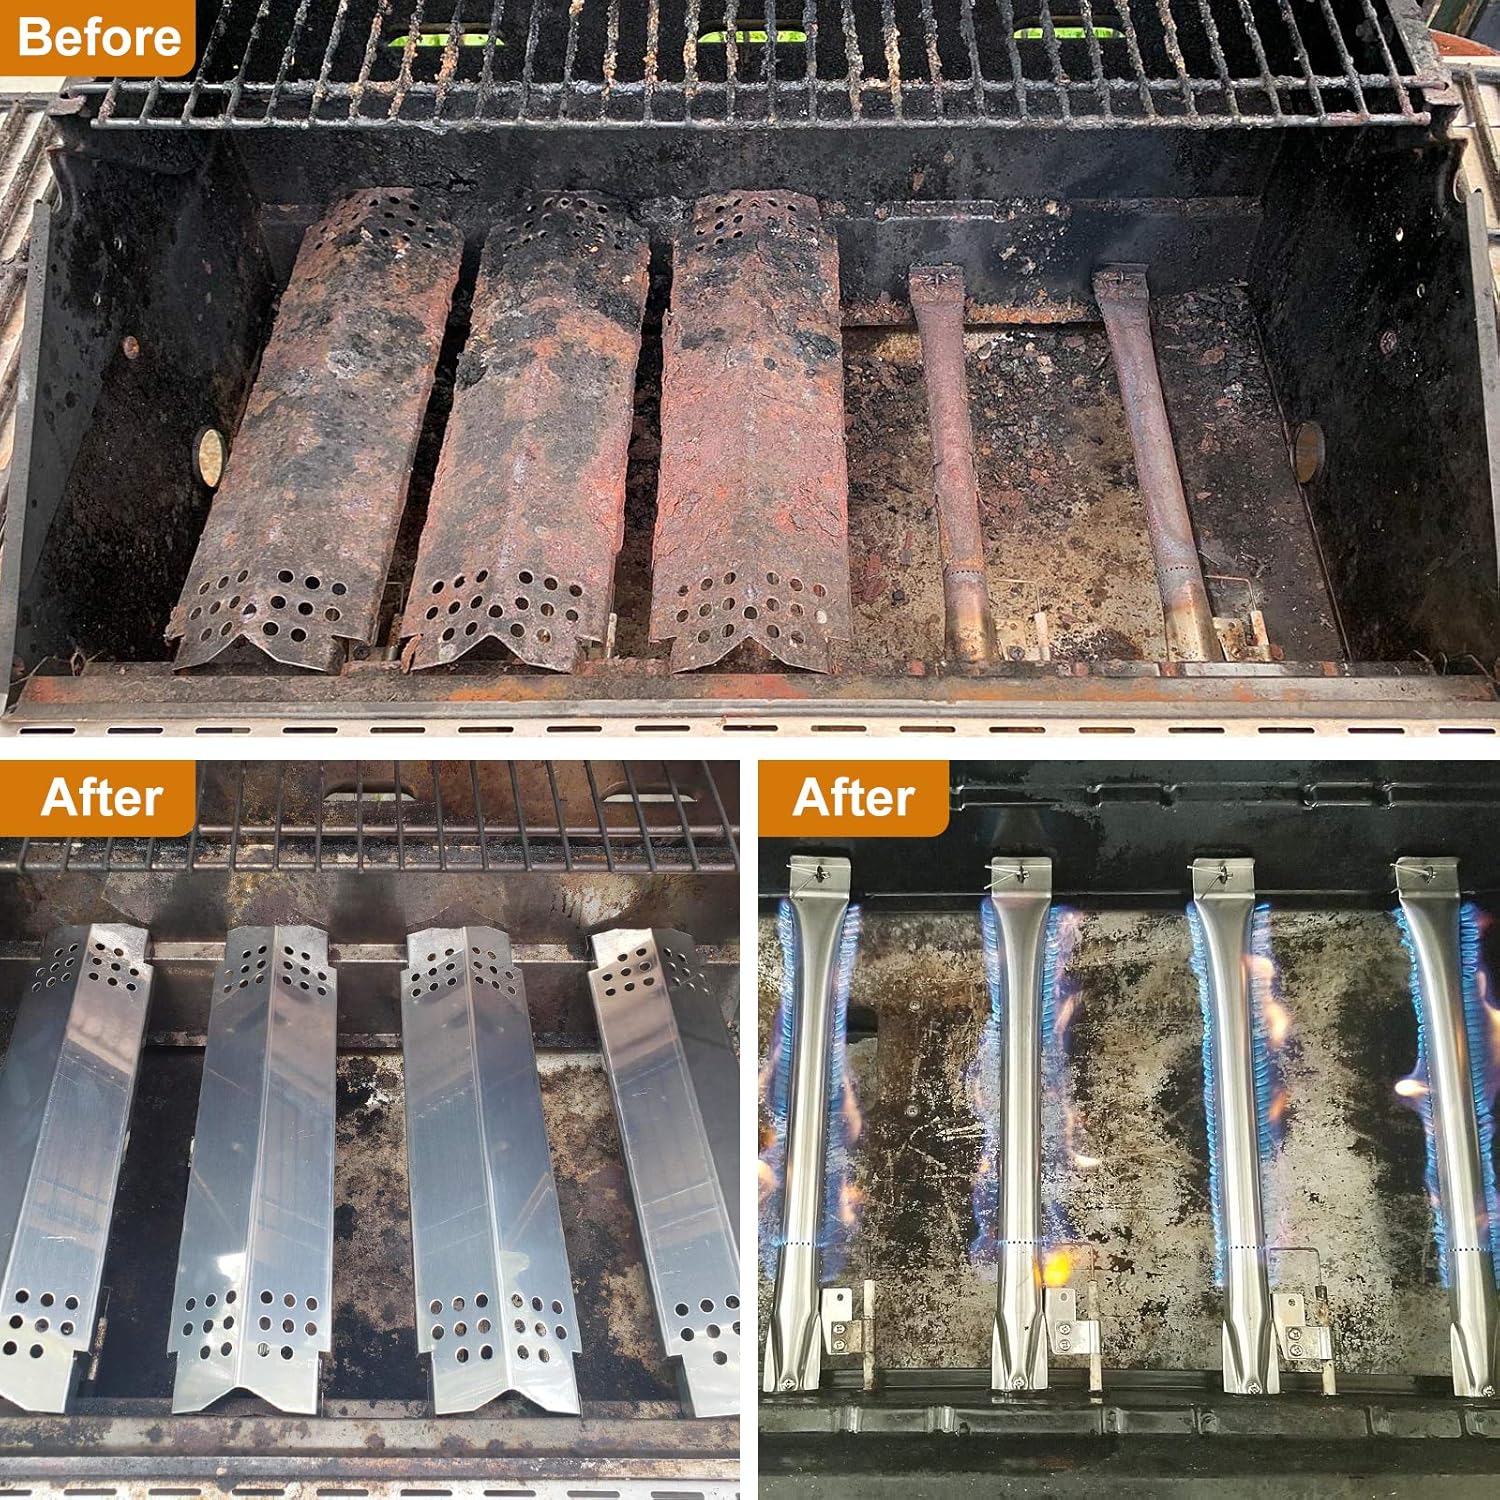
Image 3.2: Further visual examples of compatible grill models.
4. Setup and Installation
Before beginning installation, ensure your grill is completely cool and disconnected from its fuel source. It is recommended to wear protective gloves.
4.1 Replacing Burner Tubes and Heat Tents
- Remove the cooking grates and any existing heat tents from your grill.
- Carefully remove the old burner tubes. They are typically held in place by pins or screws at the back. Save any reusable pins or hardware.
- Disconnect the igniter wires from the old burner tubes.
- Install the new burner tubes one at a time. Align the gas inlet with the manifold orifice and secure the back end with the appropriate pins or screws.
- Attach the new heat shield tent plates over the installed burner tubes. Ensure they sit securely.
4.2 Installing Igniters
- Attach the new igniter probes to the designated brackets on the new burner tubes using the provided screws.
- Route the igniter cables to the ignition module. Connect each cable to its corresponding port on the module. Ensure connections are secure.
- After installing all components, perform a quick test by reconnecting the fuel source and attempting to ignite each burner. Verify that each burner lights properly.
Tip: Some grill models may require minor adjustments for igniter fit. If the igniter probe does not align perfectly, slight bending of the igniter bracket or drilling new holes on the grill pan may be necessary. Ensure the igniter tip is close enough to the burner for reliable spark.

Image 4.1: New burner tubes and heat tents installed and operating with blue flames.

Image 4.2: Before and after comparison of heat tents, demonstrating the visual improvement and functionality of new parts.
5. Operation
Once installed, your grill should operate like new. When igniting, observe the flame. Properly functioning burners will produce a stable, blue flame without yellow tips or excessive noise. If you notice yellow flames or uneven heating, refer to the troubleshooting section.
Image 5.1: Burners operating with ideal blue flames, indicating proper gas combustion.
6. Maintenance
Regular maintenance will extend the life of your grill replacement parts and ensure continued performance.
- Cleaning: The stainless steel components are designed for easy cleaning. After each use, allow the grill to cool, then brush off any food residue from the heat tents and burner tubes. For stubborn grease, use a grill cleaner and a non-abrasive brush or cloth.
- Inspection: Periodically inspect the burner tubes for any signs of blockage or damage. Ensure the heat tents are free of excessive grease buildup.
- Rust and Corrosion: While made from rust-resistant and anti-corrosion stainless steel, prolonged exposure to harsh elements can affect longevity. Store your grill in a dry area or use a grill cover when not in use.
Image 6.1: Visual comparison showing the effectiveness of replacing old, corroded parts with new, clean components.
7. Troubleshooting
If you encounter issues after installing your replacement parts, consider the following common problems and solutions:
7.1 Burners Not Lighting or Uneven Flames
- Check Igniter Connection: Ensure all igniter cables are securely connected to both the igniter probe on the burner tube and the ignition module.
- Igniter Spark: Verify that the igniter produces a visible spark. If not, check the igniter cable for damage or ensure the igniter tip is positioned correctly near the gas port.
- Gas Flow: Confirm that gas is flowing to the burner. Listen for a hissing sound when the knob is turned. Check for blockages in the burner tube orifices.
- Flame Appearance: Yellow or orange flames often indicate incomplete combustion, possibly due to a partially blocked burner port or improper air-to-gas mixture. Ensure burner ports are clear.
7.2 Short Lifespan of Components
- Material Quality: While our parts are made of stainless steel, extreme conditions or lack of maintenance can accelerate wear.
- Environmental Factors: Exposure to moisture and corrosive substances can reduce lifespan. Regular cleaning and proper storage are crucial.
8. Specifications
| Feature | Detail |
|---|---|
| Product Dimensions | 14.88 x 4.2 x 2 inches (packaged) |
| Item Weight | 3.87 pounds |
| Burner Dimensions | 14 7/8" (Length) x 1" (Diameter) |
| Heat Plate Dimensions | 14 9/16" (Length) x 4 3/16" (Width) |
| Material | Stainless Steel |
| Igniter Cable Length | 33.5 inches |
9. Warranty
Adviace stands behind the quality of its products. While specific warranty details are not provided in this manual, please refer to the product packaging or contact Adviace customer support for information regarding warranty coverage and terms.
10. Customer Support
For any questions, concerns, or assistance with your Adviace Grill Replacement Parts, please contact our customer support team. Refer to the contact information provided on the product packaging or visit the official Adviace website for further assistance.
We are committed to ensuring your satisfaction and helping you enjoy your grilling experience.
Ask a question about this manual
Ask about setup, troubleshooting, compatibility, parts, safety, or missing instructions. Manuals+ will review the question and use this page’s manual context to help answer it.