
Etarewilt PowRyte Elite
PowRyte Elite Electric Pressure Washer User Manual
Model: PowRyte Elite
Introduction
Thank you for choosing the PowRyte Elite Electric Pressure Washer. This manual provides essential information for the safe and efficient operation, maintenance, and troubleshooting of your new pressure washer. Please read this manual thoroughly before operating the unit and keep it for future reference.

Image: The PowRyte Elite Electric Pressure Washer, featuring its black and green design, wheels, and hose reel.
Safety Information
Always observe basic safety precautions when using this product to reduce the risk of injury or damage. Failure to follow these instructions may result in serious injury or property damage.
- WARNING: Always wear appropriate personal protective equipment, including safety glasses, hearing protection, and protective footwear.
- WARNING: Never point the spray gun at people, pets, or electrical devices. The high-pressure spray can cause severe injury.
- Ensure the power cord and plug are in good condition. Do not use if damaged.
- Connect the pressure washer to a grounded outlet only.
- Do not operate the pressure washer in the rain or near standing water.
- Keep children and pets away from the operating area.
- Always turn off the pressure washer and disconnect the power before performing any maintenance or cleaning.
- Do not use flammable liquids or solvents with this pressure washer.
Product Overview
Familiarize yourself with the components of your PowRyte Elite Electric Pressure Washer.

Image: Diagram showing various components and accessories of the pressure washer, including the foam cannon, nozzles, and quick connector.
Key Components:
- Main Unit: Contains the motor and pump.
- High-Pressure Hose: Connects the pump to the spray gun.
- Spray Gun: Handheld device for directing the water spray.
- Spray Wand: Extends from the spray gun, where nozzles attach.
- Nozzles: Interchangeable tips for different spray patterns and pressures.
- Detergent Tank: For applying cleaning solutions.
- Power Cord with GFCI: For electrical connection and safety.
- Wheels: For easy portability.
Setup
Follow these steps to assemble and prepare your pressure washer for first use.
- Unpack: Carefully remove all components from the packaging. Check for any damage.
- Attach Handle: Secure the handle to the main unit using the provided fasteners.
- Connect High-Pressure Hose: Attach one end of the high-pressure hose to the pressure washer's outlet and the other end to the spray gun. Ensure connections are tight.
- Connect Water Supply: Attach a garden hose (minimum 5/8 inch diameter) to the water inlet on the pressure washer. Ensure the water supply is clean and free of debris.
- Connect Power: Plug the GFCI-equipped power cord into a grounded electrical outlet. Press the "RESET" button on the GFCI plug.
- Purge Air: Before turning on the power, turn on the water supply and squeeze the trigger on the spray gun to allow water to flow through the system and purge any air. Continue until a steady stream of water emerges.
Operating Instructions
Learn how to effectively use your pressure washer for various cleaning tasks.
Nozzle Selection:
The PowRyte Elite comes with 4 different quick-connect nozzles, each designed for specific applications. Always select the appropriate nozzle for the task to prevent damage to surfaces.
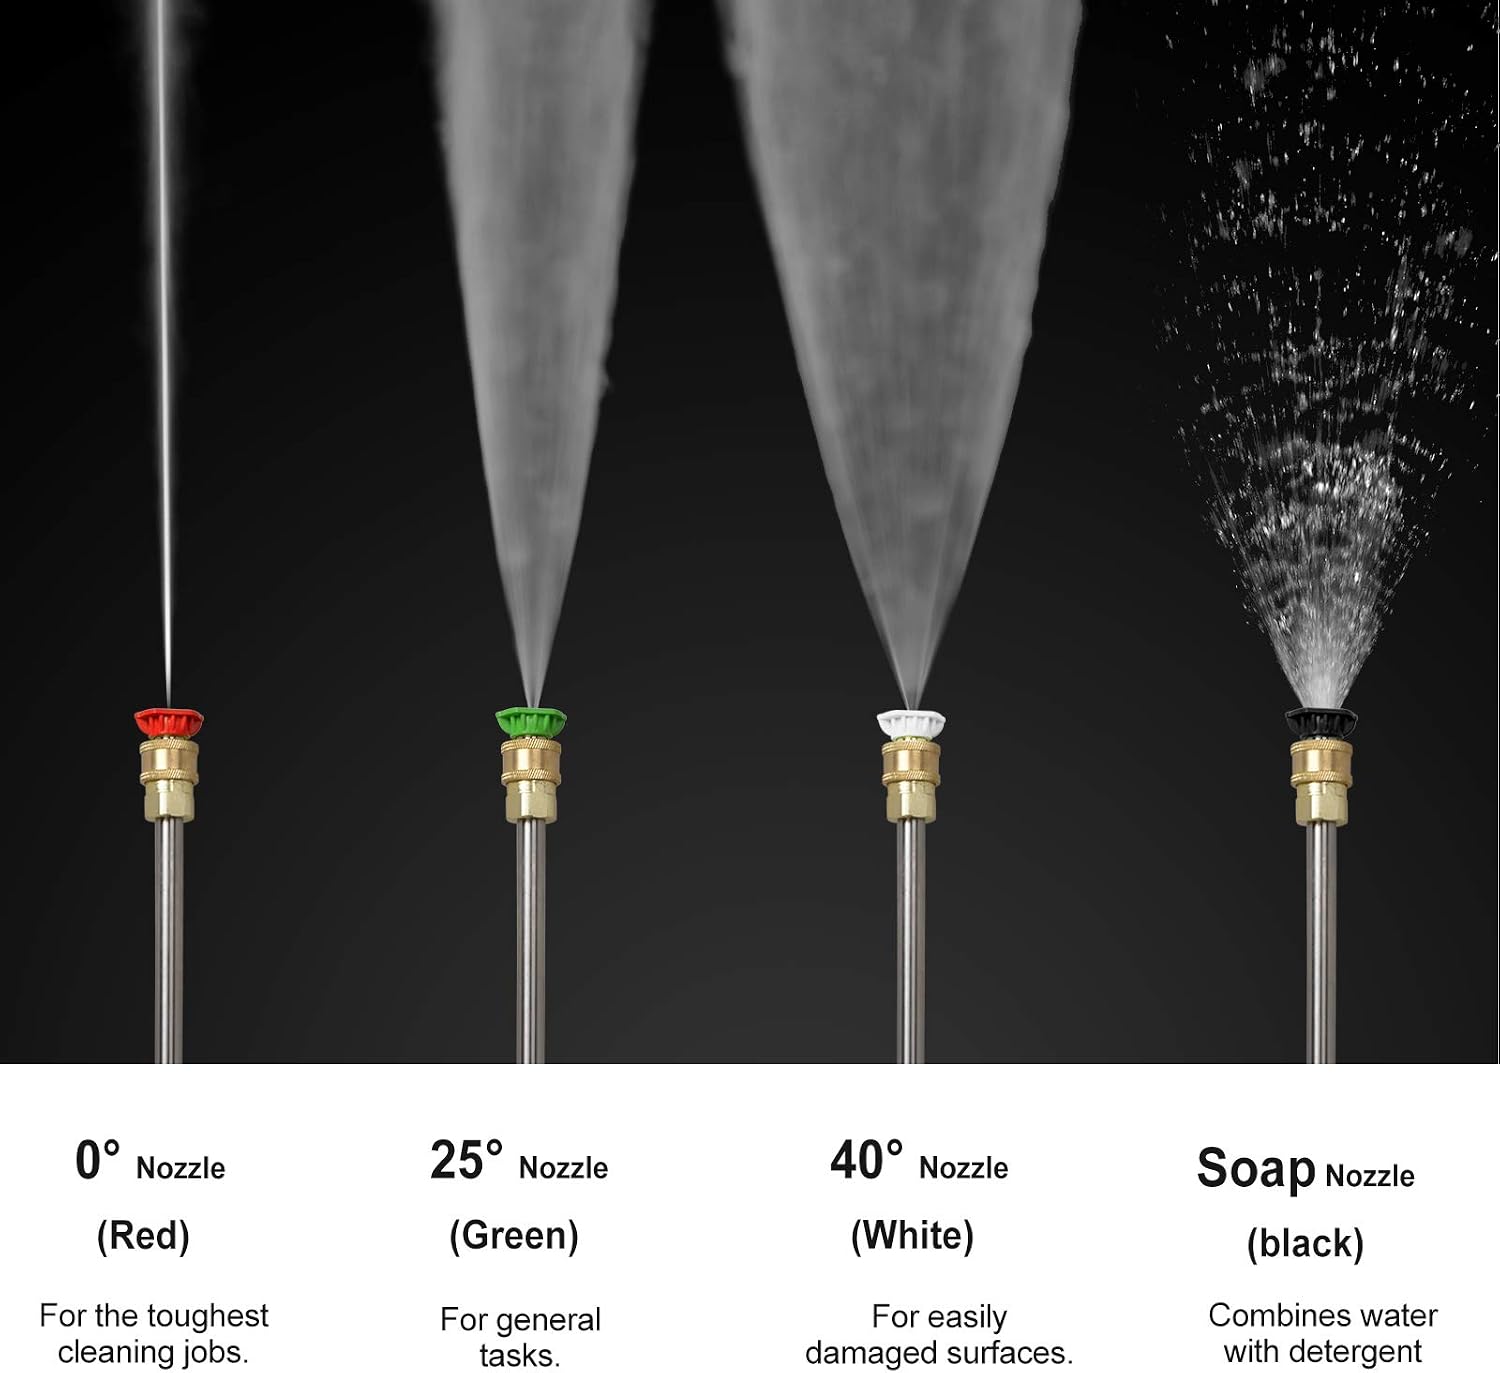
Image: Illustration showing the spray patterns of different pressure washer nozzles: 0° (red), 25° (green), 40° (white), and Soap (black).
- 0° (Red) Nozzle: A concentrated, high-impact stream. Use for tough, localized stains on concrete or metal. CAUTION: Can damage surfaces if not used carefully.
- 25° (Green) Nozzle: A medium-fan spray. Ideal for general cleaning of driveways, patios, and siding.
- 40° (White) Nozzle: A wide-fan spray. Best for delicate surfaces like wood decks, vehicles, or painted surfaces.
- Soap (Black) Nozzle: Low-pressure spray for applying detergent. Activates the detergent tank.
General Operation:
- Select Nozzle: Choose the appropriate nozzle and insert it into the quick-connect collar on the spray wand.
- Turn On: Ensure water supply is on, then turn on the pressure washer's power switch.
- Begin Cleaning: Squeeze the trigger on the spray gun to start the high-pressure spray. Always start spraying away from the surface and move closer as needed.
- Detergent Application (Optional): If using detergent, fill the detergent tank with a pressure washer safe cleaning solution. Attach the black soap nozzle. The pressure washer will automatically draw detergent at low pressure.
- Rinsing: After applying detergent, switch to a high-pressure nozzle (e.g., 25° or 40°) and rinse the surface thoroughly.
- Cleaning Examples:

Image: A building facade showing a clear before-and-after comparison of pressure washing, with one side clean and the other still dirty.
The pressure washer is effective for cleaning various surfaces, including:
- Driveways and Patios: Use a 25° or 40° nozzle for general cleaning. For stubborn stains, pre-treat with detergent.
- Siding: Use a 40° nozzle or the soap nozzle for gentle cleaning. Work from bottom to top when applying detergent, and top to bottom when rinsing.
- Vehicles: Use the 40° nozzle or soap nozzle. Avoid spraying directly into engine compartments or sensitive electrical components.

Image: A pressure washer being used to clean the hood of a red car, demonstrating its application for vehicle cleaning.
- Shut Down: When finished, turn off the pressure washer's power switch. Turn off the water supply. Squeeze the spray gun trigger to release any remaining pressure in the system. Disconnect the garden hose and high-pressure hose.
Maintenance
Regular maintenance ensures optimal performance and extends the life of your pressure washer.
- Clean Nozzles: If a nozzle becomes clogged, use the included nozzle cleaning tool (or a small paper clip) to clear any debris from the nozzle opening.
- Inspect Hoses and Connections: Regularly check the high-pressure hose, garden hose, and all connections for leaks, cuts, or damage. Replace damaged parts immediately.
- Clean Water Inlet Filter: The water inlet has a filter to prevent debris from entering the pump. Periodically remove and clean this filter.
- Winterization (for cold climates): If storing the pressure washer in an area where temperatures may drop below freezing, it is crucial to winterize the unit to prevent damage from freezing water.
- Disconnect all hoses.
- Pour pressure washer pump protector (or RV antifreeze) into the water inlet and run the unit for a few seconds until the fluid exits the high-pressure outlet.
- Store in a dry, protected area.
- Storage: Store the pressure washer in a clean, dry, and frost-free environment. Coil hoses neatly and store nozzles in their designated holders.
Troubleshooting
Refer to this section for solutions to common operational issues.
| Problem | Possible Cause | Solution |
|---|---|---|
| Motor does not start | No power to unit; GFCI tripped; Power switch off | Check power outlet; Reset GFCI; Turn power switch ON |
| Low pressure | Insufficient water supply; Clogged nozzle; Air in pump; Leaks in hose/connections | Ensure full water flow; Clean nozzle; Purge air from system; Check for leaks and tighten connections |
| Pulsating pressure | Air in pump; Water supply restriction; Clogged nozzle | Purge air; Check garden hose for kinks; Clean nozzle |
| Water leaks | Loose connections; Damaged O-rings/seals | Tighten all connections; Replace worn O-rings/seals |
Specifications
Technical specifications for the PowRyte Elite Electric Pressure Washer.
- Brand: Etarewilt
- Model: PowRyte Elite
- Power Source: Corded Electric
- Color: Blue
- Maximum Pressure: 4500 PSI (Pound per Square Inch)
- Maximum Flow Rate: 3.5 GPM (Gallons Per Minute)
- Item Weight: 18 Pounds
- Hose Length: 20 Feet
- Package Dimensions: 19.7 x 18.4 x 15.3 inches
- UPC: 763347907431
- ASIN: B088NGKV8T
Warranty and Support
For warranty information or technical support, please refer to the contact details provided with your purchase documentation or visit the official Etarewilt website. Keep your proof of purchase for warranty claims.
For further assistance, you may also contact customer service through the platform where the product was purchased.
Ask a question about this manual
Ask about setup, troubleshooting, compatibility, parts, safety, or missing instructions. Manuals+ will review the question and use this page’s manual context to help answer it.