
1. Introduction
This manual provides comprehensive instructions for the installation, operation, maintenance, and troubleshooting of your Ruckus Wireless ZoneFlex R320 Access Point. The R320 is designed to deliver consistent and reliable 802.11ac Wave 2 wireless networking, suitable for small to mid-sized businesses and low-density hotspot environments. It incorporates patented Ruckus performance optimization and interference mitigation technologies to ensure a superior user experience.
2. Safety Information
- Read all instructions carefully before operating the device.
- Do not expose the device to water, moisture, or extreme temperatures.
- Use only the power adapter or Power over Ethernet (PoE) source specified for this device.
- Do not open the device casing. Refer all servicing to qualified personnel.
- Ensure proper ventilation around the device to prevent overheating.
3. Package Contents
Verify that your package contains the following items:
- Ruckus ZoneFlex R320 Access Point
- Mounting Bracket (if included with your specific model)
- Quick Start Guide
- Note: Power adapter and Ethernet cables are typically sold separately or provided by your network installer.

Figure 3.1: The Ruckus R320 Access Point product box. This image shows the brown cardboard packaging with the Ruckus logo and "R320 Series" printed on it, indicating the product model.

Figure 3.2: Side view of the Ruckus R320 Access Point box showing the product label. The label includes the MFG P/N: 901-R320-US02, serial number, MAC address, CE mark, and "Made in China" information.
4. Product Overview
4.1. Physical Features

Figure 4.1: Side view of the Ruckus R320 Access Point. This image highlights the recessed Power over Ethernet (PoE) input port, labeled "POEIN", and a small indicator light slot on the side of the white casing.
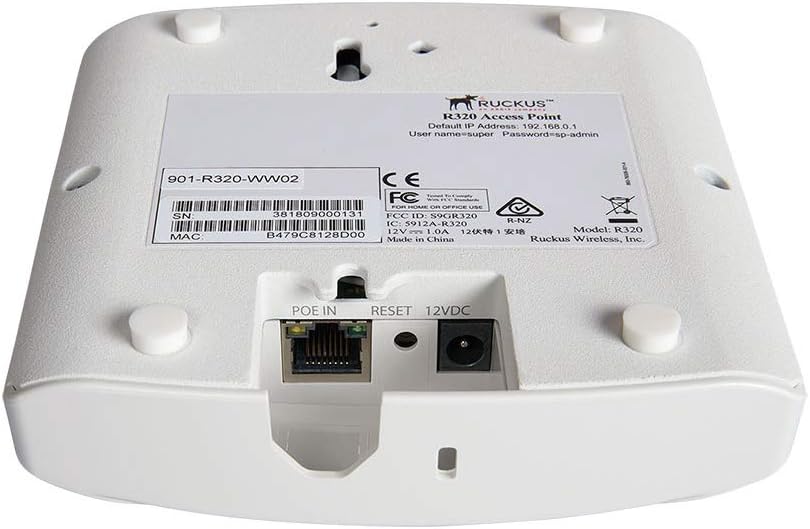
Figure 4.2: Bottom view of the Ruckus R320 Access Point. This image displays the product label with model information (R320), default IP address (192.168.0.1), username (super), and password (sp-admin). It also clearly shows the "POEIN" Ethernet port, a "RESET" button, and a "12VDC" power input port.
4.2. Internal Components

Figure 4.3: Internal view of the Ruckus R320 Access Point. This image shows the green circuit board with various electronic components, including chips, capacitors, and connectors, illustrating the device's internal hardware architecture.
The Ruckus R320 Access Point features a compact design with essential ports for connectivity and management. Key components include:
- PoE In Port: An Ethernet port that supports Power over Ethernet (PoE) for both data and power transmission.
- 12VDC Power Input: An alternative power input for use with a standard 12V DC power adapter (sold separately).
- Reset Button: Used to restore the device to factory default settings.
- Status LED: An indicator light that provides information about the device's operational status.
5. Setup and Installation
Follow these steps to set up your Ruckus R320 Access Point:
- Mounting (Optional): If using a mounting bracket, secure it to a wall or ceiling in a central location for optimal Wi-Fi coverage.
- Powering the Device:
- Using PoE: Connect an Ethernet cable from a PoE-enabled switch or injector to the "POEIN" port on the R320. This will provide both power and data connectivity. The R320 is designed to operate on existing PoE switches and CAT 5e cabling.
- Using a Power Adapter: If PoE is not available, connect a 12V DC power adapter (not included) to the "12VDC" port and plug it into a power outlet. Then, connect an Ethernet cable from your network switch or router to the "POEIN" port for data connectivity.
- Network Connection: Ensure the Ethernet cable connected to the "POEIN" port is connected to your network infrastructure (router or switch) that provides internet access.
- Initial Configuration:
- Once powered on, the device will boot up. Observe the status LED for activity.
- The default IP address for management is typically 192.168.0.1. You can access the web-based management interface by connecting a computer directly to the R320 (if not using a DHCP server) or by finding its assigned IP address on your network.
- The default username is super and the default password is sp-admin. It is highly recommended to change these credentials immediately after initial login for security purposes.
- Wi-Fi Configuration: Access the web interface to configure your Wi-Fi network settings, including SSID (network name), security protocols (WPA2/WPA3), and passwords.
6. Operating the Access Point
6.1. Management Options
The Ruckus R320 offers flexible management options:
- Standalone Mode: Manage the R320 directly via its web interface for basic configurations.
- Cloud Management: Integrate with Ruckus Cloud for centralized management of multiple access points.
- On-premises Controller: Manage using Ruckus SmartZone physical or virtual appliances for advanced network control and scalability.
6.2. Key Features
- BeamFlex Adaptive Antenna Technology: Extends coverage and mitigates interference by utilizing 64 directional antenna patterns, optimizing Wi-Fi performance.
- ChannelFly Dynamic Channel Technology: Uses machine learning to automatically identify and select the least congested Wi-Fi channels, ensuring optimal throughput.
- Dual-Band Operation: Supports both 2.4 GHz and 5 GHz frequency bands for versatile connectivity and reduced congestion.
7. Maintenance
- Firmware Updates: Regularly check the Ruckus Wireless support website for the latest firmware updates. Updating firmware ensures optimal performance, security, and access to new features. Follow the instructions provided with the firmware package for a safe update process.
- Cleaning: Keep the device clean and free from dust. Use a soft, dry cloth for cleaning. Do not use liquid cleaners or aerosols.
- Resetting to Factory Defaults: If you encounter persistent issues or need to reconfigure the device from scratch, press and hold the "RESET" button (located on the bottom of the unit, see Figure 4.2) for approximately 10 seconds while the device is powered on. This will restore all settings to their factory defaults.
8. Troubleshooting
| Problem | Possible Cause | Solution |
|---|---|---|
| Device does not power on. | No power, faulty power adapter/PoE. | Ensure power adapter is securely connected or PoE switch is active. Test with a different power source if available. |
| Cannot connect to Wi-Fi network. | Incorrect Wi-Fi password, SSID not broadcasting, device out of range. | Verify Wi-Fi password. Check if the SSID is visible. Move closer to the access point. Restart the access point. |
| Slow Wi-Fi speeds. | Interference, channel congestion, outdated firmware, too many connected devices. | Ensure optimal placement. Check for firmware updates. Consider using ChannelFly technology (if enabled) or manually select a less congested channel. Reduce the number of active devices. |
| Cannot access web management interface. | Incorrect IP address, network connectivity issue, firewall. | Verify the device's IP address (default is 192.168.0.1). Ensure your computer is on the same network segment. Temporarily disable firewalls. Try resetting the device to factory defaults. |
9. Specifications
| Feature | Detail |
|---|---|
| Model Name | R320 |
| Brand | Ruckus Wireless |
| Wireless Communication Standard | 802.11ac |
| Frequency Band Class | Dual-Band (2.4 GHz, 5 GHz) |
| Connectivity Technology | Wireless |
| Special Features | BeamFlex, ChannelFly |
| Antenna Type | Internal |
| Product Dimensions | 7 x 6 x 3 inches |
| Item Weight | 1 pound (16 Ounces) |
| Color | White |
| Compatible Devices | Laptop, Personal Computer, Smartphone, Tablet |
10. Warranty and Support
For detailed warranty information and technical support, please refer to the official Ruckus Wireless website or contact your authorized Ruckus Wireless reseller. Keep your purchase receipt for warranty claims.
Online Resources:
- Visit the Ruckus Networks Support Portal for documentation, downloads, and community forums.
- For product registration, visit the Product Registration page.


