
1. Introduction
This manual provides detailed instructions for the safe and efficient operation, setup, and maintenance of your NECCHI Q132A Sewing Machine. Please read this manual thoroughly before using the machine to ensure proper function and to prevent damage.
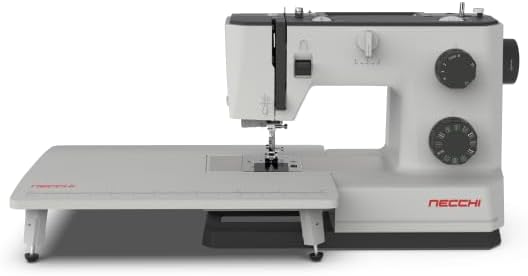
Image 1.1: The NECCHI Q132A Sewing Machine with the extension table attached.
2. Important Safety Instructions
When using an electrical appliance, basic safety precautions should always be followed, including the following:
- Read all instructions before using this sewing machine.
- Keep fingers away from all moving parts. Special care is required around the sewing machine needle.
- Always use the proper needle plate. The wrong plate can cause the needle to break.
- Do not pull or push fabric while stitching. This may deflect the needle, causing it to break.
- Switch the sewing machine off when making any adjustments in the needle area, such as threading the needle, changing the needle, threading the bobbin, or changing the presser foot.
- Always unplug the sewing machine from the electrical outlet when removing covers, lubricating, or when making any other user servicing adjustments mentioned in the instruction manual.
- Never operate the sewing machine if it has a damaged cord or plug, if it is not working properly, if it has been dropped or damaged, or dropped into water.
- Never drop or insert any object into any opening.
- Do not use outdoors.
- Do not operate where aerosol (spray) products are being used or where oxygen is being administered.
3. Package Contents
The NECCHI Q132A Sewing Machine package includes the following items:
- NECCHI Q132A Sewing Machine
- Extension Table
- All-Purpose Foot
- Zipper Foot
- Buttonhole Foot
- Button Sewing Foot
- Seam Ripper/Brush
- Edge/Quilting Guide
- Pack of Needles
- Spool Holder
- Bobbins (4 included)
- L-Screwdriver
- Spool Pin Felt
- Second Spool Pin
- Darning Plate
- Oil Bottle
- Soft Cover

Image 3.1: Overview of the included accessories with the NECCHI Q132A sewing machine.

Image 3.2: A closer look at the various presser feet, bobbins, needles, and tools included.
4. Setup
4.1 Attaching the Extension Table
The extension table provides a larger work surface, which is particularly useful for larger projects like quilting or home decor items.
- Locate the free arm of the sewing machine.
- Align the extension table with the free arm, ensuring the pins on the table fit into the corresponding slots on the machine.
- Gently push the extension table until it clicks securely into place.

Image 4.1: The extension table, designed to provide a larger work area.
4.2 Power Connection
Connect the power cord to the machine and then to a suitable electrical outlet. Ensure the machine is switched off before connecting to power.
4.3 Threading the Machine
Proper threading is crucial for consistent stitch quality. Follow the numbered guides on the machine for correct upper thread path.
- Place a spool of thread on the spool pin.
- Guide the thread through the upper thread guide.
- Pass the thread through the tension discs.
- Bring the thread up through the take-up lever.
- Guide the thread down through the remaining guides to the needle.
- Use the automatic needle threader for convenience, or manually thread the needle from front to back.

Image 4.2: Close-up of the needle and presser foot area, showing the needle threader mechanism.
4.4 Winding and Inserting the Bobbin
The NECCHI Q132A features a horizontal drop-in bobbin system for easy access.
- Place an empty bobbin onto the bobbin winder spindle.
- Guide the thread from the spool through the bobbin winding tension disc.
- Wrap the thread around the bobbin a few times, then push the spindle to the right.
- Press the foot pedal to wind the bobbin. Stop when the bobbin is full.
- Remove the bobbin and open the bobbin cover plate on the needle plate.
- Insert the bobbin with the thread unwinding in the correct direction (usually counter-clockwise).
- Guide the bobbin thread through the tension spring and pull it out to the left.
- Replace the bobbin cover plate.

Image 4.3: The horizontal drop-in bobbin system for easy bobbin insertion and monitoring.
5. Operating Instructions
5.1 Selecting Stitches
The NECCHI Q132A offers 32 utility and decorative stitches. Use the stitch selector dial to choose your desired stitch pattern.

Image 5.1: Visual representation of the 32 utility and decorative stitches available on the Q132A.
5.2 Adjusting Stitch Length
The stitch length can be adjusted to suit different fabric types and project requirements. Turn the stitch length dial to increase or decrease the length of your stitches.

Image 5.2: The dial used to adjust the stitch length.
5.3 Reverse Stitch Function
To reinforce seams and prevent unraveling, use the reverse stitch lever. Press and hold the lever to sew in reverse. Release to resume forward stitching.

Image 5.3: The lever for engaging the reverse stitch function.
5.4 Presser Foot Lifter
The extra high presser foot lifter allows for sewing multiple layers of fabric or bulky materials. Lift the lever to raise the presser foot.

Image 5.4: The presser foot lifter, capable of extra high lift for thicker fabrics.
5.5 Drop Feed Mechanism
For darning, free-motion quilting, or embroidery, the feed dogs can be lowered using the drop feed lever. This allows you to move the fabric freely.

Image 5.5: The lever to engage or disengage the drop feed mechanism.
5.6 Using Specific Presser Feet
- Zipper Foot: Used for sewing zippers, piping, and cording. Its design allows stitching close to the edge of the zipper teeth.
- Buttonhole Foot: Essential for creating consistent buttonholes. The 1-step buttonhole feature simplifies this process.
- Button Sewing Foot: Designed to hold buttons in place while the machine stitches them onto fabric.

Image 5.6: Example of the button sewing foot being used to attach a button.

Image 5.7: The zipper foot positioned next to a zipper for precise stitching.
6. Maintenance
6.1 Cleaning the Machine
Regular cleaning helps maintain the machine's performance and extends its lifespan.
- Power Off: Always unplug the machine before cleaning.
- Needle Plate Area: Remove the needle plate and use the included brush to clear lint and dust from the feed dogs and bobbin case area.
- Exterior: Wipe the exterior surfaces with a soft, dry cloth. Do not use harsh chemicals or abrasive cleaners.
6.2 Oiling
Refer to the machine's specific oiling points in the detailed manual (if provided separately) or consult a qualified service technician. Use only sewing machine oil.
6.3 Needle Replacement
Change needles regularly, especially when starting a new project or if the needle becomes bent or dull. Using a damaged needle can lead to skipped stitches or fabric damage.
- Turn off and unplug the machine.
- Loosen the needle clamp screw.
- Remove the old needle.
- Insert a new needle with the flat side facing the back of the machine, pushing it up as far as it will go.
- Tighten the needle clamp screw securely.
7. Troubleshooting
This section addresses common issues you might encounter with your sewing machine.
| Problem | Possible Cause | Solution |
|---|---|---|
| Skipped Stitches | Incorrectly threaded needle, bent needle, wrong needle type for fabric, incorrect needle insertion. | Re-thread the machine, replace the needle, use the correct needle for your fabric, ensure needle is inserted correctly. |
| Thread Breaking | Incorrect tension, poor quality thread, bent or dull needle, incorrect threading, bobbin wound too tightly/loosely. | Adjust tension, use good quality thread, replace needle, re-thread machine, re-wind bobbin. |
| Fabric Puckering | Stitch length too long for fabric, tension too high, wrong needle size. | Shorten stitch length, reduce upper thread tension, use a finer needle. |
| Machine Not Starting | Power cord not plugged in, main power switch off, bobbin winder engaged. | Check power connections, ensure main switch is on, disengage bobbin winder. |
8. Specifications
- Model: Q132A
- Stitch Count: 32 Utility and Decorative Stitches
- Bobbin System: Horizontal Drop-in
- Needle Threader: Automatic
- Stitches Per Minute: Up to 1000
- Frame: Full Metal
- Illumination: LED
- Dimensions: 7"D x 12"W x 15"H (without extension table)
- Item Weight: 14.4 pounds
- UPC: 850012971016

Image 8.1: Close-up view of the stainless steel metal bedplate, highlighting the durable construction.
9. Warranty and Support
For warranty information and customer support, please refer to the warranty card included with your product or visit the official Necchi website. Keep your purchase receipt as proof of purchase.
For technical assistance or service inquiries, please contact Necchi customer service.


