
1. Introduction
The EPEVER MT-50 Remote Meter is a versatile accessory designed for EPEVER solar charge controllers, including TracerAN, BN, TRIRON, XTRA, LS-B(P), VS-BN, ETRACER, iTRACER, and TRACER-BPL series. It provides real-time monitoring of operational data, allows for parameter setting, and offers various load control modes. Its large-screen multifunction LCD displays information in digital, graphic, and textual forms, enhancing user convenience and control over the solar system.
2. Key Features
- Automatic Identification: Automatically identifies the connected controller, displaying its type, model, and relevant parameter data.
- Real-time Monitoring: Displays operational data and working status of connected devices in digital, graphic, and textual forms via a large-screen multifunction LCD.
- Failure Alarm: Provides real-time alarms for failure information.
- User-Friendly Interface: Features six navigation function keys for direct, convenient, and rapid operation.
- Extended Communication: Offers longer communication distance based on RS485.
- Diversified Load Control: Supports various load control modes including Manual Control, Light ON/OFF, Light ON+ Timer, and Time Control.
- Battery Type Selection: Allows selection of battery types such as Gel, Sealed, Flooded, and User-programmable.
- Parameter Modification: Enables real-time data monitoring, remote load switch control, and modification of device parameters, charging control parameters, and load control parameters.
- No External Power Required: Both data and power flow on the same lead, eliminating the need for an external power supply.
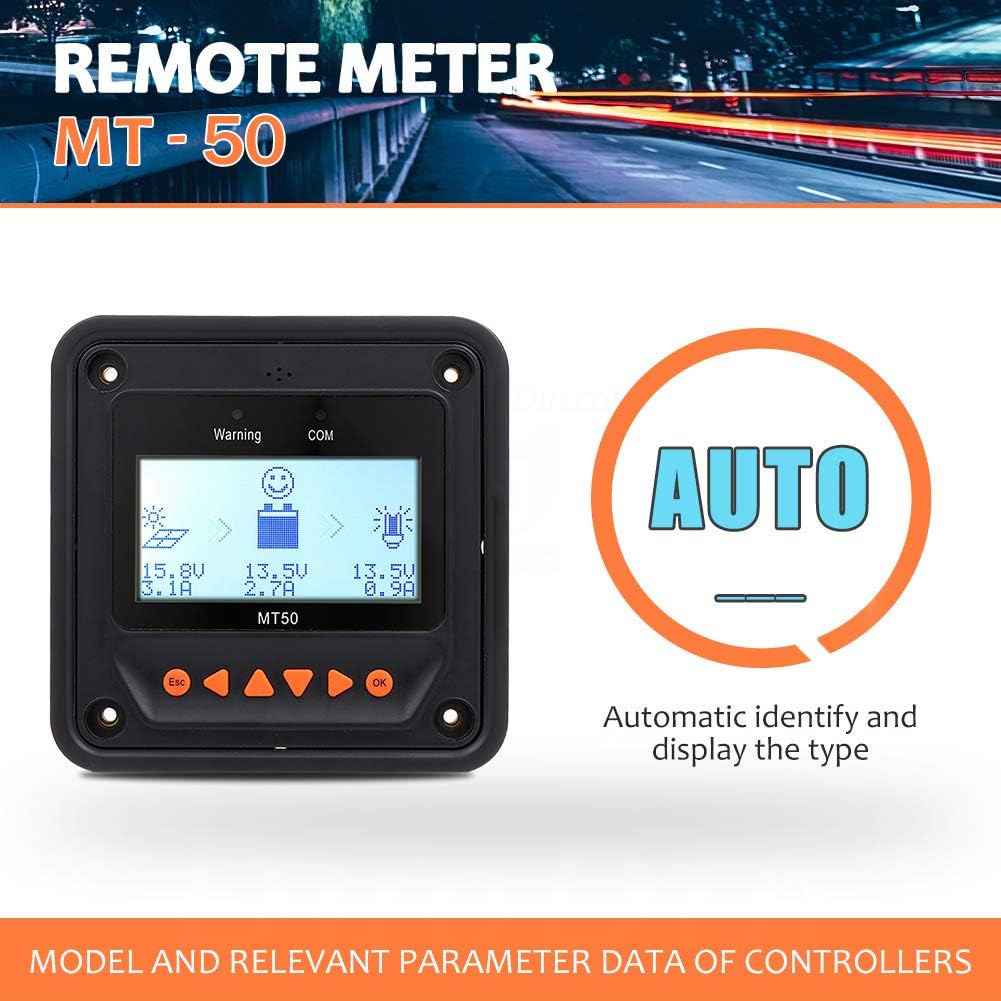
Figure 2.1: The MT-50 Remote Meter automatically identifies and displays the type of connected solar charge controller.
3. Unboxing and Package Contents
Upon opening the package, verify that all components are present and in good condition. The standard package for the EPEVER MT-50 Remote Meter typically includes the following items:
- EPEVER MT-50 Remote Meter Unit
- Mounting Bracket
- Communication Cable (RJ45)
- Mounting Screws and Wall Plugs
- User Manual
- Certificate of Quality/Warranty Card

Figure 3.1: Overview of the EPEVER MT-50 Remote Meter and its included accessories.
Video 3.1: A short clip demonstrating the unboxing of the MT-50 Remote Meter and its components.
4. Setup and Installation
The MT-50 Remote Meter is designed for easy installation and connection to your EPEVER solar charge controller. Follow these steps for proper setup:
- Mounting: Choose a suitable location for the MT-50, preferably indoors and away from direct sunlight or extreme temperatures. Use the provided mounting bracket and screws to secure the unit to a wall or panel.
- Connection: Locate the RS485 communication port on the back of the MT-50 unit. This is typically an RJ45 Ethernet-style port. Connect one end of the provided communication cable to this port.
- Controller Connection: Connect the other end of the communication cable to the RS485 port on your EPEVER solar charge controller. Ensure a secure connection at both ends. The MT-50 draws power directly from the controller via this cable, so no external power supply is needed.
- Power On: Once connected, the MT-50 display should power on automatically, indicating successful communication with the controller.

Figure 4.1: Connection diagram illustrating how the MT-50 Remote Meter connects to an EPEVER solar charge controller.
Video 4.1: Demonstration of connecting the MT-50 Remote Meter to a compatible EPEVER solar charge controller.
5. Operating the MT-50 Remote Meter
The MT-50 provides a comprehensive interface for monitoring and configuring your solar charge controller. The LCD screen displays various parameters, and the navigation buttons allow you to browse menus and adjust settings.
5.1 Display Overview
The main display shows real-time data including solar panel voltage/current, battery voltage/current, and load voltage/current. Indicators for warning and communication status are also present.

Figure 5.1: The main display interface of the MT-50 Remote Meter, showing key operational parameters.
5.2 Navigation Buttons
The MT-50 features six buttons for navigation and control:
- ESC Button: Used to exit the current menu or cancel an operation.
- Left/Right Buttons: Used to navigate between different screens or menu options.
- Up/Down Buttons: Used to scroll through options within a menu or adjust parameter values.
- OK Button: Used to confirm a selection or enter a menu.
5.3 Parameter Setting
You can access various settings to customize your solar charge controller's behavior. Key settings include:
- Battery Type: Select the appropriate battery type (e.g., Sealed, Gel, Flooded, User) to ensure correct charging algorithms.
- Load Control Modes: Configure how the load output operates. Options typically include:
- Manual Control: Manually turn the load on or off.
- Light ON/OFF: Load turns on at dusk and off at dawn.
- Light ON+Timer: Load turns on at dusk and stays on for a set duration.
- Time Control: Load operates according to a predefined schedule.
- Charging Parameters: Adjust voltage thresholds for over-voltage disconnect, charge limit, boost recovery, and low voltage recovery.
- Discharge Parameters: Set low voltage disconnect and discharge limit.
Video 5.1: Detailed demonstration of navigating the MT-50 menu and setting various parameters, including battery type and load control modes.
6. Technical Specifications
| Specification | Value |
|---|---|
| Brand | EPEVER |
| Model Number | MT50-1-FBA |
| Display Type | LCD |
| Product Dimensions | 4.49"L x 3.86"W x 3.86"H (11.4 x 9.8 x 9.8 cm) |
| Item Weight | 12.2 ounces (0.35 Kilograms) |
| Operating Temperature | -20°C to 70°C (-4°F to 158°F) |
| Communication Port | RS485 (RJ45) |
| Power Supply | Powered directly by the solar charge controller via communication cable |
7. Maintenance
The EPEVER MT-50 Remote Meter requires minimal maintenance to ensure optimal performance and longevity. Follow these guidelines:
- Cleaning: Regularly wipe the display screen and casing with a soft, dry cloth to remove dust and smudges. Avoid using abrasive cleaners or solvents that could damage the surface.
- Connection Check: Periodically inspect the communication cable and its connections to ensure they are secure and free from damage. Loose connections can lead to intermittent communication or inaccurate readings.
- Environmental Conditions: Ensure the meter is operated within its specified temperature range and protected from excessive moisture or direct sunlight, which can degrade performance over time.
8. Troubleshooting
If you encounter issues with your EPEVER MT-50 Remote Meter, consider the following common troubleshooting steps:
- No Display/Power:
- Check the communication cable connection at both the MT-50 and the solar charge controller. Ensure it is firmly plugged in.
- Verify that the solar charge controller is powered on and functioning correctly. The MT-50 draws power from the controller.
- Inspect the communication cable for any visible damage (cuts, kinks). Try using a different RJ45 cable if available.
- Incorrect Readings:
- Ensure the MT-50 is connected to the correct RS485 port on your controller.
- Verify that the battery type and other parameters are correctly set on the MT-50 to match your system configuration.
- Check the connections of the solar panels, battery, and load to the solar charge controller for proper wiring.
- Communication Error (COM indicator):
- This indicates a problem with the RS485 communication. Re-check the cable and connections.
- Ensure your solar charge controller is compatible with the MT-50.
- Power cycle the solar charge controller (disconnect and reconnect battery/solar) to reset communication.
- Buttons Unresponsive:
- Ensure the unit is not in a locked state (though the MT-50 typically doesn't have a lock function).
- Try a soft reset by disconnecting and reconnecting the communication cable.
If these steps do not resolve the issue, please refer to the detailed troubleshooting section in your solar charge controller's user manual or contact EPEVER customer support for further assistance.
9. Warranty and Support
EPEVER products are designed for reliability and performance. For information regarding the warranty period and terms for your MT-50 Remote Meter, please refer to the warranty card included in your product packaging or visit the official EPEVER website. In case of technical issues, product inquiries, or warranty claims, please contact EPEVER customer support through their official channels. Providing your product model number (MT50-1-FBA) and purchase details will help expedite the support process.