
1. Product Overview
The Lorell Wall Mount Hutch, Model 18240, is designed to provide convenient overhead storage. This unit features a durable espresso laminate finish, complementing Lorell Essential Series furniture. It is intended for wall-mounting above a desk, lateral file, or other compatible surfaces to optimize your workspace.

Figure 1: Lorell Wall Mount Hutch, Model 18240. This image displays the hutch with its open design and espresso laminate finish.
Key Features:
- Part of the Lorell Essentials Series.
- Wall-mountable design for flexible overhead storage.
- Quality Espresso laminate finish.
- Bottom and side panels are approximately 1 inch (25mm) thick.
- Back panel is approximately 5/8 inch (16mm) thick.
- Top panel is approximately 5/7 inch (18mm) thick.
- Features 1mm and 3mm PVC edgebanding for durability.
2. Safety Information
Please read and adhere to all safety guidelines to ensure safe installation and use of your Lorell Wall Mount Hutch.
- Always follow the provided installation instructions carefully.
- Ensure the wall structure can adequately support the total weight of the hutch and its contents. Consult a professional if unsure.
- Do not overload the hutch shelves. Distribute weight evenly.
- If using optional door kits (sold separately), ensure they are installed correctly for stability and safety.
- Keep the area around the hutch clear to prevent accidental bumps or falls.
- This product contains wood dust, a substance known to the State of California to cause cancer.
3. Package Contents
Verify that all components are present before beginning installation.
- 1 x Lorell Wall Mount Hutch (Model 18240)
Note: Wall mounting hardware is typically included with the hutch. Door kits (glass and wood) are sold separately and are not included in the standard package.
4. Setup and Installation
The Lorell Wall Mount Hutch requires wall-mounting for proper use. No assembly of the hutch itself is required, as it comes as a single unit.
Tools and Materials (Not Included):
- Stud finder
- Drill with appropriate drill bits
- Level
- Measuring tape
- Pencil
- Safety glasses
Installation Steps:
- Determine Mounting Location: Choose a suitable wall location, ensuring it is free from electrical wires or plumbing. The hutch is designed to be mounted over a desk or lateral file.
- Locate Wall Studs: Use a stud finder to locate and mark the center of at least two wall studs where the hutch will be mounted. Mounting into studs is crucial for stability and safety.
- Mark Mounting Points: Hold the hutch against the wall at the desired height. Use a level to ensure it is straight. Mark the locations for the mounting screws on the wall, aligning them with the previously marked stud centers.
- Drill Pilot Holes: Drill pilot holes at the marked locations. Ensure the drill bit size is appropriate for the wall mounting hardware provided.
- Secure Hutch to Wall: Carefully lift the hutch and align its mounting holes with the pilot holes. Insert the wall mounting screws (typically heavy-duty screws or lag bolts) and tighten them securely into the wall studs. Do not overtighten.
- Verify Stability: Gently pull on the hutch to ensure it is firmly attached to the wall and does not wobble.
Important: If you are not comfortable with wall-mounting procedures, it is recommended to seek assistance from a qualified professional.
5. Operating Instructions
The Lorell Wall Mount Hutch is designed for general storage purposes in an office or home environment.
- Storage: Utilize the open shelf space to store books, binders, office supplies, decorative items, or other personal belongings.
- Weight Distribution: Distribute items evenly across the shelf to maintain balance and prevent undue stress on the mounting hardware. Avoid placing excessively heavy items on the hutch.
- Optional Door Kits: If you have purchased and installed optional door kits, use them to conceal contents and provide a more organized appearance.
6. Maintenance
Proper care will help maintain the appearance and longevity of your hutch.
- Cleaning: Wipe the surfaces with a damp cloth. Avoid using harsh chemicals, abrasive cleaners, or excessive moisture, as these can damage the laminate finish.
- Inspection: Periodically check the wall mounting screws to ensure they remain tight. Retighten if necessary.
- Avoid Direct Sunlight: Prolonged exposure to direct sunlight can cause fading or discoloration of the finish.
7. Troubleshooting
This section addresses common concerns regarding the hutch.
- Hutch feels unstable after mounting: Ensure the hutch is securely fastened into wall studs. If only drywall anchors were used, they might not be sufficient for the weight. Re-evaluate mounting points and consider professional installation.
- Damage to finish: For minor scratches, touch-up pens or furniture markers matching the espresso finish may be used. For significant damage, contact Lorell customer support for advice.
- Missing parts: If any components (e.g., mounting hardware) were missing from the package, contact the retailer or Lorell customer support immediately.
8. Specifications
Detailed product specifications for the Lorell Wall Mount Hutch, Model 18240.
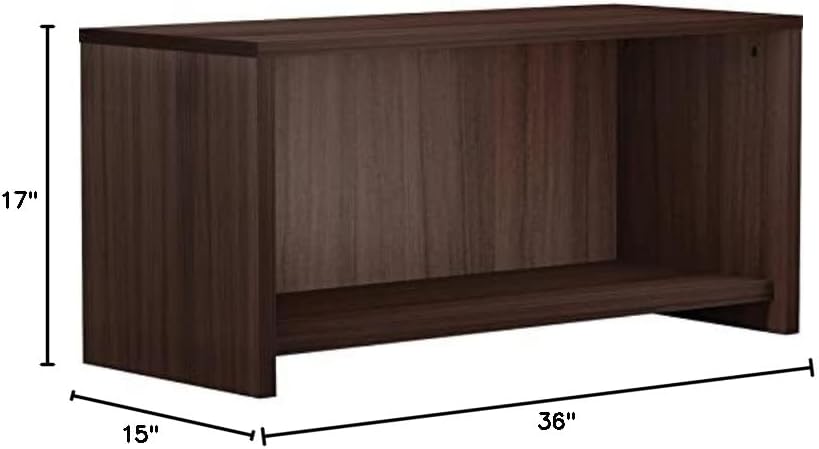
Figure 2: Dimensions of the Lorell Wall Mount Hutch. The hutch measures 36 inches in width, 15 inches in depth, and 17 inches in height.
| Attribute | Detail |
|---|---|
| Brand | Lorell |
| Model Name | Essentials |
| Item Model Number | 18240 |
| Product Dimensions | 36"W x 15"D x 17"H (91.44 cm W x 38.1 cm D x 43.18 cm H) |
| Color | Espresso |
| Finish Type | Espresso Laminate |
| Material | Laminate |
| Number of Shelves | 1 |
| Shelf Thickness | 1 Inch (approx.) |
| Installation Type | Wall Mount |
| Assembly Required | No (for hutch unit itself) |
| Item Weight | Approximately 0.01 Ounces (Note: This weight is likely a placeholder or incorrect. Actual weight will be significantly higher for furniture.) |
| UPC | 035255182409 |
9. Warranty and Support
For information regarding product warranty, replacement parts, or technical support, please contact Lorell customer service or refer to the official Lorell website.
Please retain your purchase receipt for warranty claims.