Bergner BGMP-9053
Bergner BGMP-9053 Digital Cooking Thermometer User Manual
Model: BGMP-9053
1. Introduction
The Bergner BGMP-9053 Digital Cooking Thermometer is designed to ensure precise temperature measurement for various types of food, particularly meats. It features a digital display, a timer, and an alarm function to help you achieve optimal cooking results and food safety. This manual provides detailed instructions for the proper setup, operation, and maintenance of your thermometer.
2. Product Overview and Components
Your Bergner BGMP-9053 thermometer consists of the following main components:
- Main Thermometer Unit with LCD Display
- Stainless Steel Probe (19 cm length)
- Probe Cable
- Base Unit / Stand
- Control Buttons: MODE, MEAT/CLEAR, MIN, SEC, TASTE, START/STOP
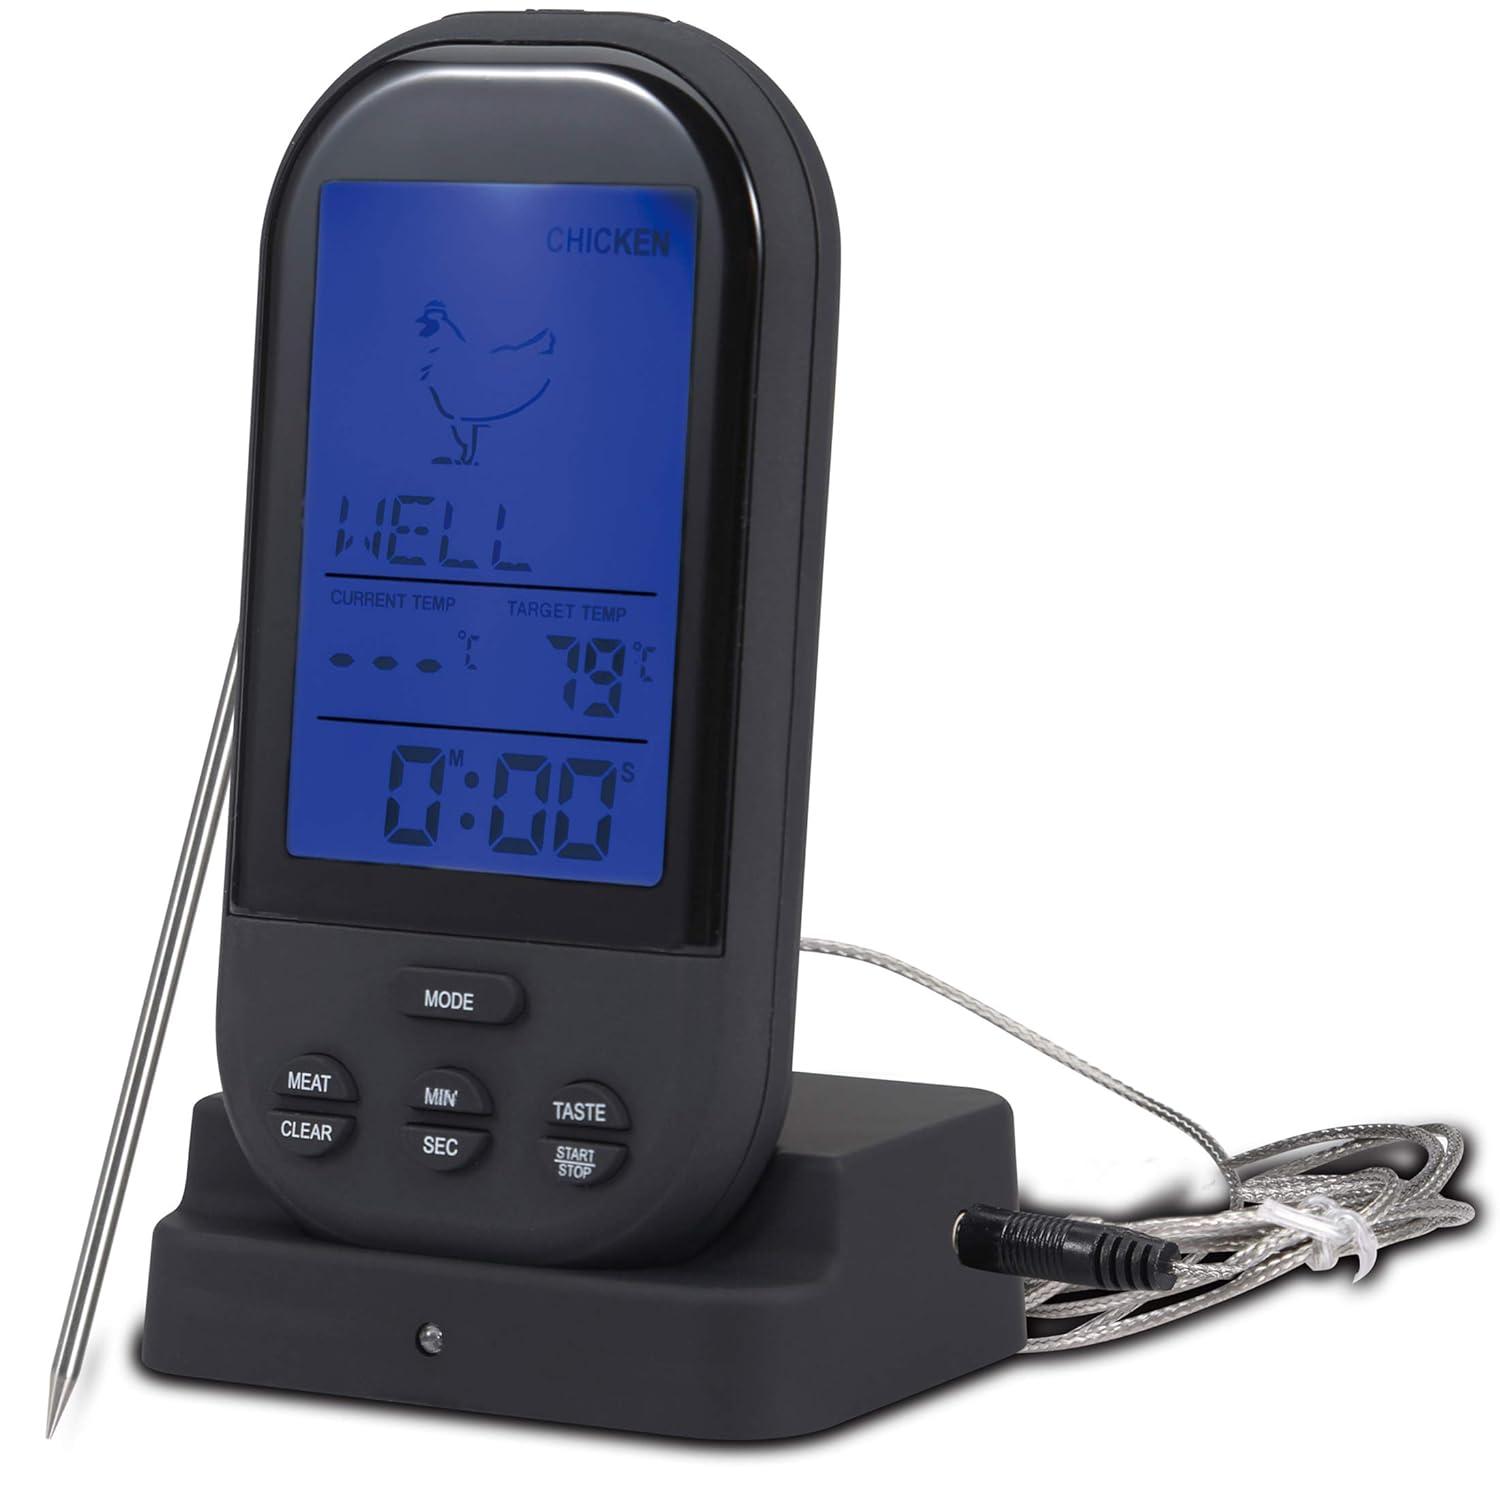
Figure 2.1: Main Thermometer Unit with Probe and Base.

Figure 2.2: Product Packaging.
3. Setup
3.1 Battery Installation
The thermometer requires 4 AAA batteries for operation. To install the batteries:
- Locate the battery compartment on the back of the main thermometer unit.
- Open the battery compartment cover.
- Insert 4 AAA batteries, ensuring correct polarity (+/-) as indicated inside the compartment.
- Close the battery compartment cover securely.
3.2 Probe Connection
Connect the stainless steel probe to the main thermometer unit by inserting the probe cable's jack into the designated port on the side of the unit. Ensure it is firmly seated.
4. Operating Instructions
4.1 Powering On/Off
The thermometer powers on automatically when batteries are installed and the probe is connected. To turn off, disconnect the probe or remove batteries.
4.2 Temperature Unit Selection (°C/°F)
Press the MODE button to switch between Celsius (°C) and Fahrenheit (°F) temperature displays.
4.3 Setting Meat Type and Doneness
The thermometer offers up to 8 variable settings for different meat types and desired doneness levels. To set:
- Press the MEAT button repeatedly to cycle through meat types (e.g., Beef, Lamb, Veal, Hamburger, Pork, Turkey, Chicken, Fish).
- Once the desired meat type is selected, press the TASTE button repeatedly to select the desired doneness (e.g., Well, Medium Well, Medium, Medium Rare, Rare). The target temperature will adjust automatically based on your selection.

Figure 4.1: Available Meat Types and Doneness Options.

Figure 4.2: Setting the Meat Type.
4.4 Using the Timer Function
The thermometer includes a timer function. To use it:
- Press the MODE button until the timer display is active.
- Use the MIN and SEC buttons to set the desired countdown time.
- Press START/STOP to begin the countdown.
- Press START/STOP again to pause or stop the timer.
4.5 Measuring Temperature
To measure the temperature of your food:
- Carefully insert the stainless steel probe into the thickest part of the meat, avoiding bones or gristle.
- Ensure the probe tip is fully embedded in the food for accurate readings.
- The current temperature will be displayed on the LCD screen.
- An alarm will sound when the food reaches the preset target temperature.

Figure 4.3: Inserting the Probe into Food.

Figure 4.4: Thermometer in use with a roast.
5. Maintenance and Care
Proper care will extend the life of your thermometer:
- Cleaning: After each use, clean the stainless steel probe with warm soapy water. Wipe the main thermometer unit with a damp cloth. Do not immerse the main unit in water.
- Storage: Store the thermometer and probe in a dry place when not in use.
- Battery Replacement: Replace batteries when the display becomes dim or the unit does not power on.
6. Troubleshooting
| Problem | Possible Cause | Solution |
|---|---|---|
| Display shows "LLL" or "HHH" and beeps continuously. | Probe not connected properly, probe damaged, or temperature is outside the measurable range (0-250°C / 32-500°F). |
|
| No display or dim display. | Low batteries or incorrect battery installation. |
|
| Alarm does not sound. | Target temperature not reached, or unit malfunction. |
|

Figure 6.1: Example of "LLL" error display.
7. Specifications
| Feature | Detail |
|---|---|
| Model Number | BGMP-9053 |
| Temperature Range | 0-250°C (32-500°F) |
| Temperature Accuracy | +/- 2°C |
| Probe Material | 304 Stainless Steel |
| Probe Length | 19 cm |
| Display Type | LCD with LED Backlight |
| Power Source | 4 x AAA Batteries |
| Device Dimensions (L x W x H) | 130 x 75 x 55 mm |
8. Warranty and Support
For warranty information and customer support, please refer to the documentation included with your purchase or contact Bergner customer service directly. Details regarding warranty coverage and support channels are typically provided at the time of purchase.
Ask a question about this manual
Ask about setup, troubleshooting, compatibility, parts, safety, or missing instructions. Manuals+ will review the question and use this page’s manual context to help answer it.