
1. Product Overview
This replacement kit is designed to restore the functionality of your Charbroil gas grill. Over time, grill components can wear out or rust, impacting performance. This kit provides essential replacement parts to ensure your grill operates efficiently and extends its lifespan.
The kit includes:
- 4 Grill Burner Tubes
- 4 Heat Plates (Flavorizer Bars)
- 3 Adjustable Crossover Tubes

Image 1: Complete Adviace Grill Replacement Parts Kit, showing four burner tubes, four heat plates, and three adjustable crossover tubes.
2. Compatibility
This replacement kit is compatible with various Charbroil Performance Gas Grill models. Please verify your grill's model number against the list below to ensure proper fitment. It is highly recommended to measure your original parts and compare them with the specifications provided in this manual.
Compatible Charbroil Models:
- 463673517
- 463673017
- 463376018P2
- 463376117
- 463275517
- 463377117
- 463673617
- 463377017
- 463347017
- 463335517
- 463376017
- 463342119
- 463349917
This kit is specifically designed for the Charbroil Performance 475 4-burner liquid propane gas grill.

Image 2: Visual compatibility chart displaying various Charbroil grill models that are compatible with these replacement parts.
3. Product Specifications
| Component | Dimensions | Material |
|---|---|---|
| Barbecue Burner Tubes | 17 3/4" x 3/5" Dia | Stainless Steel |
| Flavorizer Bars (Heat Plates) | 16 15/16" X 2 1/12" | Stainless Steel |
| Adjustable Crossover Tubes | Extends from 5" - 9.5" | Stainless Steel |
All components are made from high-quality stainless steel, offering rustproof, anti-corrosion, heat-resistant, and easy-to-clean properties for long-lasting performance.
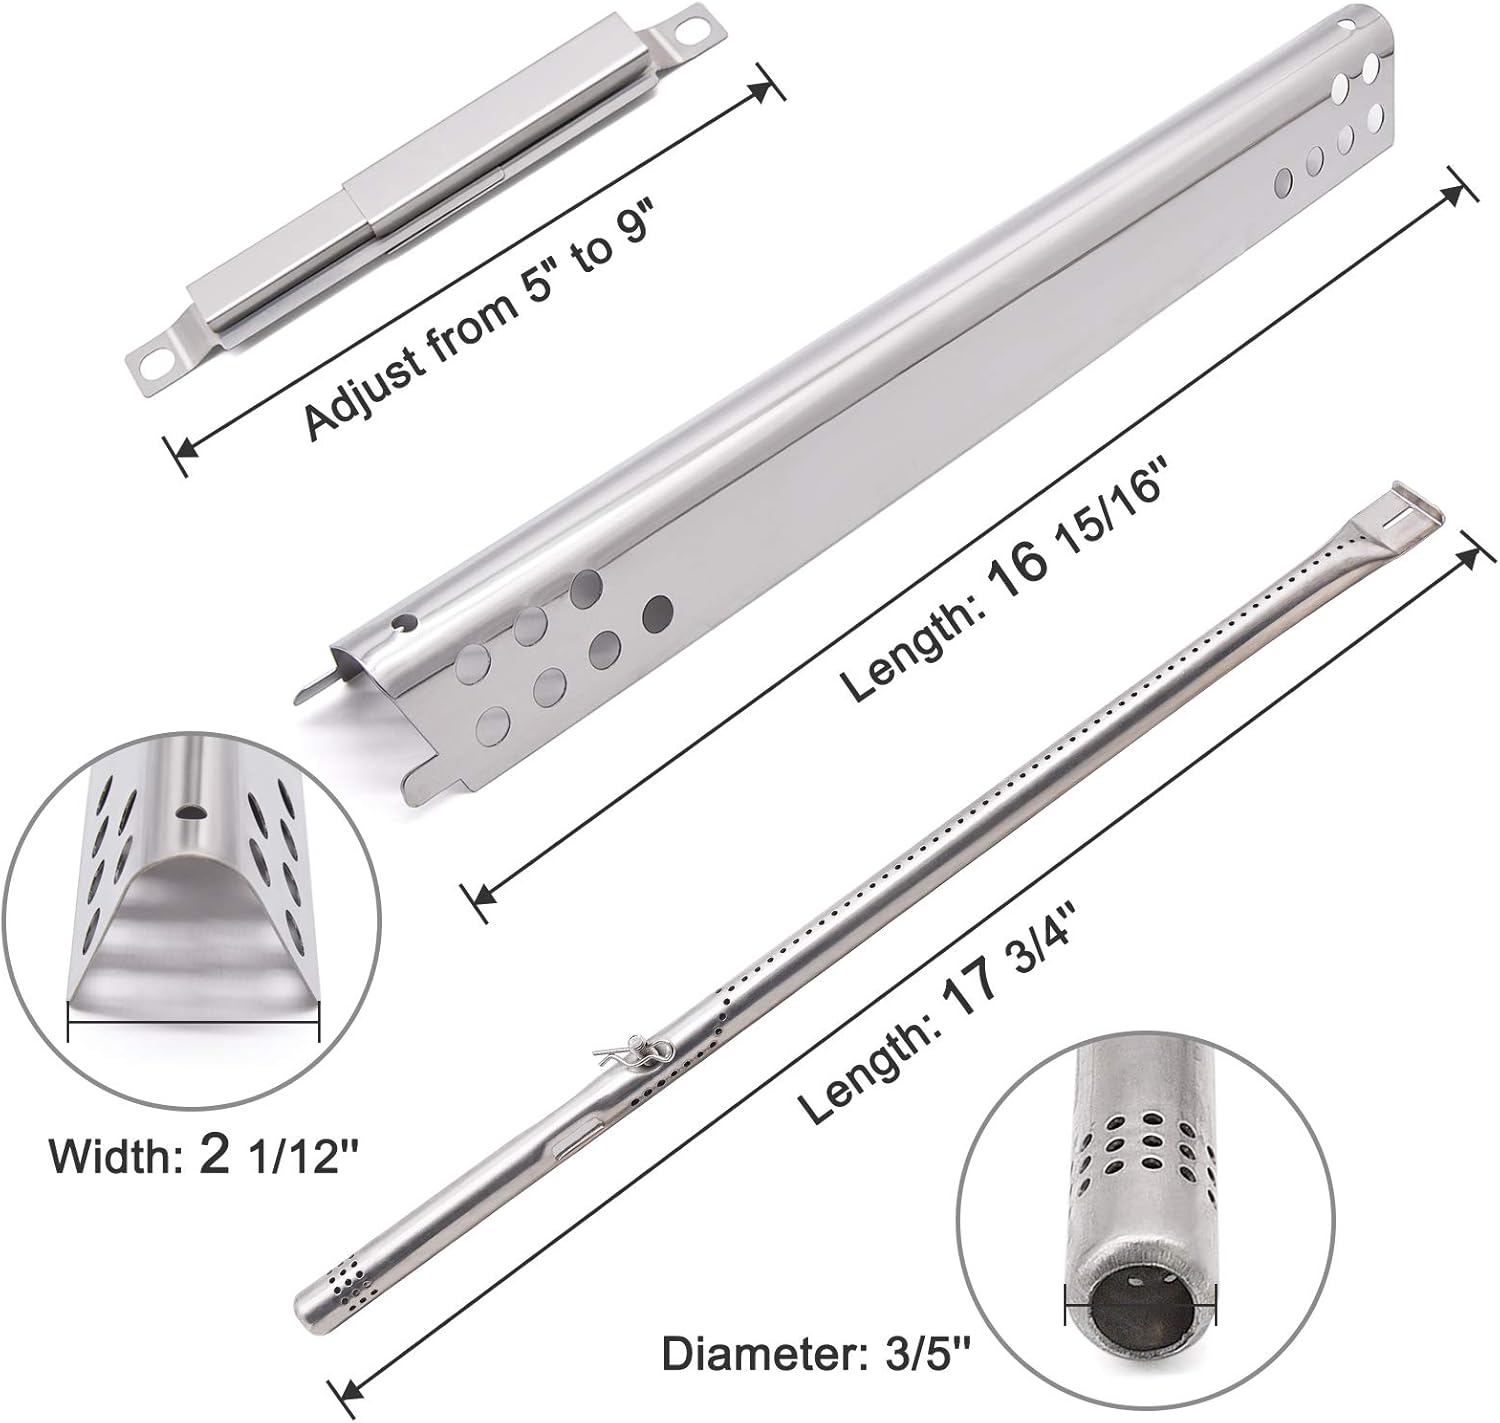
Image 3: Detailed view of the dimensions for the burner tube, heat plate, and adjustable crossover tube.

Image 4: Illustration highlighting the premium quality stainless steel material, emphasizing its rustproof, anti-corrosion, heat-resistant, and easy-to-clean attributes.
4. Installation Guide
4.1 Safety Precautions
- Ensure the grill is completely cool before beginning any installation or maintenance.
- Disconnect the gas supply to the grill.
- Wear protective gloves to avoid cuts from sharp edges.
4.2 Step-by-Step Installation
- Remove Old Components: Carefully remove the old, worn-out burner tubes, heat plates, and crossover tubes from your grill. Note their original placement for easier reassembly.
- Install Burner Tubes: Place the new burner tubes into their designated slots. Ensure they are securely seated at both ends.
- Connect Crossover Tubes: Attach the adjustable crossover tubes between the burner tubes. These tubes facilitate flame transfer between burners. Adjust their length as needed to fit snugly.
- Place Heat Plates: Position the new heat plates (flavorizer bars) directly above the burner tubes. These plates help distribute heat evenly and protect the burners from drippings.
- Verify Connections: Double-check all connections to ensure parts are firmly in place and there are no loose components.

Image 5: A visual comparison showing the grill interior before and after the installation of the new burner tubes and heat plates, demonstrating the restored appearance.

Image 6: Close-up view of the newly installed heat plates and burner tubes within the grill, showing proper alignment.

Image 7: An alternative angle showing the installed heat plates and burner tubes, providing a comprehensive view of the setup.

Image 8: The grill burners in operation, emitting consistent blue flames, indicating proper gas flow and combustion after installation.
4.3 Installation Video
For a visual guide on the installation process, please refer to the official product video below:
Video 1: An official installation guide demonstrating the process of replacing grill burner tubes, heat plates, and crossover tubes for Charbroil grills.
5. Operating Instructions
After successful installation of the replacement parts, your grill should operate as intended. Ensure all gas connections are secure and leak-free before lighting. Follow your grill's original manufacturer instructions for safe lighting and operation. The new burners should provide consistent and even heat distribution for optimal cooking performance.
6. Maintenance
Regular maintenance of your grill parts will prolong their lifespan and ensure continued performance. The stainless steel components in this kit are designed for easy cleaning.
- Cleaning Burners: Periodically inspect burner ports for blockages. Use a wire brush or a stiff wire to clear any debris.
- Cleaning Heat Plates: Scrape off any accumulated grease or food residue from the heat plates after each use, once they have cooled. For deeper cleaning, remove and wash with warm, soapy water.
- General Care: Keep the grill interior clean to prevent grease buildup, which can lead to flare-ups and corrosion.
7. Troubleshooting
If you encounter issues after installing the new parts, consider the following common troubleshooting steps:
- Uneven Heating or Weak Flame:
- Check if burner tubes are properly seated and connected to the gas valves.
- Inspect burner ports for any clogs or debris. Clean as necessary.
- Ensure crossover tubes are correctly installed and allowing flame transfer.
- Gas Leaks:
- Immediately turn off the gas supply.
- Check all gas connections for tightness. Apply a soapy water solution to connections; bubbles indicate a leak. Tighten or replace faulty connections.
- Parts Not Fitting Correctly:
- Re-verify your grill model number against the compatibility list.
- Ensure you have the correct "4-Burner" variant of the kit.
- Double-check the orientation of the heat plates and burner tubes during installation.
If problems persist, contact customer support for further assistance.
8. Warranty and Support
For any questions regarding installation, compatibility, or product performance, please contact Adviace customer support. While specific warranty details are not provided in this manual, please refer to your purchase documentation or the manufacturer's website for warranty information and claims procedures.
You can visit the Adviace Store for more information and products: Adviace Store