
1. Introduction
This instruction manual provides detailed guidance for the installation and maintenance of your Adviace Grill Replacement Parts Kit. This kit is designed to restore the functionality of compatible Charbroil and Thermos gas grills by replacing worn or rusted components such as burner pipes, heat plates, carryover tubes, and igniters. Proper installation and care will ensure optimal performance and extend the life of your grill.
2. Product Components
The Adviace Grill Replacement Parts Kit includes the following components:
- 4 x Grill Burner Pipes
- 4 x Heat Plate Tent Shields (Flavorizer Bars)
- 3 x Carryover Tubes
- 4 x Grill Igniters

Image 2.1: Overview of all included replacement parts.
3. Compatibility
This replacement parts kit is compatible with various Charbroil and Thermos gas grill models. Please verify your grill model number against the list below to ensure compatibility. It is highly recommended to measure your existing parts and compare them with the specifications provided in Section 4 before purchase and installation.
Compatible Charbroil Models:
- 461334813
- 463234413
- 463436213
- 463436214
- 463436215
- 466334613
- 466342014
- 466436213
- 466436513
- 467300115
Compatible Thermos Models:
- 466360113
Important Note: Always measure your original parts to confirm fitment. "Measure Twice...Buy Once..."
4. Specifications
| Component | Dimensions (Approx.) | Material |
|---|---|---|
| Grill Burner Pipes | 14 7/16" x 1" | Stainless Steel |
| Heat Plate Tent Shields | 15" x 4 3/8" | Porcelain Steel |
| Carryover Tubes | 7 1/4" x 3/4" | Stainless Steel |

Image 4.1: Heat Plate Tent Shield dimensions.
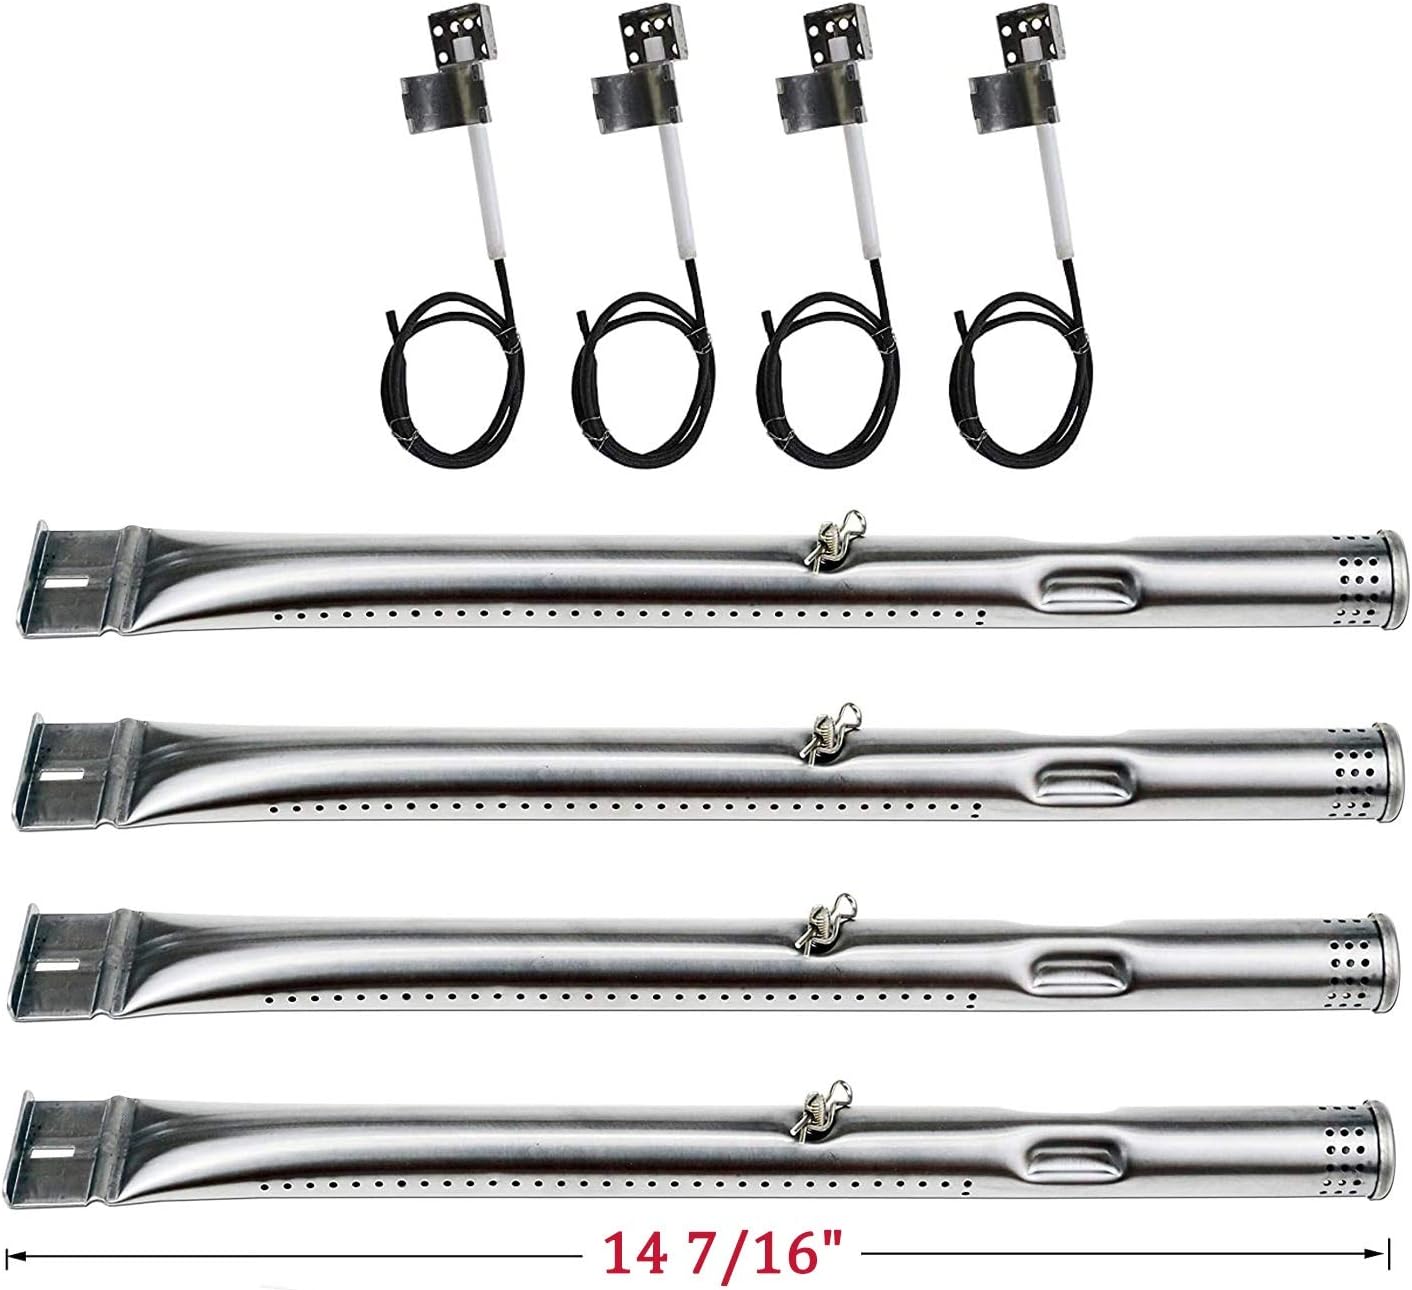
Image 4.2: Grill Burner Pipe and Igniter dimensions.
5. Setup and Installation
Replacing your grill's internal components is a straightforward process. It is recommended to perform this task in a well-ventilated area and ensure your grill is completely cool and disconnected from its gas supply before beginning.
Required Tools (Not Included):
- Screwdriver (Phillips or Flathead, depending on your grill's fasteners)
- Gloves (for protection against rust and sharp edges)
- Wire brush or scraper (for cleaning)
Installation Steps:
- Preparation: Ensure the grill is turned off, the gas tank is disconnected, and the grill is cool. Open the grill lid.
- Remove Grill Grates and Heat Tents: Carefully lift out the cooking grates and any existing heat tents or flavorizer bars. Set them aside.
- Remove Old Burners and Crossover Tubes: Locate the fasteners holding the old burner pipes in place (usually screws at the back or front). Remove these fasteners and carefully lift out the old burner pipes. Disconnect and remove any old crossover tubes. Note how the old components were arranged for easier reassembly.
- Clean Grill Interior: Use a wire brush or scraper to remove any accumulated grease, rust, or debris from the grill's firebox. This will improve performance and longevity of new parts.
- Install New Burner Pipes: Place the new burner pipes into their respective positions. Secure them with the appropriate fasteners. Ensure they are properly seated over the gas orifices.
- Install New Crossover Tubes: Connect the new crossover tubes between the burner pipes. These tubes facilitate flame transfer between burners.
- Install New Igniters: If replacing igniters, carefully remove the old ones and install the new igniters, ensuring the electrode is positioned correctly to spark near the burner. Connect any necessary wiring. Note: Some igniters are individual, while others may be tethered.
- Install New Heat Plate Tent Shields: Place the new heat plate tent shields over the newly installed burner pipes. Ensure they are seated correctly to distribute heat evenly and protect the burners.
- Replace Grill Grates: Carefully place the cooking grates back into the grill.
- Test for Leaks: Reconnect the gas tank. Before lighting, perform a leak test by applying a soapy water solution to all gas connections. If bubbles appear, tighten the connection. Do not proceed until all leaks are resolved.
- Test Ignition: With the lid open, slowly turn on the gas and attempt to ignite the burners. Verify that all burners light properly.

Image 5.1: Comparison of old (top) and new (bottom) burner pipe installation.

Image 5.2: Comparison of old (top) and new (bottom) heat plate tent shield installation.
6. Maintenance
Regular maintenance of your grill and its components will prolong their lifespan and ensure safe operation.
- Regular Cleaning: After each use, clean cooking grates. Periodically, remove grates and heat tents to clean burner pipes and the firebox of grease and food debris.
- Inspect Components: Annually or semi-annually, inspect burner pipes, heat tents, and crossover tubes for signs of corrosion, cracks, or blockages. Replace parts as needed.
- Protect from Elements: Use a grill cover to protect your grill from rain, snow, and excessive sun exposure when not in use. This significantly extends the life of all components.
- Gas Line Inspection: Regularly check gas lines and connections for kinks, cuts, or leaks.
7. Troubleshooting
If you encounter issues after installing the replacement parts, consider the following common troubleshooting steps:
- Burners Not Lighting:
- Check gas supply: Ensure the gas tank is open and has sufficient fuel.
- Igniter position: Verify that the igniter electrode is correctly positioned near the burner port to create a spark.
- Gas orifice blockage: Ensure burner pipes are properly seated over the gas orifices and that orifices are not clogged.
- Crossover tube alignment: Confirm crossover tubes are correctly connecting burners for flame transfer.
- Uneven Heating:
- Heat tent placement: Ensure heat plate tent shields are correctly positioned over the burners.
- Burner port blockage: Inspect burner ports for any debris that might be obstructing gas flow.
- Gas Smell:
- Immediately turn off gas supply.
- Perform a soapy water leak test on all connections (refer to Section 5, Step 10). Tighten any leaking connections. If the smell persists, do not use the grill and consult a qualified technician.
8. Warranty and Support
For specific warranty information regarding your Adviace Grill Replacement Parts Kit, please refer to the product packaging or contact the manufacturer directly. While this manual provides installation guidance, for complex issues or professional assistance, it is recommended to consult a qualified grill technician.
For further inquiries or support, please visit the official Adviace store on Amazon: Adviace Store